Yes, that’s the right order to use Microscale’s product’s. If you read on the bottles you will see that normaly you use only Micro Set both before and after applying the decal. Only if there is a double curved surface you should use Micro sol to get the decal snuggle down nice and smooth. I had no major problems with the NSX, the only thing that happend was that it took a while before I started clearcoating and by that time some of them started to peel of in the edges. No big problem thou, it took a little clear to get them down and some touch ups in some areas. The main key is to not tamper with the decal after using Micro Sol as it most likely will ruin it.
I just got this kit today. Usually I only prime the body and the wing etccc, but never the enginge, suspension or any of the other smaller parts. Since alot of the parts are molded in black would it be best if I just primered everything.
Personally, I didn’t. But I used enamel paint, not acrylic. I’m wondering if that would make a difference. Since most of the black parts are supposed to be flat or semi gloss black, I just figured that primer would be a waste. Like you, I generally just primer the body components. Just don’t use Micro Sol!!! Use only Micro Set!!! BTW Nice Beavis pic!!!
Ok cool, I didnt really want to doing any additional priming unless absolutely necessary. Im not positive, but I think in the case of using acrylic it would be better to have a primer coat. I think it would help to get better coverage, but I could be wrong. I use mostly enamels anyway. I will remember not to use microsol when I get to the decals, I havent had much luck with that stuff anyway. LOL…the Beavis picture I thought was hilarious, I guess they are putting that show back on TV sometime soon.
I got the kit at value craft, also went to Hobby People but I didnt end up getting anything there. They seem to be a little pricy with the Tamiya kits.
Yeah, the only good kit I found at Hobby People was the Tamiya Enzo Ferrari marked down to $28.00…it was some sort of sale. Where’d you grow up at? Are you from San Diego?
havent spent much time in Ramona…for obvious reasons. Its kind of similar to valley center. Hey I was just looking at a buildup of the NSX on some website. Unfortunately it was in japanese or something so I couldnt read what was being said. But it looked like the builder didnt even paint the body, just applied decals. Do the decals cover the body completely? I havent given it a serious look yet.
Yes and No. The Front and Rear Bumper assemblies are supposed to be painted blue, and do not get covered completely in decals. The main body piece (the piece before you assemble it) gets painted white. The white shows through on the doors mainly, and it kind of highlights a few of the decals. I’m not sure if you could get away with just decaling it, as I’ve never heard of someone not painting first. You got a link to the site? I’d like to check that out. Oh also, the headlight pieces are supposed to be painted blue as well as the Wing pieces. Basically only the body piece is supposed to stay white.
Hey guys!
Here’s what I did to my NSX, No primer on the body or anywhere else for that matter, just Humbrol paints all over in appropriate colors. I dont know what kind of problems you encounterd with Micro sol, I haven’t had any problems what so ever on my NSX-decals!? But if you feel it’s gonna foul the decals try using only Micro set and maybe some hotwater on a rag, the heat usually gets the decal a little softer and lets it snuggle down easier.
Good Luck on your project, please show us som pictures as it’s coming on!
Niclas
Its interesting reading about how other people decal. I’m quite brutal with decals. I flood the area with MicroSet (and occassionaly sol) keep the brush I usd to flatten the decal down very wet with the stuff. If its a compound curve I will often use a hot hair drier directly on the decal and if its a real problem then I will wet a finger in Set and rub my finger across the decal to get it to conform (heat and pressure). Works for me but its about 20 years practice now.
Hey Kik36, I dont remember the link to that page, but now that you explained how the painting goes im sure the builder did paint the body. I was under the impression he did not because I did not realize that some of the body needed to be painted white. Did anyone find any refrence material on this car, especially pictures of the interior?
I found a few different pics of NSX’s, not all of them are the NSX in the kit. And good luck with those interior pics. I couldn’t find any, and I had to fly blind!!! If you e-mail me I can send ya some of those pics (you can’t send pics through the FSM link and they don’t give out your e-mail address, until you send a message to a person).
Here you have some pictures of different NSX’s. Very little of the interior though, but some useful pics afterall. Just check the gallery, it’s mainly in japanese but that doesn’t matter if you wan’t pics http://www.museumcollection.co.jp/
Hey kik,
Pretty sweet lookin man…!!! Theres something about the NSX w/ that paint job[;)]. She sure does look good in those colours!!
By chance do you have any pix of the interior and especially the engine area. From the pix of the engine, it looks tough!!
Overall how is the build besides the decals?
Flaps up, Mike
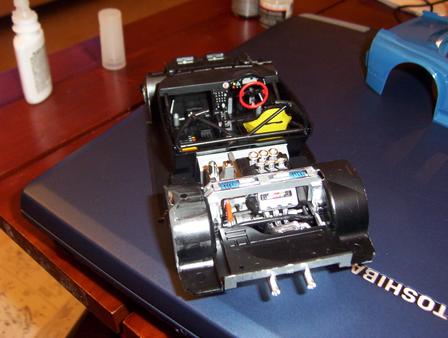
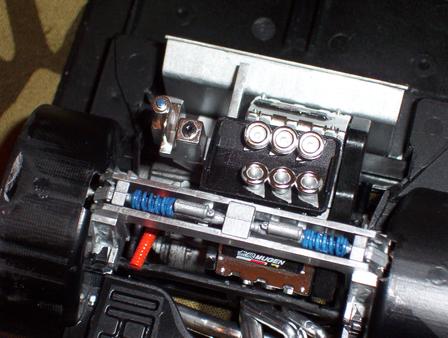
Hey Mike, how ya been? Ain’t seen ya around in a while!! Here’s a pic of the engine and interior.
close-up of eng
I’m going to be putting up some finished pics next weekend of her as well. Everything else was a very pleasing build. Unfortunately while trying to strip the chrome from the rims and firewall, I destroyed the pieces, and I had to order another kit. Which was good, 'cause I had to replace a couple of decals (I’m entering box stock). It’s tough building straight out of the box! This will be my first completed kit ( and first decaling job) since I started back modeling. My 2nd complete in my whole life!! I think overall, I learned a tremendous amount, and I will treasure the build, even if it didn’t turn out like I had hoped. Now, I just have to wrap it up!!! LOL easier said than done!!!