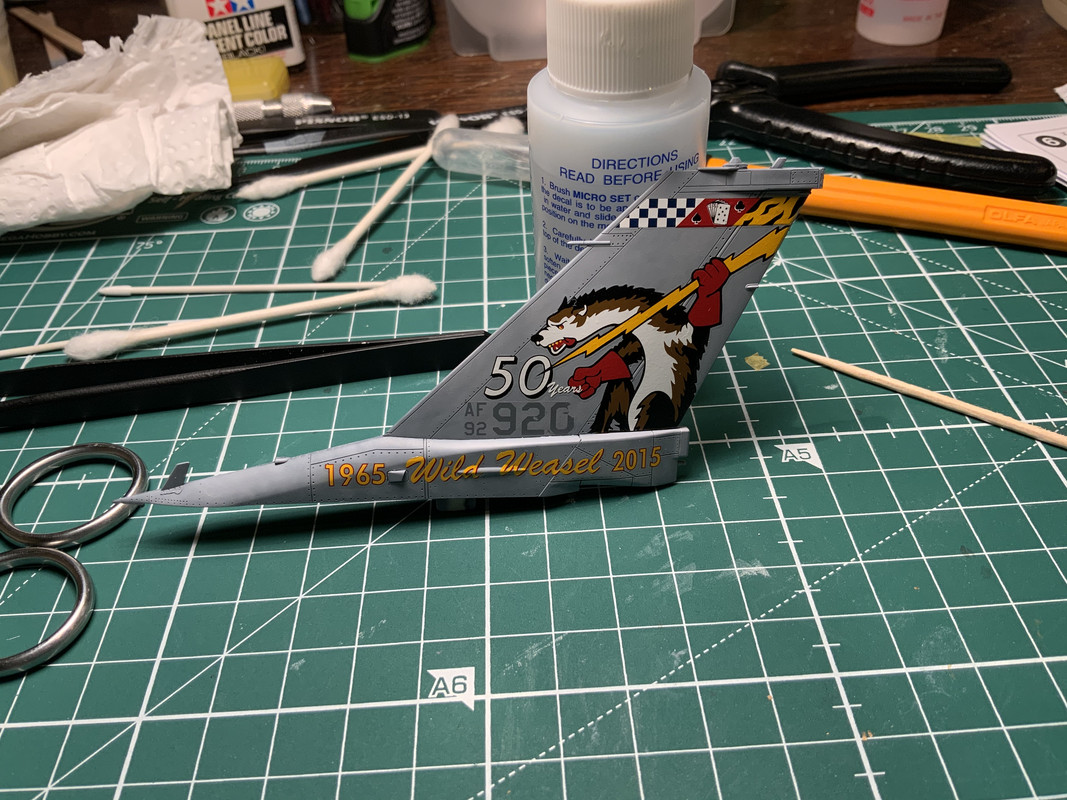
Need some help with Two Bobs decals. I think they are rather nice if I can avoid ripping them. They are really thin. Any application advice to avoid this? The directions say use micro set/sol. Will anything stronger destroy them?
My typical decal procedure is micro set the decal spot, decal in water 12-15 seconds, remove from water, place on model, move decal (this is where that grey one ripped), squeeze out water (this where the 9 in 1965 ripped), then micro sol.
Wow! You’re doing the same Viper I am doing in 1/32! When I applied my Two Bobs decals, I just used water to wet the surface with instead of the MicroSet. I found that MicroSet softens the decal a little too much prior to moving it, which doesn’t end well with the nice thin ones like Two Bobs makes. Put water on the model where the decal will go, and move it with a paint brush. If it gives you any resistance at all, just add more water with the brush. I usually dip the decal for 30 seconds and then let it rest on a paper towel for at least another 30 seconds before sliding it onto the model from the paper. After that, once you get it into position, gently push the the excess water out with a q-tip. One application of MicroSol afterward is usually all that’s needed with Two Bobs decals. Just make sure you resist the temptation to mess with the decal when you see it wrinkling from the MicroSol. That goes away on its own, and it will lay flat once its dry.
Yeah Eagle I’m working on the 1/48 Viper. I dont like the Tamiya decals so I went with these. I’ll try the water and wait 30 seconds trick for the rest of the decals. It’s been a fun kit. All the sub assemblies are coming together and I’ll be ready to paint the air frame soon. I also used PE and Anyz knobs/dials to add to the cockpit. I’m happy with the PE instrument panel and the added knobs. Not so thrilled with my effort on the PE harness and seat belts. I often find photo etch belts tough to install. Maybe I’ll start using the pilot figure to rid myself of the kit decal belts and fighting PE.
Terrible weather in the mid Atlantic today. I played hooky from work and got a lot of bench time in. In 15-18 short years I can retire and spend more days like this.
I have another F16 in the stash too. I think that one will be the aggressor paint scheme.
I’m with you on the Tamiya decals. They’re nice and clear, but WAY too thick. Besides, I saw that weasel tail art and just had to have it. Might have to look into getting aftermarket decals for the Tamiya Mark XVIe Spitfire I just bought. Won’t be starting that one until after my Su-25M1 for the CAS group build is done. It’ll be my first time building a WWII subject.
Nice and sunny here in Colorado, but cold and windy.
I dip my decals in warm water and then set them aside to freely release from the paper that may take minutes, this way the decals film is floating. I then use lots of water over the application area to float on the decal then carefully blot from the center out all the water and air under the film. If it moved just rewet and adjust the decal. After all looks ok I hit it with Solvaset that will melt the decal down looking as if was painted. I find Sol abs Set very weak and don’t like using it.
I like solvaset too. These decals are just so thin I’m worried about them getting destroyed. I think the right move is to use one on a test piece and experiment. I have a few different decal solutions. I’ll start with sol then go mark fit-mark fit strong-solvaset.
I’ve been taking the decal out of water and placing on the subject after a few seconds. Sounds like waiting a minute or longer will get better results.
Sure you can experiment and test. I can honestly tell you I use Solvaset on all decals and have excellent results every time. Once the Solvaset goes on do not touch, move or blot the decal otherwise you will wish you hadn’t. In many cases the decal will wrinkle up and look like crap but leave it alone. The Solvaset will stretch and schrink the film down snug.
No need to use a heavy application either, I go easy with it over the decal and rarely needs a second application.
I’ll have to pick up some Solvaset, PJ. MicroSol works, but I still get occasional silvering here and there of the decals. Sounds like Solvaset might solve that issue.
Sometimes if a decal is big I cut it up and align the pieces on the model. It often is easier than trying to unwrinkle a big decal or fix one that has folded over on itself.
Also, I only leave the decal in water until the backing paper turns dark. Then I set it on a piece of paper towel until it comes free.
Of all the aspects of plastic modeling decals is probably the biggest mystery. I’m only working on model number 6 but the decals have behaved differently on each one. On the Revell F18 Super Hornet the decals were great. Probably the best experience I’ve had with decals. That was my first model and its terrible but the decals look amazing. I then built two Tamiya kits and they fought me and wouldn’t lay down no matter how much Solvaset went down. Then it was a Tamiya car kit, Ferrari 640, and they were great. Same process for each build. I recently watched a decal tutorial and the presenter said he’s had decals behave differntly on the same sheet! How crazy?
For me they can be a real PITA. The problem is when done right they look really cool.
Just some feedback for you, wpwar11, on using Solvaset with Two Bobs decals, if you haven’t already. Up until the ordnance phase of my 1/32 build of the same subject, I had been using Microsol and have not had any issues other than the occasional leftover silvering I mentioned. Bought a bottle of Solvaset and tried that for the first time on my build’s missiles and all I can say is that I’m glad that I hadn’t used it on the main model. It ruined many of the decals on the missiles due to the fact that any droplet or bead of it that gets left behind (as it sometimes has to because you don’t want to keep brushing at the decal) dissolves the color layer and floats it, so you end up with little, indecipherable blobs on your missile placards. Going back to Microsol. The Two Bobs decals are so thin, they don’t need anything more aggressive anyway.
I like solvaset too. These decals are just so thin I’m worried about them getting destroyed.
Eagle- Thanks for the heads up. The response above is something I wrote earlier on this thread. Solvaset is a must for thick Tamiya decals but I was concerned using it on these thin Two Bobs decals. Hopefully you have plan B for the missiles. Speaking of decals and missiles…I always have a hard time wrapping the decals around the missile. I’m gonna try thin masking tape and paint the bands on. The subject we are building has a band between some of the fins on the AGM-88. Not sure how I’m going to pull that one off.
Good luck the rest of the way. I got primer down on the main airframe. Small gap between nose and fuselage I need to fix but it’s building up rather nicely so far.
On the 88s, both stripes are near the leading edges of the fins, so for the front stripe I was able to flex the front fins backward just enough to be able to slip the decal underneath the leading edges. One of the fins broke loose, but that just meant it wasn’t glued on well enough to begin with, so it went right back on with no damage. For the rear fins it was the same way, except for the opposing side fins that were molded into the missile body. I just ended up cutting those decals in three pieces to get them on. I normally have trouble getting decals to wrap around things too, but the Two Bobs decals being so thin makes them wrap around the missile almost on their own. Then I just worked them with a toothpick until they were squared up.
Thanks for the tip about Solvaset with the Tamiya decals. I still have the Spitfire Mk XVIe build coming up at some point, and so far its looking like there aren’t many after-market decal sets out there for it. I’ll keep the Solvaset around for that project.
Thankfully, the missiles are small enough and stuck under the wings, so the splotches won’t really be all that noticeable. I switched back over to MicroSol for the remaining decals for my CATM-9Xs and the wing tanks.
Good luck with the painting process, and if you want to put the smoke plume on the fuselage for the gun, ultra-fine graphite powder works really well for that.
You got some nice shading on the panels that are common with F16’s. Was that post shading with the airbrush? Maybe oils? I’m going with MRP gunship grey for the dark camo and MRP light ghost for the light shade. My primer is black and I’m thinking of marbling the panels white then spraying dilluted gunship grey for main color. Do you think the white will show thru? If not, I can always use a slightly lighter shade of grey to highlight those panels.
Haven’t thought of those gun stains yet. My go to is Tamiya weather powder in soot. Your method looks convincing.
On this one I used a combo of Model Master enamels and Tamiya acrylics. Did a base coat with FS36270 Neutral Grey then did the darker FS36118 Gunship Grey. Did my panel line pre-shading with Tamiya XF-69 Nato Black, panel highlighting FS36375, and streaking with Tamiya XF-4 Yellow-Green and Tamiya XF-11 Flat Aluminum. Then I went back to my two Model Master FS colors and slowly scribbled on the top coat in random, swirling patterns…that part took FOREVER and I had to give my compressor frequent cool-off periods. Then the clear coat (Model Master Glosscote) went on, then decals, then another Glosscote…black Flory Wash…then MRP Matt Clear. All the hard-points and ordnance are going to be the FS36375 Light Ghost Grey, with the exception of the ALQ-184 and LH-mount HTS pod(FS36270), Sniper ATP pod (FS36118), and the CATM-88s (Tamiya XF-2).
Figured the graphite would be a good way to simulate gun smoke, since there tends to be a little metal dust in that.
With Solvaset you can’t over brush cause you will trash the decal. I brush it once over and let it work and apply it liberally with no puddles. I have never had issues with ANY decals I have used in many years including Two Bobs. I even used Solvaset on a set of decals that were so thin you had to be careful not to have it fold even partially otherwise you could not separate it. I can’t remember the decal brand but it wa extremely thin.
I wonder if the formula has changed in some way. This stuff was pulling back on itself and beading up on the surface like water. When I went back to the Microsol today, it just spread in a film and didn’t bead up. What do you apply yours with, PJ? It almost seems like it would have been better to dampen a Q-Tip with it rather than use a brush like I did. Haven’t ever seen a setting solution bead up on the surface like this stuff was doing.
That’s odd that it was beading. Mine just spreads evenly and evaporates, I use the enclosed cap brush but very sparingly. My bottle is at least 3 years old and the one before that was from the early 80s. Who knows maybe the formula changed like you said.
I‘m sorry you had issues with this product that I recommended to you but I love using it and have never had bad results.