Trumpeter 1:32 F-105G Wild Weasel Build Thread

Happy New Year!

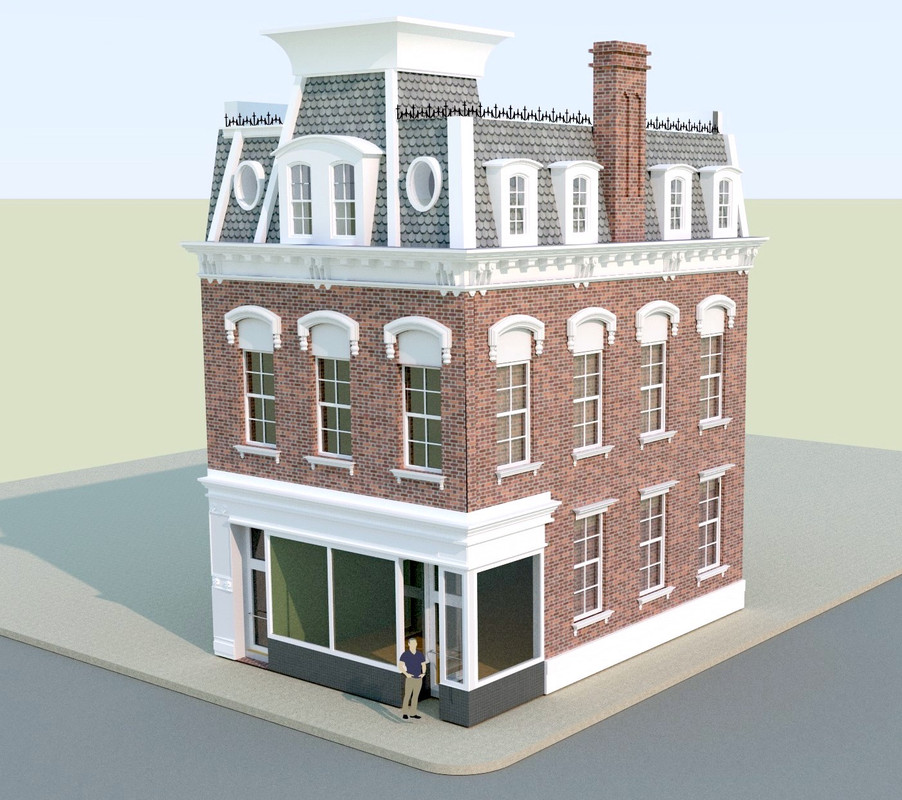
I’m not starting this build right now so don’t get too excited, but I have the kit in my possession. I have to first finish the Bronx Victorian which I’ve invested $$$ heavily.

The Wild Weasel is a commision build for the same person for whom I build that nice “Yankee Lady” Monogram 1:48 B-17G a couple of years ago. He was able to buy this new model for a very low price since Allied Hobbies in Philadelphia is going out of business and was selling things for 70% off. This time I’m getting paid! We’re bartering… He’s going to give me a Tamiya 1:32 De Havalind Mosquito kit. I’ve really wanted to build that plane!

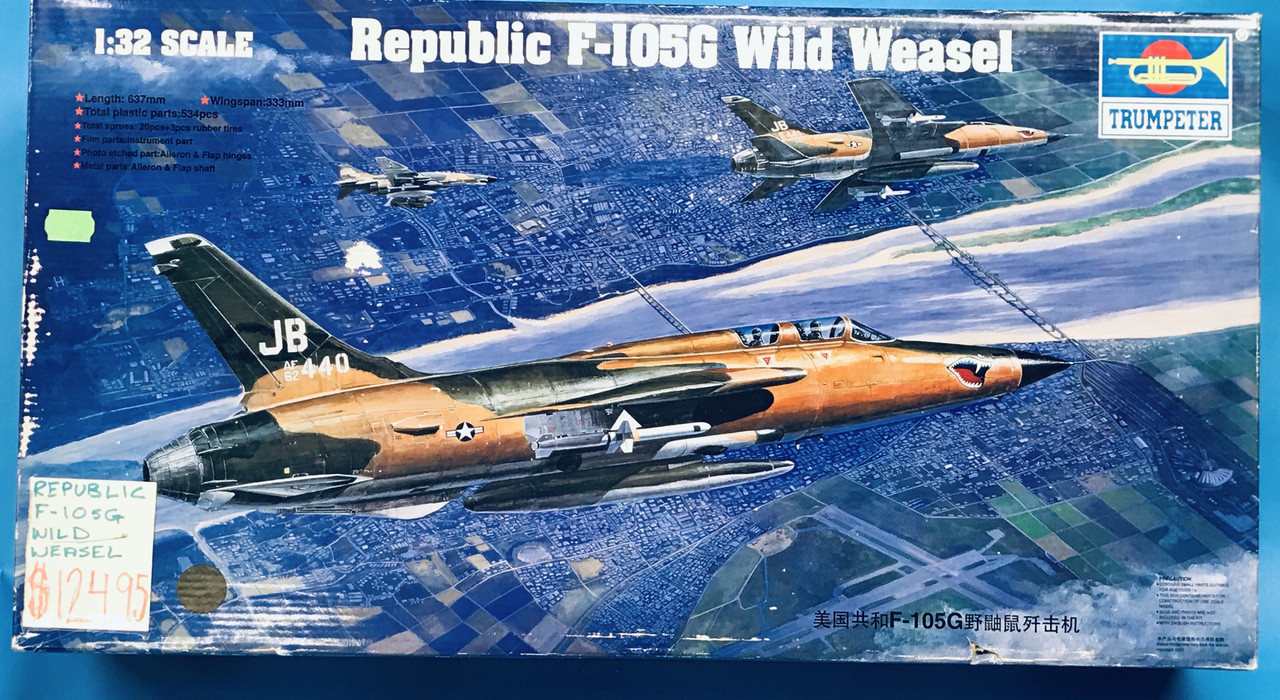
The kit shows $124. He got it for $50. Good deal. It’s an older Trumpeter kit and I’m expecting the usual old Trumpeter problems. This will be my 3rd Trumpeter large scale plane so I’m getting used to them. It has those finicky PE flight surfaces hinges. On the TBM I just glued the flaps and ailerons, but did get a movable rudder and elevators. On this one, I’ll try that again.

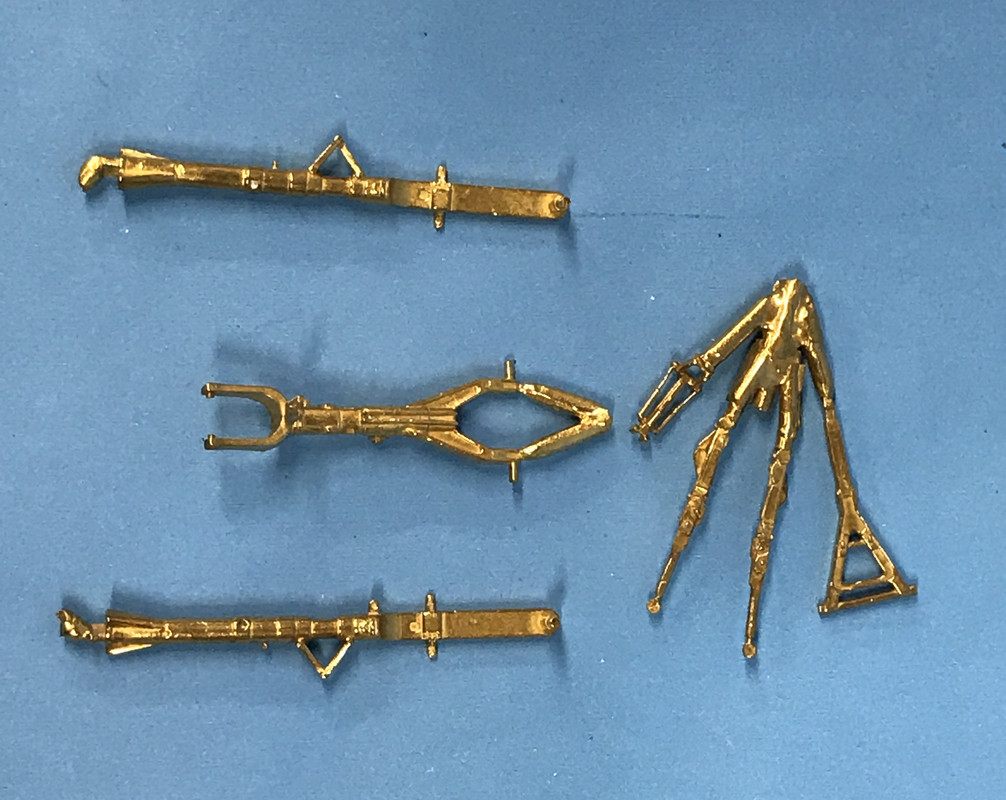
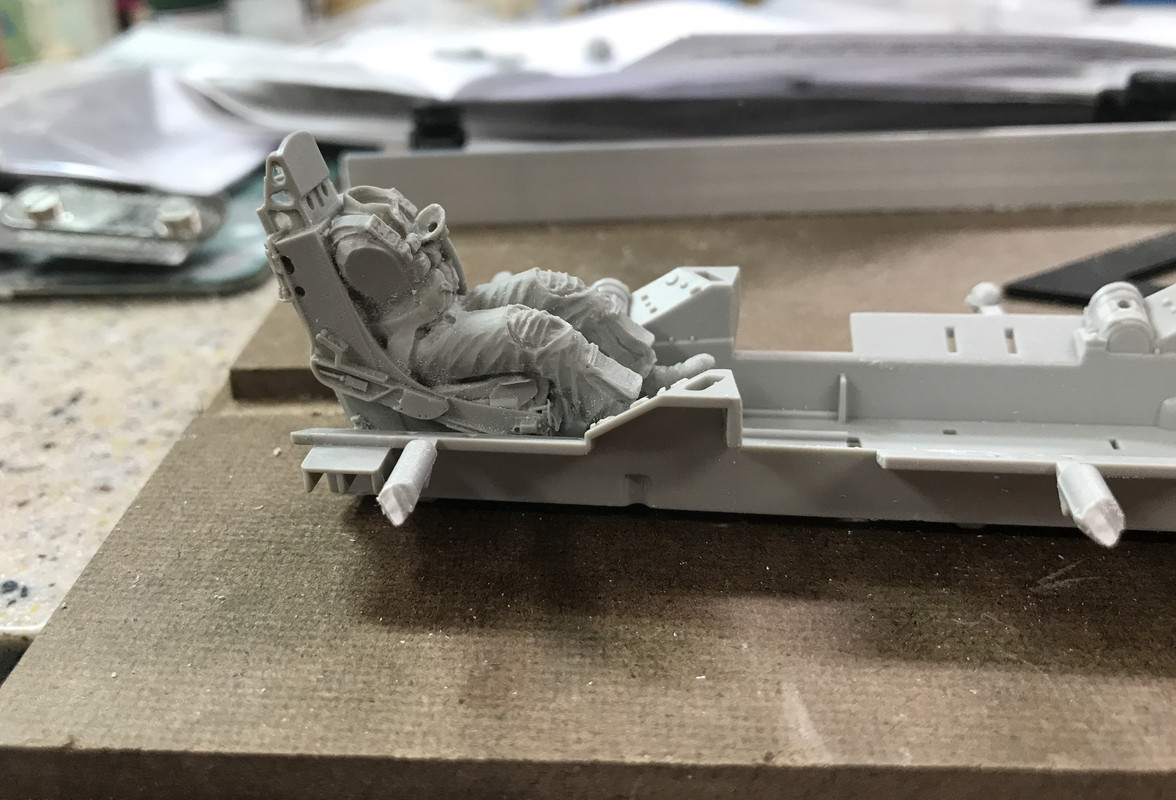
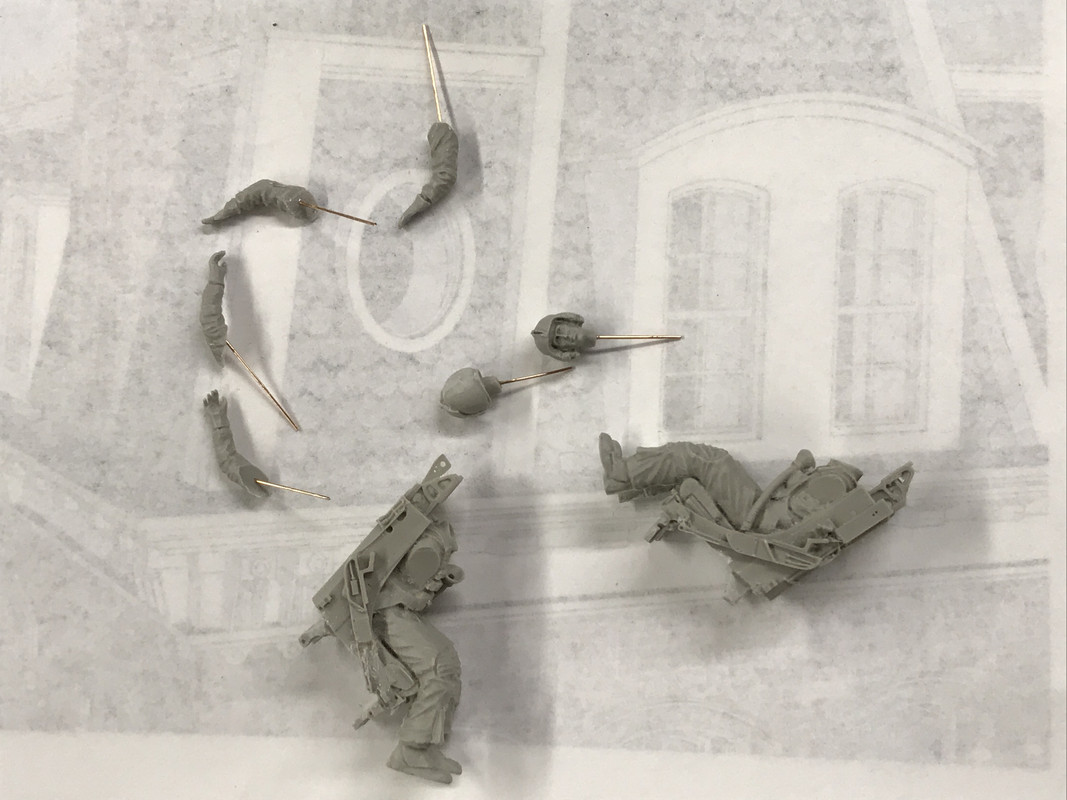
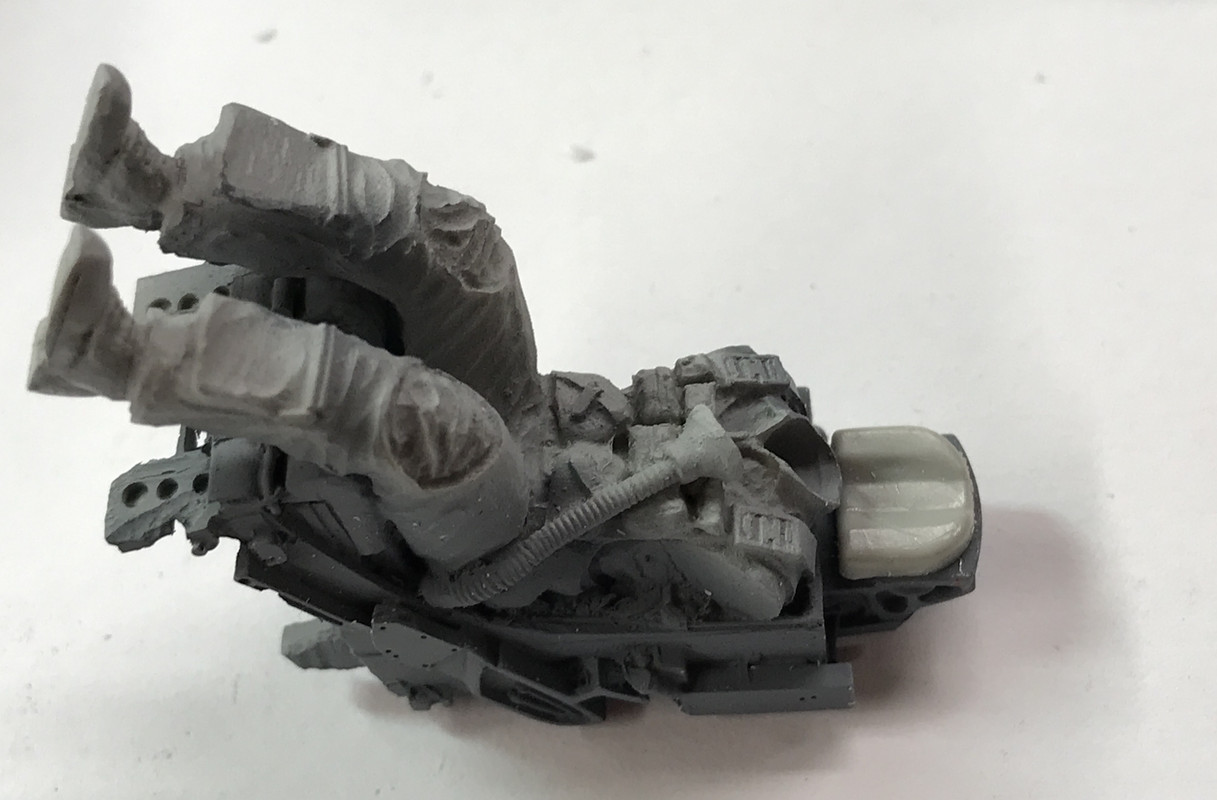
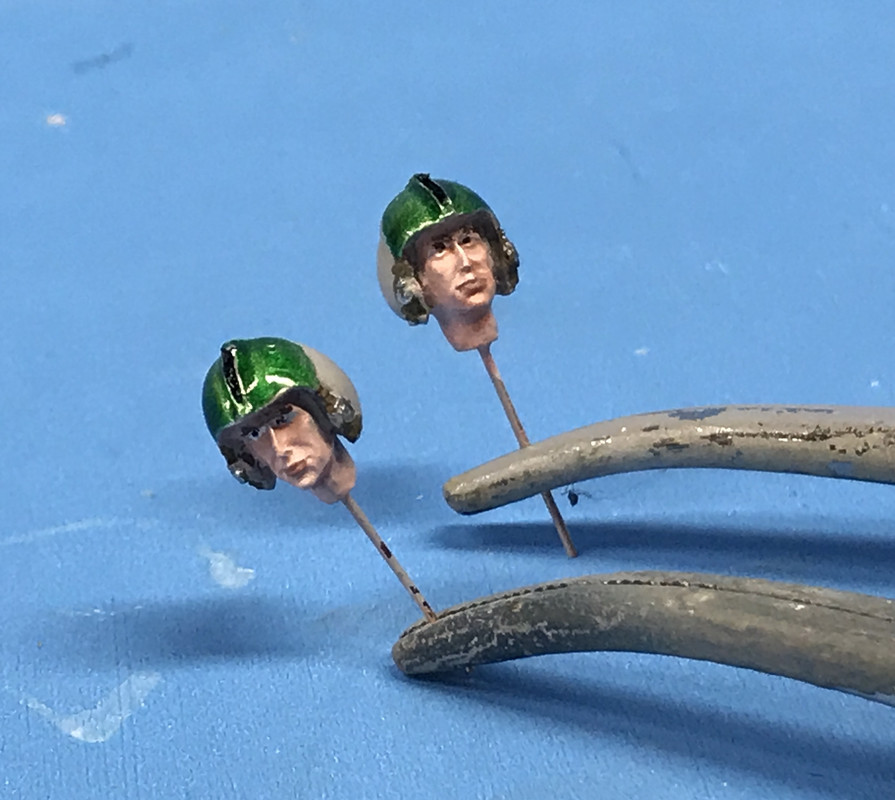
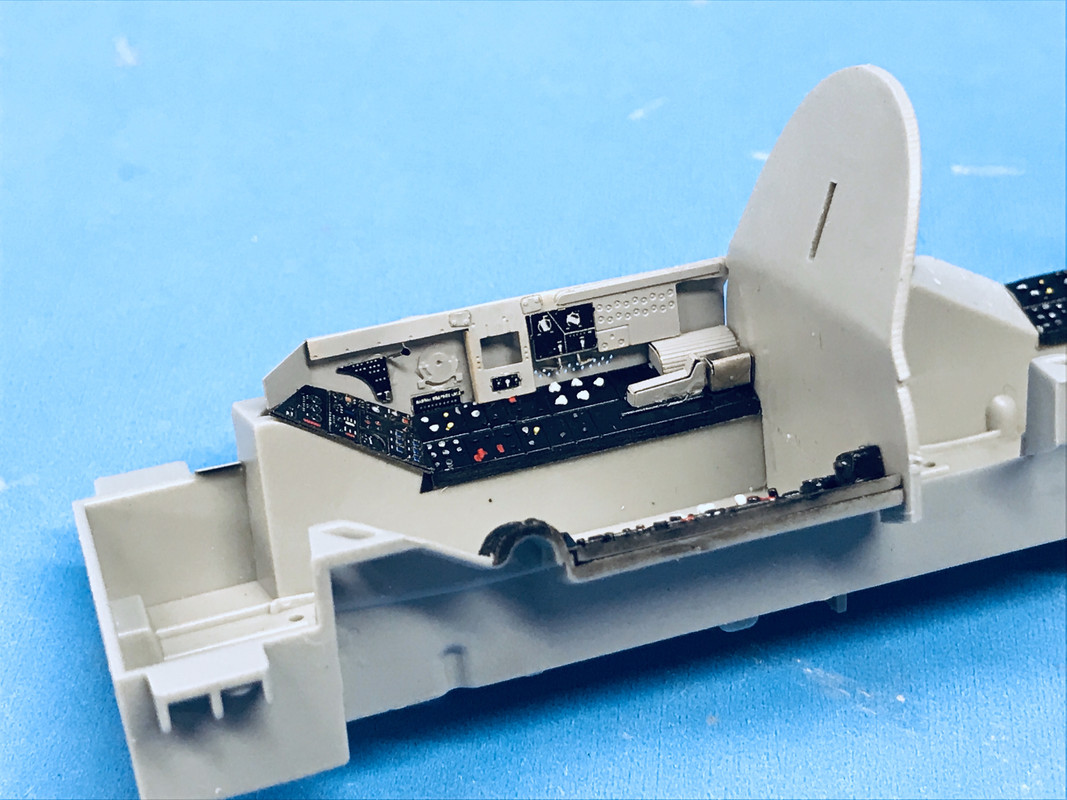
I’ve ordered some aftermarket for the F-105G including two resin ejection seats with pilots, Eduard cockpit details, and G-Force brass landing struts. The model is big and heavy and I’ve read that the plastic gear isn’t sturdy enough. It has a complete J-75 turbo-jet included which will be completely hidden so I’m either going to cut some access hatches to show it off or make a service rack and mount it outside the plane. I will attempt to super-detail the engine and the other usual places. The plane has a fully detailed Gatling gun and I will show that off too.

So sit tight. I will be back at this thread in a month or so when the Bronx Building is complete.

And after it, I will also regale you with the construction of the Mossie.

Well, you can never go wrong with a Thud Weasel, no matter what the shortcomings are…

I’m in with the clam dip!

SEA, big scale, big mean airplane.

I have never seen one of these fly although I have seen quite a few at shows.

It’s probably Republic’s last big program- the A-10 was both Republic and Fairchild.

Saaaweeet! I built Trumpy’s younger brother in 1 48 scale, and you’ll definitely need those metal landing gear. It’s more so the attachment part of the gear legs that’s the weak point. The bottom wing is so thin that the attachment hole isn’t very deep.

What are you doing for ordinance?

“First in, last out” has a lot of detail on that.

Two ARMs.

Big bird! I’m taking a seat, this should be interesting! :slight_smile:

His older 1/48 Revellogram brothers already look big and mean!

Did Trumpeteer’s infamous Mad Riveter went to town on this one also? The 1/72 version had parts looking like a cheese grater…

Riveting looks modest. I don’t yet know what ordinance, but since it’s a anti-radiation plane, the HARM missiles seem like a must-have. I suppose you need to do this pretty early on if you need to drill out mounting holes. I’ll have to study the instructions to see what those are. I also need to get a reference book on this bird, and FSM just reviewed a F-105 A-F book by MMP, but it’s $40, and that’s a little steep. I’ll see if there’s other stuff available. There’s always Google.

If you’ve got a 1/2 price book seller near you check them out. It’s a long shot but the one near us gets this stuff in every once in awhile. You may get lucky!

Squadron has a good book with tons of photos for reference, “Wild Weasel- The SAM Suppresion Story”, that covers the whole SEAD program. At least until the 90s and before the Balkan Wars, when the F-16 took over the SEAD role. From early efforts in Korea, thru the whole Vietnam Air war effort, to finally Desert Storm. It is quite affordable, and a great starting point.

As a side note, Shrike ARMs will be your primary weapon for a Thud Weasel in Vietnam. The Standard ARM did not appear until late in the war. Early Thud Weasels often carried CBUs in a”flat four” configuration on the centerline rack as well.

I’ve built this kit years ago and it’s really nice without any major issues. Good thing you already got the metal landing gear. That is a must for this kit. It’s too heavy for the plastic gear.

I bought 2 Aires Ejection Seats with pilots, resin rear-flank air inlets, and Eduard’s cockpit instruments/placards, but the G-Force gear was out of stock at my LHS’ suppliers. So the fellow for whom I’m building the model located them on ebay and they were delivered to my home today. I suspect I may have to solder the gear to a brass plate and glue that into the airframe, especially since the mounting is depending on those thin wing skins.

I still have a few weeks of work on the Bronx Building that I’m constructing for the railroad and it’s coming out quite well. I had some of the more intricate architectural details 3D printed, and am constructing the remaining cornices. All the rest is laser cut.

It’s going to be one heck of a building.

So stay tuned.

Well sports fans, work has finally commenced on the Trumpeter F-105G Wild Weasel. I am just about finishing up on the Victorian town house that’s a few days away from being installed on my model railroad. It came out really well and represents another potential model railroad magazine article.

Building is lit by surface mount LEDs and the interior is an art gallery (which is the use of the actual building in the Bronx). Here it’s mounted on it base ready to go on the railroad.

What I’m currently doing is adding some resin cast roof parapet caps. I made the master out of Super Sculpey and cast them, one at a time, in a silicone mold. When I finish the last three tomorrow, I will paint them a terra cotta color and glue them to the roof edge.

BACK TO THE WILD WEASEL:

I unboxed the whole deal today and again used my home made, albeit too narrow, sprue organizer.

Not shown are four large sprues containing lots and lots of ordinance, most of which will not be used.

The first thing I did today was attack one of two Aires resin ejection seats with pilot. There is a huge block of resin that you optionally can remove to free up the seat’s legs that sit on the flight deck. I chose to do this to see if I could.

Using razor saws, then carbide router and finally a diamond coated burr, I was able to hollow other the bottom without accidentally removing the legs (which is quite easy to do with a Dremel and Flexi-shaft.) I did put an errant divot in one rear leg, but I have the best solution ever for this kind of repair: Bondic UV curing clear resin. You fill the hole, shine the attached UV LED light on it and in about 5 to 10 seconds it’s solid as a ceramic. Dentists have been using this stuff for some time now.

Here’s the first seat sitting in the cockpit tub just for fun.

It’s going to be fun painting all the details in these seats.

I’m also going to add the Eduard Interior set. It’s quite huge and comprehensive.

So stick around folks. Over the next couple of weeks construction will move ahead apace. It’s going to be a very big (long) airplane.

Stickin’ right here - your builds are always entertaining and informative, and your skills are an inspiration!

I continued working today cleaning up the resin casting of the ejection seat. I cut the legs free on the 2nd seat, and did slip with the carbide router and clipped off half of one of the front feet. Luckily, I had a “dental” solution. I drilled the leg stump with a 0.022" drill and inserted some phosphor bronze rod of the same diameter held with some CA. I then built up layers of Bondic UV curing filler. Between each layer I illuminated it with the UV LED light. It cures in 5 to 10 seconds and is ceramic hard. With the rod reinforcing the piece the new leg is stronger than the existing one. This will not be visible in the finished cockpit, but the new leg does have to support the seat at the right height and angle. This is almost exactly the same technique that dentists use to restore a broken tooth with a pin and composite light-cured material.

In addition to replacing the missing leg, there was also a large entrained bubble in the seat bottom that penetrated through the seat side and also got filled with the Bondic. If you havn’t done so, get some Bondic. It’s not the ultimate adhesive, but it does some things that other materials just can’t. Unlike CA, it doesn’t cure until you shine the light on it. You can wipe it off and not screw anything up. It’s great for adhering transparent parts where the UV can hit it. No UV, no cure.

The last thing I did was clean up the arms and heads, and then insert some more phosphor bronze rods to act as holders for these parts. After trial fitting the arms and heads I realized that they would block access to body parts lying underneath making painting more difficult. So I’m going to paint these pieces separately and then join them. I’ll liquid mask the spots where the arms and head will go to make gluing more secure.

I added the plastic control boards to the four armrests in the cockpit tub. These pieces need to be there and then you’re supposed to remove all of the relief detail in prep for the Eduard PE replacements. I have a quandry. I’m not sure what color to paint the interior. It calls for “Interior Gray”. I have no idea what that is. The light gray of the kit could very well be the “interior gray”. Or could Tamiya Gray Primer be the color. Who can help me here? If I paint them, I’m going to mask the surfaces where the PE goes again to insure a good glue bond.

The interior, including the seats should be dark gull gray FS36231. I’m looking forward to seeing this big beast come together.

Hope this helps,

Tom

Watching. My uncle was a test pilot for Republic, and worked on the F-105 project.

I might have that color… I bought some Tamiya Japanese Light Gray that might work also. I may have the light gull gray. I started working on the PE officially today and coordinating the work with the Eduard instructions. It’s a challenge (to me at least) switching back and forth between what and when Eduard wants, and the kit’s instructions. I like to prime the PE using a good primer to help the top coats adhere. Before priming I went over all the non-pre-printed PE with a scratch brush to rough up the surface on both sides to provide tooth for the primer and the CA that’s going to hold the PE to styrene.

The Eduard instructions call for the entire cockpit tub to be installed 4mm higher in the fuselage. To accomplish this they have you remove the 4mm from the bulkhead that lies behind the pilots position, and provides PE folded shims that raise the tub up higher into the fuselage. Very clever… I hope it works. It will make the cockpit details more visible.

Also included in the Eduard set are fully detailed side panels. They are folded affairs with a very tight double fold that has about 1/32" between one bend and the other making a full 180 degree turn. I primed one side of the PE, and then after folding, primed the now bare-brass backside (don’t say that last phrase too quickly[8-)] too.

This image shows the primed PE, the cut-down bulkhead, and the folded side panels for the starboard side of the aircraft. The model did not have any side panel details.

I’m still not sure if I want to scrap off all the arm rest details and use the printed Eduard PE parts. While the Eduard printing is highly detailed, it has very little relief. Besides, I really enjoy picking out cockpit details. I have some amazingly pointy brushes perfectly equipped to do this. I may mix and match, using the Eduard in some cases, but the model’s in others. There are a whole raft of little PE boxes and details that go onto those side panels. And I am going to use those.

I also primed all the ejection seats/Pilots pieces to get ready to paint them. That too will be fun.

Somebody on one of the many forums on which I contribute gave a great suggestion: Eyeliner makeup brushes. They have the finest points of any brush I own and are available from Amazon. They’re resistant to all of our modeling solvents including acetone, iso alcohol, mineral spirits and Tamiya glues. But wait, there’s more… they cost $7.99 for 100. Yes! You read that correctly! They’re 8 cents apiece. When they get munged up, you throw them out. This is just one bag. You get two of these!

If you’re interested, here’s the link: https://i.postimg.cc/VsqJcjYd/Make-Up-Brushes.jpg

Just thought I’d share this since I’m going to use them to detail the cockpit switches.

I started today’s session by finally deciding that I was going to leave the kit’s unpainted light gray to be the base color for the cockpit. I also decided to use the kit’s side panel switches instead of scaping them off for the Eduard PE. But I did decide to scrape off the knobs on the angled panels since I like the Eduard’s better. I really enjoy painting knobs and buttons… I masked the tub to just expose the side panels and airbrushed them semi-gloss black.

After pulling all that tape I was pleased with the result.

I found some great pictures of the Thud’s ejection seat and used it plus the instructions that came with the resin seat/pilot to color it. The instructions didn’t include any information about the seat itself. It’s not the light interior gray like the cockpit wall are. Instead it’s clearly a medium gray.

The resin seat is very complete, but still has a couple of things missing including that yellow (ejection handle?) on the seat’s left side. I airbrushed the gray first.

The resin seat was also missing the red head pad, but the kit’s pad was not configured right to just glue on, so I used the fine razor saw to separate the pad from the rest of the molding and then CA’d it to the seat frame.

After gluing I painted it red using Vallejo paint. Although the instruction called out “Olive” and “Olive Green” as the two colors for the flight suit and the Mach suit, I don’t have colors by those names. But the ones I do have (Olive Drab and Khaki) look very much like the colors actually printed in the resin seat’s instructions, so I used them.

I used a combination of brushes to paint all these details. The seat picture (above) showed the seat cushions to be darker than the frame and the seat belts to be a much lighter gray, so I attempted to match them as well.

There’s some wet paint in the above picture which is where the highlights are coming from. I started using Tamiya Retarder for the first time. It improves flow and slows down drying which helps in brush painting the Tamiya colors. The oxygen hose and mask is Tamiya Nato Black. Shoes are semi-gloss black.

I also painted the arms which are hung in a cool painting fixture that I won as a door prize at a Military Modelers Club of Louisville. It was designed and 3D printed at the Advanced Manufuring Processes Lab at University of Louisville Speed School of Engineering. One of our new club members is a technical manager at this facility. It swivels on an enclosed ball bearing.

The arms are Olive Drab with Khaki gloves. The last pieces to paint are the all-important heads. The eye openings are very narrow and I suspect, it will be close to impossible to render the eyes in any meaningful way. You can see those metal extension paying off in holding these small parts.

Here are the two seats sitting in the tub for a status shot.

I really like cockpits! To me, they’re the most interesting aspect of aircraft modeling. Next is engines and followed by landing gear. It’s way I find modeling drones and UCAVs very dissatisfying. No cockpit!

I’m a pretty basic figure painter. I don’t really do shading and shadowing, although I probably will on the facials features. I’m careful, just not that artistic. Once the pilots are done, I really dig into putting the cockpit together with tons of PE.

This is really an interesting build of a fascinating airplane - I worked on the Weasels and most other 105 models in Thailand in 69. Will be watching this beauty come together.

Cheers,

Russ

I hope you don’t remember too much about them since I’m probably going to take some “modeler’s license” in the build.

I painted those heads today. All that’s left is the white of the helmet. I use a mixture of Vallejo Shadow Flesh and white to create a decent flesh tone. I was able… barely… to paint the eyes along with the iris. I then used the Molotow Chrome Pen to put a coating of bright silver on the visors and then go back and coat with Tamiya Clear Green. Tomorrow I’ll get the white on and put the heads together with the bodies.

I then got back to work on the cockpit proper. I painted the knobs and switches on the kit side sill parts and then added the starboard side Eduard 2-layer diagonal panels. I added all the extra PE on the folded PE startboard side panels and got the forward one installed. The aft panel was ready to install when dinner time came.

There’s a couple of added pieces in the above picture that still need some paint besides the gray primer. I like how the side panels are going to really spiff up the cockpit, and am also concerned that little or none of this will be visible when the cockpit’s closed up. I certainly hope it will be seen. This is slow, painstaking work, but it’s fun.

I use gel or thick CA to hold PE to a model. I didn’t used to, but Brian Bunger, proprietor of Scale Reproductions, Inc, our excellent local hobby shop, said that he uses gel since it stays put and you can apply tiny amounts in a very controlled manner. And it doesn’t set instantly so you actually have the chance to move the part a bit if it’s not perfect when you lay it down.

I have another question. What’s a good way to add that yellow or white seal that’s between the canopy glazing and the canopy frame? I’ve been thinking of different ways to do that, but haven’t come to conclusion about how to actually do it without making a mess.