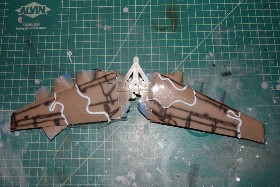
Hello folks. So I decided to try to airbrush camouflage over the dark yellow coat I laid down on my 1/48 Tamiya Nashorn yesterday. Today, I sprayed red brown ‘striping’. My final product leaves some room for improvement (maybe it is just optimism, but I am nevertheless pretty excited to start to imagine what I might be able to do with laying down more than one color in the future:) I do tremor/shake with my hands, but (surprisingly to me) I am actually finding this is not that big of a problem. I am spraying Tamiya Red Brown thinned with X-20A thinner. I have read in hobby books and online forums (like this one) that when one ‘free hands’ camouflage, one should thin the paint more than usual. So I added more thinner so that when I touch the brush to the side of my mixing cup, the big drop runs down the side pretty quickly. I also dialed my regulator down to about 15 PSI (again advice, that I have also read). I think the idea of thinning and airbrushing is that it gives you a little more control over the color you are laying down? I also spray first on newspaper an instant before squeezing the trigger so that I can see how much paint is being discharged, and I turn the ‘needle cone’ on the Paasche H slightly until it is putting down just a thin narrow band of paint. It is relatively light on the first pass, but then as I spray over it again, it gets darker. Here is where I am puzzled and why I have not yet been able to crisply put down camouflage ‘striping’. I am finding that between the time I adjust and have the airbrush spraying the right kind of line on newspaper and when I raise the airbrush tip to the model, the amount of paint flowing out has changed DRAMATICALLY. I am talking I either get a very wet, major splotch that really messes up that part of the vehicle’s coat OR the paint flow stops altogether after just a few short passes of an inch or so. I just don’t understand why my airbrush is so hypersensititve with paint flow (and why I have to constantly keep readjusting with a subtle flick of my finger (Counter clockwise or clockwise)). Please note that I am not touching the part of the airbrush that adjusts the amount of the paint flow. I am not even breathing hard. I move the tip to the model slowly. I just don’t understand it… I sprayed as best as I could and started with the outside lines of the stripes, keeping my needle tip very close to the model, and filled in the middle (I found this gave me a little more leeway when I had a bad starting splotch. Please let me explain this is not the drying tip spittle that one gets when one stops airbrushing for more than a few seconds, but rather it is a MASSIVE disgorge of paint. I really wish the Paasche H had a ‘lock switch’ so that the paint flow setting would be dialed in exactly and not change at all. I should note that this is my experience using the standard needle cone with three stripes going around its circumference. When I use the bigger needle cone with six concentric stripes, I have less problem with this (there is a little more resistance when turning counter clockwise or clockwise, and it just seems to stay better locked in at the uniform paint flow that I have tested on the newspaper a couple of seconds before).
What can I do to compensate for this hypersensitivity on the standard smaller needle (since the larger needle cone is not really suitable to painting a relativelty small camouflage design on a 1/48 model)? It’s a bit puzzling (to me) how I can shoot on the paper and then the flow has changed again by the time I raise for the real spray job on the model… If I could just get that thin stripe of paint shooting out consistently, I think I would do OK even with my hand shaking. I would just fill in the stripes gradually.
While the edges on the dried stripes I painted today don’t look super ‘frayed’, my second question is how to make the edges of these stripes (more) crisp with little or none of the speckled (‘soft’) edges that I am getting (I’ve been told before to get in close when doing this kind of painting of camo, but I dont think I can get any closer or my needle would touch the model?). Maybe I still need to thin my paint even more so that there is less color (so that the dripping paint is almost translucent when doing the test with dripping down the side of my paint cup)? Or maybe I need to go even lower than 15 PSI? I was attracted to using a single action airbrush like the Paasche because I thought it would take away one of the variables that I have to contend with as a new user (allow the paint flow to be fixed). But ironically, it is that paint flow inconsistency which is confounding me most now…
Not really. Just takes practice. [H] That being said, I still prefer to mask for camo patterns…just makes it less risky.
To the OP, have you tried thinning your Tamiya paint with 91% isopropyl alcohol? I have found that to be the best thing to thin it with if you want consistent flow so you don’t get the tip drying that is causing the sudden splotches of paint when you’re trying to do more precise paint work.
Also denatured alcohol as thinner will help keep the tip wet when the brush is off but it flows out more than IPA. So will retarder slow the tipdry ( I use Liquitex Slow Dry retarding medium personally). Start your lines off the model, then if it spits it doesn’t spit on the airplane. When you do the outline fine lines that you will fill inward from tilt your airbrush towards that fill in area and the feathering will go to where you will fill anyway. You will get a little soft edged line but not anything like you are showing us. I think it’s satisfactory. I can do this with an H and the #1 tip which is a .45 needle acceptable for this kind of work once you conquer that tip dry issue. And make no mistake, you’re getting tip dry as based from what you describe. In art work we routinely use .3-.5 for this kind of line and fill in, though I actually like .2-.3 personally for finer lines for say T Shirt lettering for instance.
Arguably it can be done with the H yes but double action would be easier once you get control of it’s function. Even an inexpensive Master G43 ( just polish the needle) would do this work easier. But it can be done with the H. My Badger 200 is good for this with the .25 tip and it’s single action. So single action does work. Though the 200 produces much finer atomization that can be cut back to vertually an invisable mist in the air but slowly builds on the surface of the model ( has that potential if someone wants to cut it back that far been there done that).
I can do that with the H, it just takes practice with technique and thinning. Never needed anything else. I paint everything with it, including instrument panels (short of the knobs and switches of course).
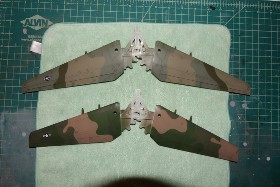
I use a variation of “the sausage technique” that Keavdog uses for camo patterns. Used frisket film for my area masks and Blu Tack for the sausages to feather the edges on these wings (F-111F and FB-111A). The paint wasn’t Tamiya though, it was decanted Model Master Enamel rattle cans. I imagine it’ll be even easier now that I have discovered Tamiya Masking Sticker Sheets.
Yup, they appear to be the same stuff. They have a couple of types, one with a 1mm grid printed on them, and another with no grid. The 1mm grid paper is also kind of a cool way to take measurements on curved parts. Superior alternative to masking tape as well, IMHO.
I don’t know, how about silly putty masks ? I know it’s old tech but it does work for a semi soft/sharp edge.
I’m only an occasional armor builder though, some of you guys are pros at it. Seriously. I just run two fine lines and fill it in same as I’d do in airbrush art work.
For soft edges to camo patterns, you can also use masking tape and then lift the edge of the tape just a hair. It does the same as using Silly Putty or poster tack-you get a little bit of a lift at the edge, with a little “underspray” and a soft edge.
My biggest challenge in spraying camo is often scaling the fade. What I mean by that is how much distance it would occupy in real life vs our models. From what I’ve seen, the “fade” on most fighter jets is probably less than 6" in width. Of course, that corresponds to less than 1/8" on a 1:48 scale model. Basically, not a hard tape line, but pretty sharp on the contrast.
Eaglecash867, thanks to you and others for the tip about using 91% isopropyl alcohol. I guess I incorrectly assumed that Tamiya (X-20A) thinner worked best (and was somehow specially designed) for use with Tamiya acrylic paints and purchased a decent stock of this thinner. Now I know better and will give the alcohol a shot…Having said that, are there some cases where X-20A is still useful?
Oldermodelguy, OK thanks for explaining that what I am experiencing is tip dry and for recommending how to prevent it. One follow-up question: in addition to using alcohol to thin my paint, would it be helpful to put a few drops of Tamiya retarder (mixed in with my paint), too? I have a few bottles of this retarder, but am not sure if it is only for hand brushing paint… Ironically, I already have a Master G43 (and plenty of spare parts for it)-it is the first airbrush that I have ever used, but it has sat idle for a long time since I started using the Paasche H instead. Interestingly, I have not had major problems using the Master G43 on big surfaces like my 1/16th scale motorized tanks: I don’t think I really know how to ‘consciously’ control the paint flow that well, but I managed to do OK (reasonably even coat on my big tanks). Maybe it is time that I give it (a double action airbrush) a try on my 1/35 and 1/48 models, too, though. I think that I have maybe gotten ‘tunnel vision’ with only using the Paasche H. Follow-up question: what do you mean about polishing the needle (could you elaborate)? Oh yeah, and thanks for the tip about tilting inward my airbrush when I paint camo stripes so that it will feather over the area that I want to cover over in the middle.
I think I understand what you mean. Thus far, I have only painted my 1/16th scale tanks in monocolor, but I think using silly putty/masking with tape on them to paint camouflage patterns would be a lot easier (and more effective) than on a 1/35th or 1/48. As it is, in painting my 1/48th scale Nashorn, I made the mistake of leaving too little dark yellow between the red brown stripes that I put down. And LOL, I haven’t even gotten to spraying the third color (dark green) yet…Thanks for sharing your experiences.
Not that I’m aware of. X-20A was the reason I almost gave up on getting the results I wanted with Tamiya. Then I took a shot on something I already had anyway, the isopropyl alcohol, and that worked amazingly well for the way I airbrush. I definitely do it differently than a lot of the guys I see making videos about it on YouTube. With the clouds of paint they lay down like its coming out of a firehose, it makes me wonder why they don’t just go back to using rattle cans. Makes me cringe…LOL.
Another tip on Tamiya stuff: If you ever decide to decant and airbrush Tamiya’s Grey Surface Primer, don’t use isopropyl alcohol to thin that. The chemical reaction between the two turns the primer into grey cottage cheese. For thinning that, I use MEK. MEK by itself is murder on plastic, but when properly used to thin primer you’re going to airbrush, that plastic solvent quality is just enough to give it a really strong bite on the plastic (without damaging it).
Something that will also help with getting consistent paint flow is to mix your paint and thinner before it goes into your airbrush. I use the little Dixie paper bathroom cups to mix paint and thinner in, and then pour that thorough mix into the airbrush. That ensures that you’re not going to suddenly hit pockets of thinner or thicker paint because you didn’t get a good mix in the airbrush cup.
Just an example of the precise, fine atomization that is possible with your H: I’m in the final stages of my F-4B build, and although I’m not a rivet counter, getting it as historically-accurate as possible is a big thing for me. I realized just the other day that there was an antenna they say to install on the belly that wasn’t installed on F-4Bs in 1965. The problem is that the whole thing is already painted, decaled, and weathered, and where the antenna is supposed to go? There’s a GIANT depression (well…its actually less than 1mm wide…LOL) in the skin that the antenna is supposed to go down into. There were decals less than 1/4" away from where the depression was, and I was going to have to mount the antenna, slice it off at its base, use a chisel blade to level it with the skin, fill the remaining tiny gaps with super glue, sand, primer, and paint. YIKES! But, I was able to pull it off. The only masking I did was to stuff a little chunk of Silly Putty into the nose gear well, since I had to primer and paint right to the edge of that. I was able to put fine, pencil-thin primer and paint lines down to match the surrounding paint. Just have to replace a couple of decals that got damaged during sanding and re-weather that spot…but you have a good airbrush that is capable of a lot of things. Just keep practicing with it. You’ll get there.
Tamiya retarder should work just try it and see. I’ve just always stocked Liquitex because of art work, craft paints and artist acrylics but it’s made to go in any acrylic paint and thus far has just by way of the thinner I use…
You can get in tight and make fine lines by removing the pedal cap on the front of that G43 ( you might have to play with air pressure a little bit). You will gain much control with that brush once you learn it’s ways and gain some muscle memory but it’s still difficult to make it around a curved surface without a mask of some sort. You can do fine lines yes, but you need to keep equal distance to the surface going around curves… My Ganzton is basically the same brush, learn to use the fluid stop on the back. I like the .3 needle for art work etc. But have used the .2. You can easily make a pencil line sharp line with the .3 then move further from the work to fill in and the .3 can handle a little thicker paint mix aiding in not spider webbing or full blow outs. I would only use the pedal cap on the front on broad paint work, maybe painting a whole tank hull it’s base color etc. For any finer work remove it. Course for the heavier work you probably use the H as I generally do.
IDK, my choices blow in the wind so to speak. Hope any of this helps more than hinders lol !
For camo, I’ve found that paper masks/templates work well. Just cut out the desired shape, place a loop of tape on the mask, and stick it to the model. The edges of the mask sit just a bit above the surface so that you get a fairly (but not perfectly) crisp line. If truly crisp lines are what you’re after, just cut masking tape to the desired shape. Tamiya’s white flex tape is great for masking out curved regions.
Hello. I’m unfortunately rained out this weekend (my mother’s outdoor patio is the only place I have to airbrush). Last weekend, I tried airbrushing dark green (third color) to complement the dark yellow background with red brown striping I had painted on my 1/48 Nashorn. Not quite wanting to give up on using Tamiya X-20A thinner (as I had already bought several bigger bottles of the stuff), I used it to thin my paint this time, too. (I know a couple of you guys [eaglecash, oldermodelerguy] have been coaching me for a while to give isopropyl 91% alcohol a try). Well, I’m finally ready to take your advice: my green striping turned out really crummy (using X-20A): It looks like segments of a caterpillar (hollowed out, with more paint on the outer sides and translucent-looking on the inside). Some ‘spidering’ on the outside edges in places. I guess I had a really hard time controlling the paint flow with this double action (Master G43) airbrush. What really confuses me is that I am getting this kind of ‘hollowed out’ effect (with paint pushed to the outer edges) even though I’m already down to about 10 PSI when the trigger is depressed (which I have read in books means the air pressure is too high)? (So I don’t know how I can reduce the air pressure much more on my regulator and still be able to spray?). Anyhow, I bought myself some 91% isopropyl alcohol from a local drugstore and look forward to experimenting (using it as thinner with my Tamiya acrylics) next time.
Thanks to Eaglecash (and maybe a couple of others, too) for the tip/suggestion (shared on a couple of threads) about using a cheap electric toothbrush and 91% isopropyl alcohol to scrub off acrylic airbrushed paint (while I still have several built models awaiting airbrushing, I will probably buy said toothbrush so I can start anew with airbrushing models like my Nashorn that didn’t turn out very well the first time). Traveling next weekend, but hopefully there will still be some decent fall weekend weather (dry and not too cold) before I have to close up for the season…Thanks.
You can get fine lines with G43 and .3 tip or .2 tip and needles. It helps tremendously to remove the metal pedal cap at the front of the airbrush and use it with the exposed needle tip. Spider webbing and pushing paint to the sides has more than one cause, too high a pressure yes but also too high a pressure for how thick you thinned the paint matters. I suggest your paint is a bit too thin and that’s why even 10 psi is pushing out the center. Additionally paint flow. Use the needle stop on the back of the G43.
I have the Ganzton airbrush for my double action work, same as the G43 for all intents. And I do artwork with it with Createx paints, craft paints and artist acrylics. And the fine work on models with either that brush or my Badger 200 with .25 tip. Anyway, cut your paint flow back and build it up over more than one pass for hard surfaces like models. I only mix about 25%- maybe sometimes 40% reducer with that .3 tip and on paper or cloth fabrics I shoot high pressure. Practice what I’ve said in this message on an old model or one you can strip the paint and reuse, you will get the right combo. And the IPA will have a different action and drying rate than the Tamiya thinner does.
In winter with any acrylic paints I just shoot my models into a trash can with papers inside. For solvent paints I use a booth or step outside on a sunny day. Artwork the paint is thick enough and working so close for fine lines like you’re doing just a fan is fine. I’ll spray at the kitchen counter with no over spray getting onto anything. On the Createx paints I use straight 70% IPA or the Createx 4011 reducer, it takes more of the reducer than the alcohol to get the flow I’m looking for. But if you polish the needle you can get down to almost an invisible mist with Tamiya acrylics that just kind of collects on the surface when you spray in close. About three passes will get you color and no spider webbing. You likely need to use the needle stop to do this. Don’t expect a full wet coat on the first pass, get some paint on there and flash it off then put it down wetter after it has something to stick to… But you will find your own way, these are just tips to help you get there. Let us know how you make out. I don’t let weather stop me from airbrushing lol.I’ve always found a way to paint for over 60 years now.
Hello. This is probably a really dumb question, but how do cool temperatures affect outdoor airbrushing? I tried airbrushing tank tracks (plastic links on their sprues) with dark iron Tamiya paint (thinned with X-20A yesterday) using a Master airbrush, and I had a pretty hard time getting the paint to adhere. The paint kept ‘sliding around’ on the surface of the pieces, getting shiny, but just not darkening. I had to make several passes and only fully depressing the trigger (discharging a ton of paint) really allowed the paint to really somewhat take. Even after using an entire small jar (10ml) of the dark iron paint, one can still see the dark yellow (original sprue color) on the pieces. I did not think it was necessary to prime sprue tanks tracks (because of their relatively small size), but maybe that was my first mistaken assumption? Secondly, maybe the fact that my narrow time window for airbrushing is just after sunup (about 7:00AM) and that the temperature was in the low to mid 40’s had something to do with the crummy results I got? I had planned to airbrush some camouflage using Tamiya paint and isopropyl alchohol later in this paitning session, but I decided not to try because I was thinking maybe the weather conditions were not suitable…
Oldermodelguy, could you please elaborate a bit on sanding/filing the needle on a Master Airbrush (what grit of sandpaper and how much should I sand off the tip of the needle, etc.)? Many thanks.

