As the tiger progrest is improving and near completed I decided to show this fantastic model on a diorama, if you remember I said it was going to be base on a photo of my book but I won’t make my tiger a taget practice for anti-tank weapons, but I have another idea, and not its not czechloviacia, think of this!
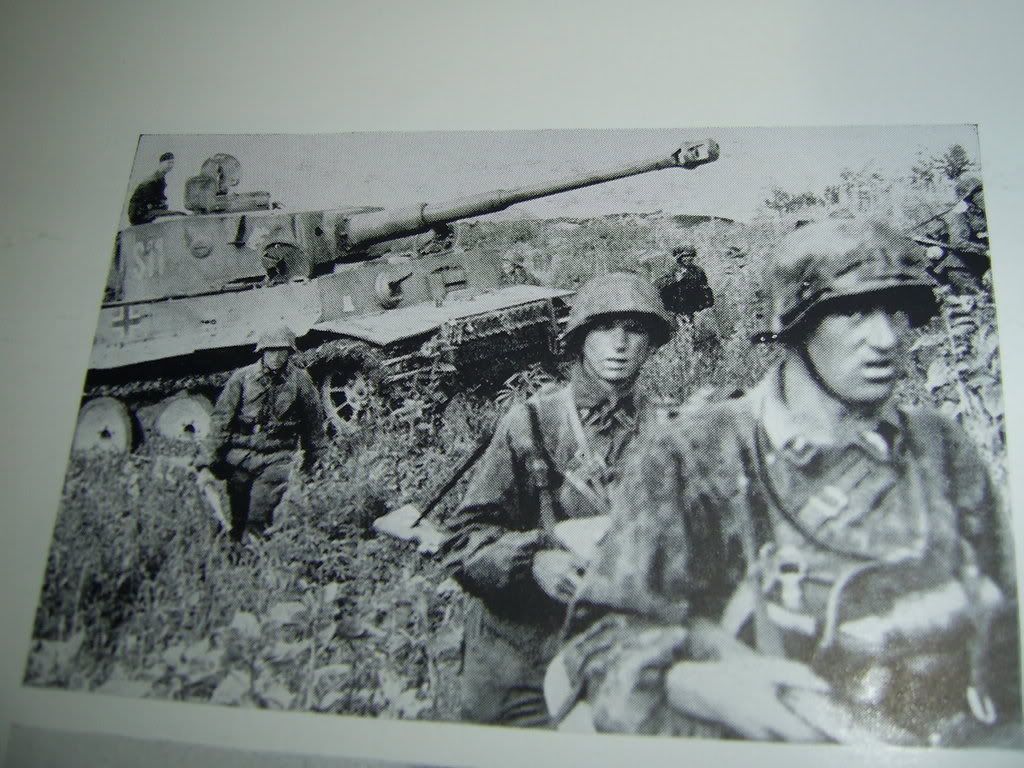
A Tiger 1 back from combat in summer russian 1944, with battle damage bullet holes on it (I can simply do this with a needel and pierce the tank at spots that are most likely to be hit) it’s being exam to make sure its still functionnal, a german soldier will be talking to the commader of the tank right beside the vehicule, another commander in the tank turret hacht, and another figure at the back to check the exaust pipe. The dio scene will be a praire wilt maybe a tree and a stream, I have some spare bare wires that can be place and the tank tire tarck of coures.
I think this is a good scene cause it maches the camo of the tank that I will use my airbrush and it resemble alot like the photo, just diffrent propurs, the bullet damage is to show how tought the tiger is like these images of the website.
I just want your opinion of this? is it a good ideas
One last thing, this dio is also practice for the stream (which I learn from another forum) and most importantly, the grass which will prove to be a challenge, does anyone know how to do grass in a Dio?
Well you’ve got a great idea, and it’s a really good start, just a little advice:
By bullet holes, are you meaning large caliber rounds, cause a “bullet” would barely scratch the surface on a tiger. It might do some damage to the zim, but not the armor. Obviosuly the larger the caliber, the more damage it would make. If you are placing holes in the tool box or other thin metal make sure you use a dremel tool on the inside to “thin” the area a little before peircing it, it helps to make the “hole” look more realistic.
Grass is fairly easy these days, many companies like Woodland Scenics make products that are very esy to use. Just search you LHS or favorite OLHS for diorama materials. The best sources are often ones that have a lot of model railroad stuff. It is easy to apply, simply dilute white glue (Elmers type) with 50% water, then add a couple drops of liquid dishwashing soap. The either spary it on with a cheap spray bottle, or brush it on using an old brush. Before it dries sprinkle the grass, dirt, what ever around. Wha-la instant grass!
You mentioned you want to do a prairie, sounds like a great idea with a lot of possibilities. Just search for pictures of the plains of Russia, and you’ll get a good idea of the colors of grass you’ll need.
Water is also easy, the same company also makes instant water, that is very esy to use. It can be found in the same section as the grass stuff.
Sounds like a pretty cool idea; I’d offer this thought though…place more focus on the fact that you want to show the toughness of the Tiger by having the two dudes by the side of the tank actually examining the shell hits; this will draw the observer’s eye to what you’re trying to emphasize. You might want to delete the guy “checking the exhaust”–it would seem to me that it might distract from your main theme (why is the guy checking the exhaust?[%-)]) unless there’s a shell hit ther–but then again, that being the Tiger’s weak spot, it might not be plausible…? Maybe a grenadier with a bottle offering a drink of congratulations might add a whimsical and poignant touch? I would put the second “commander” (panzer crewman?) on the tank’s deck either facing the “inspecting” guys, or have him nervously scanning the horizon with a pair of binoc’s–this would add a “subplot” to the composition of the scene, i.e. “where’d that shot come from?!” Hope thi provides some inspiration![:-^]
Glad that you ask that dog, first of all the tiger is almost complete just need to add forest green as camo and some weather, I have applie redbrown after a coat of dark yellow, only proble is the stripes are too big and should have reduce the size, well it still good, not bad for my first try, i’m really prode of myself.
The figure near the exaut pipe was origanly the gunner on the tank turret but due to his wrong position I wanted to place him behind the tank to show the back of the tank, it has the most assesories there, but I could place his on a hill lowering his binoc.
The bullet hole are large calebers (not anti-tank, that would just blow the tank up) are the tank is not in a battle scene he’s back from a battle scene, but I could add a crew member helping out another wounded memeber from the tank.
I can’t make the soldier talking to commander cause of the hach, its standing betwween them, but I can’t make him standing up on the tank neither cause he’s satnding too, it won’t look good, maybe he could just be walking beside the tank where the bullets have hit, or at a point where I want the viewers to see the impressive tank.
At my local hobby shop Model land in calgary is a great place for model supplie, there are lots of figure kits that the possibiletise are endless, there a surviving panzer crew likt that could go with my scene (I know it panzer but its almost the same as the tiger crew) and some allies and axis tank supplie wich could be useful for that scene and my firefly scene.
Finally weather, I bought a weather kits which at first I didn’t know what it was but its some powder set, I practise on another tank but didn’t applie on it so good, How do you applie weather? and what weather would be good for the scene? I’m assuming green (for the foliage that the tank roll over) or weathed brown of dust brown for dirt.
The Woodland Scenics “water”( in the bottle, not the meltable pellets) is an excellent product, but…there is a learning curve. First, the product recommends no more than 1/8" depth, at a time. I’ll talk about setting time in a bit. Second, the product is moderately thick, and has a tendancy to “climb” because of the greater surface tension. and finally, it “dries” flexible. The depth limitation, actually allows for the adding of detail (an eighth of an inch at a time). To insure the product is thoroughly set, allow about 5-7 days between applications. The “climb”, can be reduced by thinning the product with water. This can be done by adding water, or by brushing water around the edges, where you don’t want “climb”. ***NOTE: adding water WILL cloud the product! You will have to wait until the product goes clear (it will…in time, about 1-2 weeks, depending on the amount of water added) before adding more. As thick as this product is, it will find any way it can to “exit” the scene. Try to seal the pond/stream bed before pouring the “water”, and put a drop cloth beneath the dio. It is a one part product (not like an epoxy resin), there is no foul odor, you can use this indoors, and not have to take a vacation while it sets. There is a second product, called “water effects”, which can be used to create ripples/waves/turbulence/etc. I have used this product, and would use it again.
There is a two part system, called Magic Water, that I have heard good things about, but I haven’t used it.so can’t provide info about its use.
What about trees, what is the best way of making the most realistic tree in a dio?
And is the weather that I said in the last forum, is it correct?
“Finally weather, I bought a weather kits which at first I didn’t know what it was but its some powder set, I practise on another tank but didn’t applie on it so good, How do you applie weather? and what weather would be good for the scene? I’m assuming green (for the foliage that the tank roll over) or weathed brown or dust brown for dirt.”
Keep prcticing with weathering,its a subtle art but with dramatic effect. try to “overweather” with your pastels then “blend” it all togther with a wash or dullcote.you can use an old model and whatever color you have available 'til tour comfotable with the technique then apply that skill to your finished tiger.Keep in mind the time of year your showing(spring ~winter)this will dictate how dark or light your weathering will be. Also check out a construction site using heavy equipment,that may give you an idea of what, where, and how much to weather the mighty tiger.Happy modeling.
I did practice on a body of another tank but it didn’t show as good as I though. I try appling it by a brush but it didn’t stick to it, also, the brush I use was a ox tail bush so the hair just fell off and stick to the tank. Are all weather powder dust, or some come in paint or any other form? Just about any hints on weather apply will help.
Hey t-rex, testors modelmaster has a line of enamal paint with the following colors raw sienna(looks like dry mud),burnt sienna(rust),raw and burnt umber(both look like moist dirt or oil).there may be more but i’ve had good luck with these as well as pastel chalks.obviously the paint can be airbrushed or drybrushed.as an after thought pastels need a rough surface to stick to,i use an eyeshadow brush appropreaited from my wife to apply them,it sometime takes me several “coats” to obtain the look i want.also its a light touch much softer than drybrushing to apply but the pastels will take to the highlights or raised detail quicker than deep crevises.hope this point you in the direction ya want to go happy modelling.
For your trees you have a few options. What scale are you doing too?
Premade trees - Probably the easiest way but also most expensive. Also they may be premade but still not look the greatest and usually require touching up. Painting of the trunk and highlighting the foliage.
Tree kits - Not as expensive. These are just bare tree armatures that you add foliage too. Theres many companys that make them. Supertrees by Scenic Express has some really nice kits but are more model RR suited as you get HUNDREDS of trees and it costs more than other kits. Check your LHS and you can find many tree making materials. Its mostly just clump foliages, lichens, polyfibre, and “fine-leaf foliage”.You also need a good glue to work with. A very high-tack glue. I sometimes use superglue or a low-temp glue gun.
MAKE YOUR OWN - By far the best method, and the one I use the most. Go outside on a walk and pick up twigs and branchy looking plants. Go out into the garden and look at the plants and pick ones that may suit your needs. Use twisted fine gauges of wire then paint over them with some sort of mix of plaster/flour and water/glue then paint. For foliage you dont have many options other than going to your LHS and buying different types. I highly recommend Woodland Scenics “fine-leaf foliage” although you will pay a bit more than for regular foliages. Use fine scenic turfs colours such as burnt grass, yellow grass, and various shades of green to highlight. Sprinkle it on top sparingly.
It all depends on what kind of trees your trying to model, your scale and your season. Check out this site for scenery help. Its a model RR site but its great for that kind of stuff. You can find all sorts of tutorials on it and by using google or asking around at hobby shops.
I only know one way of doing home made trees, start by finding twigs and small branches and cover the tip with liquid glue, them place them in static grass, wait till there dried then spray the leaves with forest green, (depending on season) finally the trunk is color brown. simply pock them in the base before the grounds work dries, or make a hole and drill them in place.
Its the grass the problem, I can’t simply place static grass over the grounds work, its too small, it will look too fake, it needs to be longer and more notice (if you know want I mean).
The scene is supposde to be the battle of kursu, I’ll do my best on it.
Ok, now its time to start on it, I bought a wooden base, styrofoam, plaster and some bushes and static grass, I’ve also got some earth brown acylic paint and a new air compresseur to help me out. I still need some groundswork but I don’t know what it is or where to get it? didn’t see it at my hobby shop. I do have a weather set which is powders dust, and there is a color call dirt brown, if I applie this well it will make a realistique dirt for the scene. Any more advise.
I dunno using weathering powders for ground cover is a good idea if you have a large large amount and money isnt an issue, but mostly save it for your models not ground work. It comes in small quantities and is pricey to cover a large area probably. If you have a paypal account you can buy scenery supplies off this site for cheap www.cchobbies.com . Or you can ask your LHS about them. Most hobby shops carry ground work materials. The main company is Woodland Scenics for scenery materials and Scenic Express. You can also try sifting dirt, although it is a good idea to bake your dirt in an oven to kill the unwanted. Be sure to remove any wood particles from the dirt before hand. The baking kills off germs which live in the dirt which could be hazardous to your health. Also old cushion foam can be ground up in a blender with water and dyes or paints to make your own ground foam. The advantage of this is you get your own variety of colours and its WAY cheaper than buying it plus you get a lot more. There is also spices and herbs which can be used sparingly for accenting you scenery. Break open some tea bags and spread around for fallen and dead leaves. It works great because (surprise, surprise) ITS DEAD LEAVES. These are just a few suggestions theres many many options. If you give me specific questions as to what you want to model such as fresh soil, dead grass, sand, dirt just ask and we can give you a more specific answer on how-to.
I think that the Kragenspiegel is the SS unifrom or part of it. The SS was Hitlers elite Panzer arm. The SS were “loyal” fighters that were charged with commiting war crimes. The Malmedy Massacre, the French town, And numerous atrocities on the Eastern Front. Just google it and you’ll find a ton on them.
That is really a biased answer. The SS were considered elite fighters who were used for special missions and standard combat operations. They committed no more or no less atrocities than any other unit. They were the German WWII equivalent to Army Rangers or NAVY SEALs, etc.
I think I know who they are now, they have a unique camo uniform, but the figure aren’t the SS, its mostly the Enviroment that I was trying to replica.
Now back to the tiger,
There’s has been a few change in plans.
First due to failer of camo I can’t get it right the tiger can’t bet in a fegitaqted enviroment like my picture.
Second right now the tiger is in north afican campaing outfit, which is just dark yellow, but it won’t be a supreme dio in the middle of a desert.
What could be simpler and better is just paint him one last time in german grey and converd it into a early tiger in a german town, but if I add another coat of paint it mit ruin it even more.
What ever outfit it would have would madder which scene it goes. So far I have the wooden base and I’m cutting the styrofoam for the hill, but what can I use to stick that all to the groundwork, Plaster mixte with white glue?
Desert dios can be better than others. It doesn’t matter what setting it is. Its the skill. I like desert dios because they draw attention to the focal ppint. The tank. putting another layer of paint on would make it look thick. You should remove the paint if you were going to do that.