Hello ,
I have the excellent Dragon Tiger II , with the Porshe Turret , premium edition kit . I can’t do zimmerit very well . So is there any after market zimmerit for this kit ? Or how would I make it into a prototype with no zimmerit ? I have seen pics of protoypes ( ? ) , and it looks like the front fenders were similar to a Tiger 1 , and others with no external stowage . Thanks in advance .
Frank
" PERSEVERANCE "
There are several companies that made aftermarket zimmerit;
-
Eduard (PE)
-
Verlinden (PE)
-
Atak Model (Resin)
-
Cavalier (Resin)
I never tried either one of those, but people said that the Cavalier and Atak is the way to go.
Ben
PE is the cheapest and sadly the quality proves this. Many say it’s too uniform and lacks depth. I’ve done the Cavalier and really like it. It sometimes comes with additional resin parts like gun mantlets. Cost is usually under $20. Atak is really good, but more expensive, up to almost $30. Always give ebay a shot.
PE zimmerit requires you to putty in the seams anyways – plus they can’t simulate the curves well at all – I’ve seen photos of Eduard’s PE for vehicles with glacis MGs. It’s attempt over the hull kugelblende is laughable – something you’d do at your kid’s Sunday school craft – a flat piece of PE with radial wedges cut out, designed to fit over the rounded kugelblende – with its seams for everyone to see. I don’t see how they in good conscience can even sell that thing.
Here’s an image of their set for the DML Jagdtiger
http://www.eduard.cz/images/images/product_sheet/3341_1.gif
At least I know that Lionroar gives you a resin bit for their 1/48 PE zimmerit. I can see how that would work. Otherwise, go with the ATAK or Cavalier
I realize that you are looking for convenience, but IMHO, the issue with ALL the AM zim sets is uniformity. Zim patterns are similar but really unique vehicle to vehicle. Market saturation has now produced the condition we see in onboard stowage. You can actually pick out which set was used…your tank looks like the next and so on. The only remedy is to “chip” the resin zim or go with the generic sheets offered by Cavalier and cut your own…still the pattern is cookie cutter.
I think you would be far more rewarded by making your own, either with polyester putty, mili-put, or by my chosen method , the hot iron. Just makes for a realistic model I think, and a one of a kind presentation that cannot be considered “replicated”.
If you practice a little bit, you will see that home grown zimmerit is relatively easy, and very satisfying personally.
Just a thought…


By the way, if you are interested in depicting one of the T2 prototypes, it should have the exhaust (similar to the T1 type) shown in my pic above. I scratch built mine using T1 parts from the spares box…there were a few service vehicles in the 503rd delivered with the very early exhaust.
regards,
Steve
No they should not. V1 and V2 which are the only Tiger II’s with “Porsche” turrets that didn’t have zimmerit, had exhausts very simmilar to the ones that were used on the later versions except on V1 the ends were not bend so much as on the later versions but pointed more upwards, and V2 had exhausts with test ports to meassure exhaust pressure and temperature.
Here is a drawing of V2 seen from the rear, note the exhausts.

And here is a picture of that special looking exhaust system.
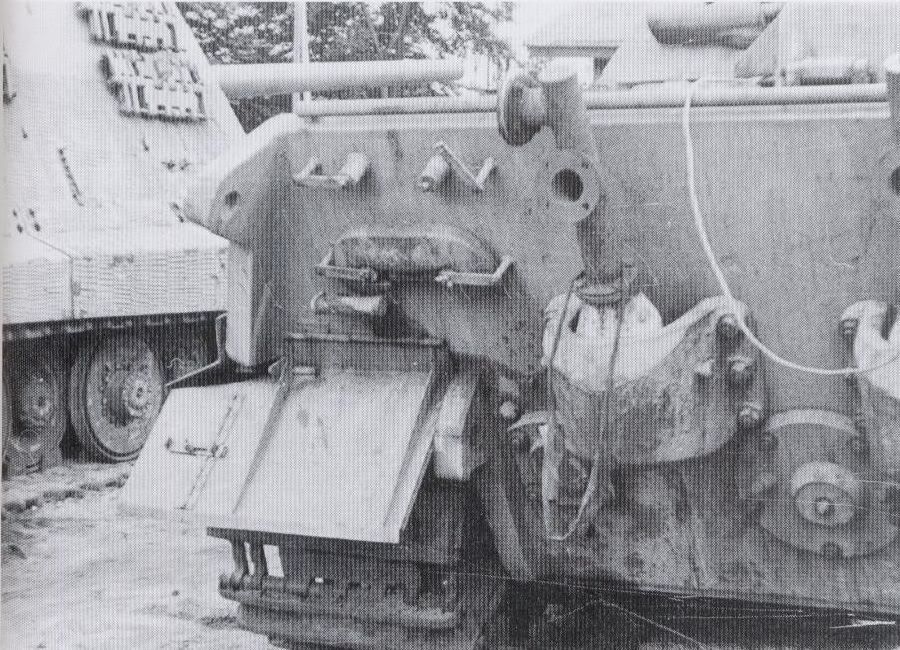
Both had a single piece gun tube and an armored cover over the snorkel on the engine deck.
Both had front fenders that ressembled those of the Tiger I.
Both had Gg24/800/300 tracks and 18 tooth drive sprockets.
On the left side of the turrets, under the comanders cupola a pistol port had been deleted so there was a big circular weld seam.
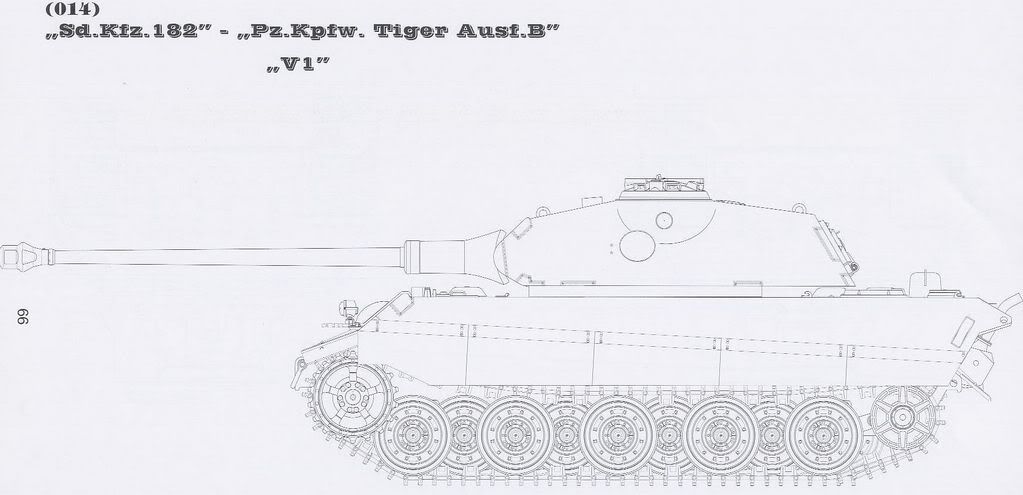
Here is drawing of V1 seen from the side, note the big weld seam on the side of the turret, the big armored cover over the snorkel on the rear deck and the exhausts that point slightly upwards.
i an new to zimmerit also, and i have the king tiger premium edition, which also requires the application of zimmerit. check out www.ausfworks.com tamiya has a zimmerit tool that you use with apoxysculpt. its very simple to use, although i haven’t used it yet, it seems really easy to use, and i went ahead and bought it. i think you might find that applying it with this easy tool is beter that applying PE that looks to uniform, or hand appliction with is too difficult for us beginners. just check out the site. you’ll like it.
Wow thanks for this information…I guess I’m dead wrong. It doesn’t seem logical that the few “porsche” turreted vehicles delivered to 503rd would have this unique exhaust?. I thought it was a prototype/early feature that was changed during early production. It would be interesting to find out why these exhaust configurations were produced in the first place. Thanks again for these excellent references.
regards,
Steve
Zim on the side skirts of the JagdTiger?
Hello ,
Thank you all , for the wealth of information . Very much appreciated . Alot of great info on the actual vehicle , aftermarket zimmerit , and how to do your own . Very helpfull indeed ! For TMN1 , the only JagdTigers with zimmerit were the ones with the Porshe Suspension ( I don’t know if all of them had it ), as for the side skirts , from photos , the zim appears to be applied
Frank
" PERSEVERANCE "
P.S Crocket , the pic of the V2 , and drawings . They are very helpfull . The King Tiger ( Porshe Turm ) , in The Tank Museum , at Bovington Dorset , England , has the same type of exhaust . All the time I thought this exhaust was added after the war , by its new owners . Thanks again.
Well I never said anything about the Jagdtiger … they don’t interest me. I did show you some drawings though, these can be found in Waldemar Trojca’s books “Sd.Kfz.182 Pz.Kpfw. VI Tiger Ausf.B Königstiger” Vol 1 & 2.
The tank in bovington IS chassis # V1 !! But don’t use it for reference. Al sorts of things on this tank has been replaced after the war including the tracks which are Kgs73/800/152 which were found on another tank at the Henschel company’s testing ground.
The type of exhausts that crocket is talking about appeared on chassis #V3, the last of the test vehicles/prototypes. However this was also the first vehicle with zimmerit.
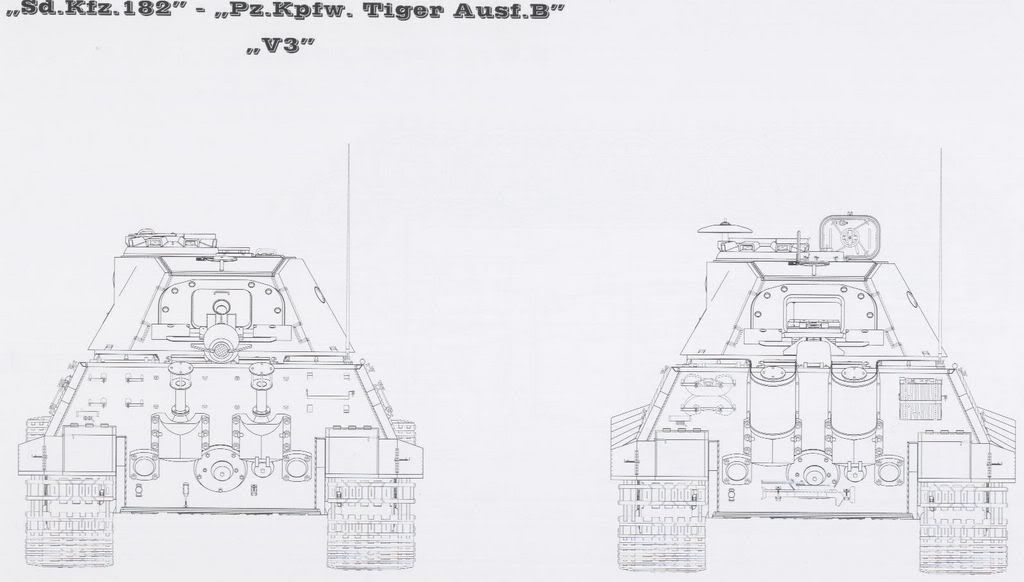
Here is drawing of the rear of V3 with and without exhaust shrouds. Again note the aromored cover over the snorkel, here shown in both opened and closed position.
As is pointed out V3 and at least one other Porsche turreted vehicle IMHO were fielded with this exhaust. There is a clear photo in Tigers in Combat 2 that shows this tank, the basis for my model. I made the error of assuming V1 and V2 were the same, but, as shown, that was not correct.
Steve