Growing up, we mostly listened to what my folks listened to, which was country western of the day, with artists like Johnny Cash and Charlie Pride. Later when I was given my own AM pocket radio I found popular music of the late 60’s and early 70’s. When I eventually was given an FM (Stereo!) radio, did I discover a whole different world of Floyd, Zeppelin, ZZ Top, and more!
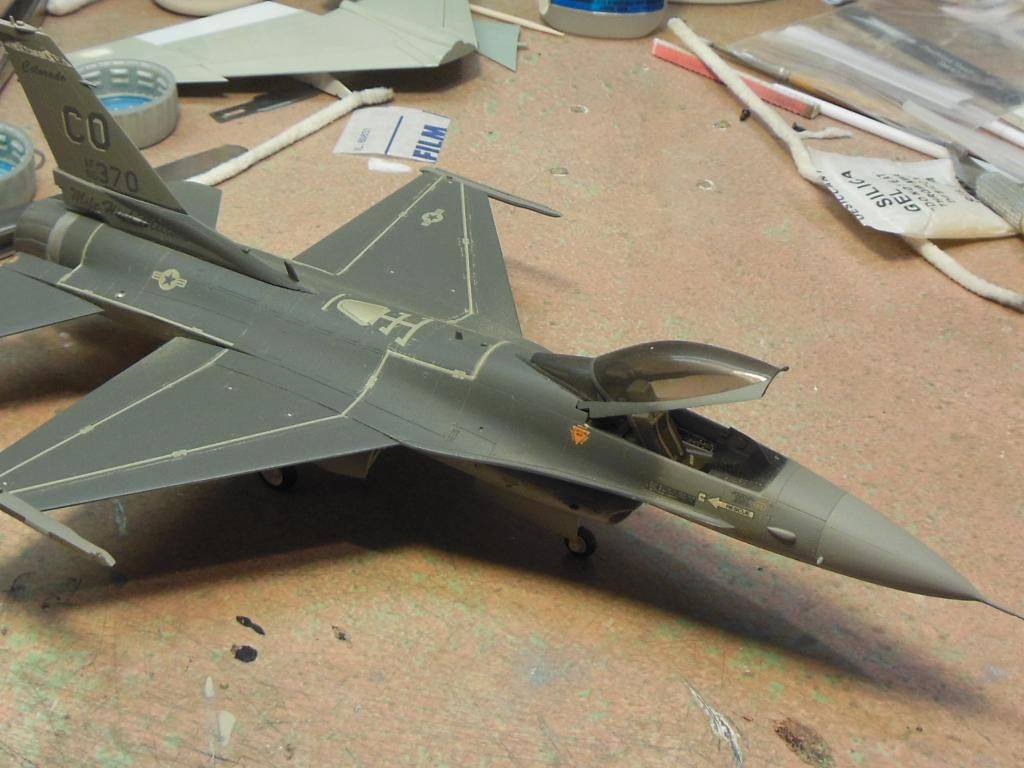
I remembered to get the pics of the painted F-16 last night. I followed the Hase FS codes which I found confirmed by a couple of sights. But the contrast between the darker grey and the lighter on the tail and forward fuselage is not as vreat as all the pics I have seen seem to indicate. This didn’t become apparent until I had taken the mask’s off and I could see both colours. I can only assume that the Xtracolour FS 36270 is to dark. But I decided to leave it rather than re mask everything, but I will keep this in mind for next time.
I have also taken the canopy off as I noticed at the last minute that the instructions call for the canopy to be tinted. On doing a search, I found a suggestion for mixing some Tamiya smoke with future and spraying it on the inside. I plan on practicing on an old canopy first just to make sure my mix is not to dark. But apartt from those issues, everything else seems ok. I have started on the decals which should be done tomorrow night.
Bish, it’s hard to tell from the photos and the fact that the paint is glossy just how close the colors are.
This is an old HAS F-16C I did way back when I first started back into this hobby. The kit called for FS36118 and FS36270. I used MM colors. This kit is complete with yellowed decals, some of which are silvered! I struggled with decals then.
For the tinted canopy I used thinned Gunze Sangyo smoke sprayed in several coats to the inside, spraying each coat to be slightly “wet” and allowing a few moments between coats to dry.
As you said, I would test it before you spray your canopy. I have sprayed both Tamiya and Mr. Color “clears” just thinning them for airbrushing and did not add Future. Just don’t overdo it as I have several times and had to redo it.
Looks great Bish, as Jim said considering that the gloss makes things look darker I think you’re fine with what you have.
The ‘smoke’ is pretty easy to use, as Jim said too just go slow so you don’t build it up too fast. If you do rubbing alcohol will remove Tamiya paint even when dry.
Jim, looking at yours, n=mine might not be that far off. The FS colours I used is the same. You are right, the gloss doesn’t help especially in the pics, but it distorts the real thing as well. Decals are almost done, I forgot how many there are on these modern birds.
Thanks Gamera and thanks for the tip. I think I will get to that on Sat as its a bit to cold and damp to be spraying Acrylics in the evening.
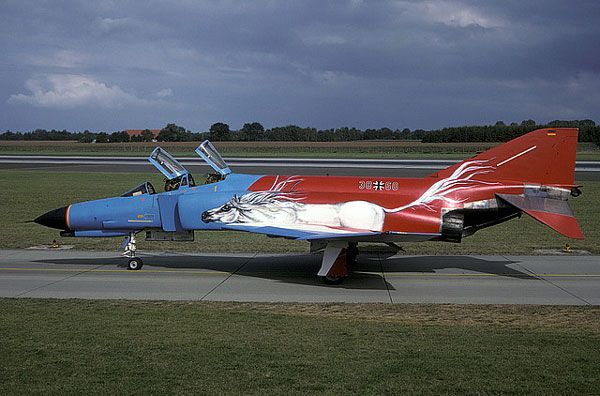
Weeeeeeelllllll, you guys have worked the Century Series whammy on me, a guy in our club was thinning out his collection - never seen him build anything but armour so I don’t know why he had this but I ended up picking up this for five bucks…
Thanks guys, already looking for replacement decals. Wish I could find a sheet for this one, might have to go for something slightly less gaudy though!
I got the decals finished and then added a flat coat this weekend and this is where things have gone a tad downhill. I have been using Microscale varnish for years, and despite a few issues now and then have stuck with it. Until a couple of years ago all my painting was done in a warm room. But then I moved everything out to the garden shed and this seem to cause problems especially in the winter. I can only assume its down to the cold but after spraying the varnish dry’s to a chalky white finish.
After this happened the first time, I took to only spraying varnish earlier in the day to avoid the night cold, but I guess today must have been really cold as it did it again. I have managed to recover some of it by polishing over it and then brushing on another varnish coat in the warm. It has helped a lot, but this, along with the other small issues in the past, has now convinced me to switch to another varnish, namely Alclad.
Hopefully the washes will improve it a bit more, but this isn’t going to be my best finished build ever that’s for sure. The contrast between the two greys is still not great, but that’s defiantly a lesson for next time. So, after my poor excuses, here is where she sits now.
I am rather pleased with the cockpit tinting, it may be a touch to dark, but overall I like it and the future dip leaves a really nice finish. But I will be glad to get this one out of the way.
Bish: She looks good in the photos but I think I can see a little frosting. I’ve had the same issues myself, don’t know if it’s the weather or what. I eventually switched to Alclad flat too and so far (cross your fingers) haven’t had a problem.
Very sorry to hear the news about your build. [:(] I can see some of the frosting in the pictures. Hopefully it will clear up. Other than that, it looks very nice.
I thought I would ask everyone’s opinion here, seeing we have a good number of you with a vast more experience than me.
I recently read somewhere that the Gunze Sangyo Mr. Mark Softer Decal Softening Solution is easier to work with than the Microscale Micro Sol. From what I read, it works slower allowing you more time to get the decal positioned correctly. Anybody here have any experience with using this product?
Believe it or not, I have actually did a little work at my bench! [:O] I painted the instrument panel of the Tamiya Mitsubishi A6M2 Zero with Future. The kit comes with a decal for the instrument panel, and since I had already painted the panel with flat paint, I needed the smooth surface for the decal.
Thanks Ken, but the Revell kit I picked up is 1/48th and those are 1/72nd, I’ll keep looking. I’m sure they did 1/48th too and I’m not planning on building her anytime soon anyway.
And I’ve used both the MicroScale setting solution and Gunze and to be honest I can’t really tell there’s any real difference. The Gunze is a one step process so it might be a little less trouble but I think the Micro works a little bit better. Still it’s only a small difference as far as I can tell.
The Gunze might work slower but I’d think you’d get the same result from just using the blue label Micro product, I use it to move the decal around and then hit it with the red to ‘lock’ it in place.
BTW: I got the Wildcat back out this weekend and laid down the underside colours this morning. Hopefully I’ll have her masked tomorrow night and put down the upper paint sometime the middle of the week. I’ll see about taking some photos then, not much to see right now.