Xradio- she’s coming along nicely. Good work!
O- Maybe the ‘O’ should be for ‘ordinance’! Looks so good it’s a shame to mount it on the bottom of the plane where it’s harder to see!
Xradio- she’s coming along nicely. Good work!
O- Maybe the ‘O’ should be for ‘ordinance’! Looks so good it’s a shame to mount it on the bottom of the plane where it’s harder to see!
At last! I made some progress on my modest Fujimi -J this evening, assembling the fuselage after spraying some cockpit grey earlier. (While I was at it, I pulled a Fujimi F-4E off the shelf and prepped the cockpit too, just in case I get a chance to do an xtra one before the close date.) I really didn’t fancy the kit seats so I pulled out some True Details MB-7s from my AM drawer and will drop those in, possibly adding trhe faceshield pullrings of the kit parts, as the resin seats omit those details. The control sticks are nowhere to be found, they must have disappeared somewhere on my bench long ago, but as the canopies will be closed, it’s not much of a disaster. I would have been leaving the rear one out anyway, as it’s a Marine plane. I’ll be adding AM stencils and markings, plus AM weapons sets, and possibly wheels
WIP photos before long, probably as I get the seats ready, and of the stages of assembly and joint dressing that will be needed in the next few days. The good thing about the Fujimi engineering is the cockpit assembly goes in from the bottom after the fuselage is closed, complete with the nosegear bay in one unit (which means there are side seams to fill…) and the seats can be dropped in at a much later date, through the top before mounting the canopy.
There have been some tremendous builds here, some great engineering and some great artistry, and I’m really proud to be instrumental in bringing this lineup of talent together!
(Hanging head in shame) I know, badges… I’ll really, really try to get them ready tomorrow!
(Saluting) Gentlemen, carry on.
Mike/TB379
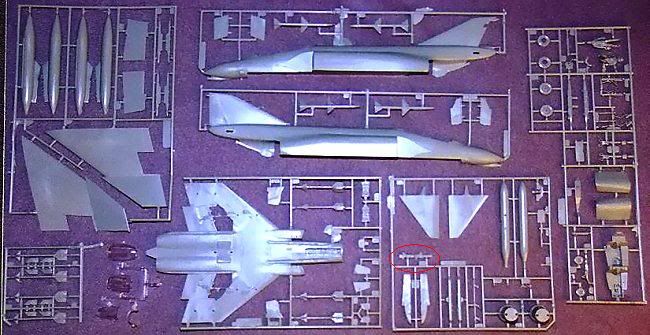
oortiz10, that is the wrong centerline pylon to use for a MER. You need to use the short one. There should be one included in the kit.
Caribwill - great phinish! I really like the look of those markings (have the same boxing). Did the Hasegawa decals lay down alright for you?
Didn’t realize the end date wasn’t until the end of June. Hmmmm. Wondering if I can squeeeeeze something in before the deadline. [^o)]
Aw, fiddlesticks!
Oh well, I’m not gonna bother with it now. Thanks for the heads up berny. Hey, I have a USAF -C in the stash that will have a TER hung along the centerline. Can you give me more info on which is the correct pylon to use? I’ll make sure I get it right on that one.
Thanks!
-O
Sorry I don’t have a better picture. Unfortunatly, I sent my last spare centerline pylon along with several MWA’s to another forum member a couple of years ago for one of his builds. The correct pylon is outlined in red below
Well if you should run over it’s not like you’ll be getting fined or anything [:D]
Jump in, the waters fine!
I know, I just hate committing to something and then not being able to produce. Trying to see if I can juggle the build schedule around enough to accommodate a Phantom sometime in the next 6 weeks. Hmmmm.
I just ardered that AM kit after reading Old’s new biography…good reviews for the most part, except for the nose pylon, which seems like an easy fix…I was impressed with the review pics of the “pit”…
The RM F-4C/D kit is very nice. The cockpit is for the F-4C and to make a F-4D the cockpit will require some work. What is the problem with the ECM chin pod? Their 1/48 scale kit has the correct pod for the F-4C with a small section to add to make it a F-4D chin pod.
Dupes – come aboard, my friend, six weeks should be enough to crank out a respectable Rhino!
I’ve made some progress on my Fujimi, here’s the cockpit. The seats are not yet installed, they’ll go in through the top later, and Superscale (72-164) instrument panels have been applied to the featureless Fujimi plastic. These were better than the panels on the kit sheet, which look rather like blobs of black…
!(http://i301.photobucket.com/albums/nn48/MikeTheModeller/Fujimi F-4J/DSCF5772a.jpg)
!(http://i301.photobucket.com/albums/nn48/MikeTheModeller/Fujimi F-4J/DSCF5773a.jpg)
Okay, the grey is a bit too dark, but I wanted to get the job done, and especially in nontoxic acrylic. I should have lightened it a bit further. Still, with closed canopies it’s probably enough that there are grey and black in there at all! The True Details seats will be completed separately, then their bases ground down until they’ll fit under the canopies. I had to do this with the seats I added to an old-tool Hasegawa back in '03, the last Phantom I did, and which appeared in FSM that year.
The instrument panels are completely the wrong shape, of course, but as they’re going to be almost invisible under the shrouds I decided not to muck about. When the decals were dry I trimmed the excess area flush with a blade.
The cockpit has now been added to the assembled fuselage, and yesterday I sprayed the inlet ramps and intake interiors white. The fuselage spine has needed some attention with filler, including some sink marks over internal alignment structures, and I’ll need to rescribe the lost panel lines. Not sure about trhe tank fillers, I might find a different way to do them, maybe as a marking. The underside component that the cockpit sits down on features the nose gear bay, much like Hasegawa’s engineering, but the fit is going to take a lot of dressing. More pics when this stage is done and I can get on with mounting the intakes and wings.
Cheers, Mike
Looks good to me Mike!
I know what you mean Dupes, I signed on to five GBs and have a pile of stuff left over from 2009 that I still need to finish. Hopefully I’ll be able to finish my F-4EJ and two other GB before the end of the month. (cross your fingers)
Still would love to have you and Manny join us.
Thanks, Gamera!
Okay, gentlemen, three badges are now available on the lead page, you may take your pick as your builds mature to the rollout point!
Caribwill, your RF-4B has taken pride of place as first finished on the roll of honour!
Let’s see some more Rhinos reach the finish line, there’s six weeks to go and many builds progressing!
Carry on, men,
Wing Commander Mike/TB379
Mike, that is a big improvement from what it was!!! They look like an IP thats what matters.[t$t]
Thanks, Richie! The cockpit is in, seams filled and dressed, and I fitted the wing subassembly this evening. Intakes tomorrow, with prelim masking already installed, then I can get all the seams bogged up. The Fujimi Phantoms do demand some fit-refinement and a lot of seam attention, otherwise they’re a pretty straightforward project. I look forward to doing a Hasegawa to compare it to.
Cheers, Mike/TB379
|  |
|
| - |
|  |
|
|  |
|
|  |
|
|  |
|
|  |
|
|  |
|
|  |
|
In recent years, Accurate Miniatures has been releasing other companies’ kits in their own boxes including Eduard’s 1/48 P-39 Airacobras, Special Hobby’s 1/48 F2G Super Corsair, Revell’s classic 1/72 aircraft, and Eduard’s beautiful 1/48 Fw 190F-8 kit. This release features Monogram’s 1/72 F-4C/D kit - let’s take a look.
The kit is molded in gray styrene and presented on six parts trees, one additional tree of clear parts, and one resin ECM pod. The tooling is older generation, which means that the panel lines are raised and there is a hint of flash here and there. The way this kit is laid out, it is clear that the tooling was designed for a number of their 1/72 Phantom releases and provides you with some nice parts for other projects.
While there are a variety of Phantom variants supported by the Monogram parts trees, the one absolute is that this is an F-4D kit. For whatever reason, Monogram opted to mold the chin pod to the underside of the radome. The F-4C chin pod housed an infrared search/track set while the F-4D chin pod housed a radar warning receiver, resulting in a different shape:

F-4C IRST Chin Pod

F-4D RWR Chin Pod

Kit Nose
The difference in shape is not significant, you’ll need to do some sculpting/reshaping of the chin pod to backdate this kit to an F-4C. Also note that the instructions are a little vague here and there which is okay for the most part since the F-4C and F-4D are very similar, but beware of the LORAN antenna (part 44) as this was only used on Pave Phantom Block 32 and Block 33 F-4Ds (no F-4C received the LORAN and only 72 F-4Ds were so modified - as always, check your references).
What kind of details are inside this box?
External stores options include:
Decals are provided for nine aircraft:
As indicated above, straight out of the box, only one of these markings apply to the kit, Chuck Yeager’s F-4D from the 4th TFW. If you don’t care about the chin fairing or choose to resculpt the fairing back to the F-4C, then you have some dynamite choices here. If you’re careful, you have enough markings in this kit to complete perhaps four aircraft.
Overall, this is stil a nice kit of the early USAF Phantom II and features some nice air-to-air and air-to-ground loadouts and enough detail variations to make this kit interesting. This kit has been off the market for a while now and it is nice to see it available on store shelves once again.
Thanks to Accurate Miniatures for this review sample!
That looks like a real nice kit. From my understanding, Monograms decals were the weak point with this kit. If I can sneak it past the wife, I’m thinking about buying the F-4J version of this kit. Unlike the 1/48th scale version, it is supposed to have a proper Navy/Marine cockpit.
Hmm… I wonder if the Eduard pe set would or could be made to work with it?
Cheers,
Greg
OK, Manny, I see what you mean about the chin dome. A file and sandpaper will fix that problem if you want to build the F-4C. The commentary is wrong about one thing. It was not an IRST on the F-4C. Only the F-4A carried the IRST sensor, with the chin dome on the F-4B/C/D housing ECM gear. The reason the F-4D had a different shape was it had a different ECM with a larger processor housed in the dome. Also they were always called chin domes rather than chin pods. Never trust a civilian to get anything right. [:D]
Progress to report, gents – the intakes have been wrangled today. First I painted the inside faces with acrylic, a 1:1 mix of flat and gloss white as I wasn’t sure of my drying times or finish. It’ll be pretty much invisible, which is why the back wall of the intake trunk was crudely brush painted. The edges of the inlet ramp parts were then stripped to allow for gluing, and were mounted with liquid cement (there are no positive-alignment pegs, you’re on your own):
!(http://i301.photobucket.com/albums/nn48/MikeTheModeller/Fujimi F-4J/DSCF5774a.jpg)
!(http://i301.photobucket.com/albums/nn48/MikeTheModeller/Fujimi F-4J/DSCF5775a.jpg)
Then I masked the edges around the lips with 6mm Tamiya tape, which will stay in place until all exterior painting is finished:
!(http://i301.photobucket.com/albums/nn48/MikeTheModeller/Fujimi F-4J/DSCF5777a.jpg)
And finally mounted the intakes:
!(http://i301.photobucket.com/albums/nn48/MikeTheModeller/Fujimi F-4J/DSCF5778a.jpg)
As 1:72nd scale Phantoms go, the fit of the intakes is pretty good, I’ve never known a Phantom kit yet that didn’t have issues around these parts. Note the gap at the wingroot: there was no positive alignment for the set of the wing and I got a fair gap to port, much less to starboard. My next big job is to fill all the joints around the intakes and wing, and when that’s done, rescribe any blurred out panel lines. I certainly couldn’t save those details if it was a raised-line kit. Then I can add small parts, gear doors and such, and turn my attention to the seats and canopy – and before you can blink it’ll be time for paint.
Berny13 – the kit has slotted stabilators. Is that correct for the -J model? I clipped a short, raked-back antenna on the aircraft’s spine as I was unable to locate any reference photos of -Js with this feature except for one early example which was a rebuilt -B (-J prototype???). This model will depict probably a mid-production airframe, though I’m not sure exactly when, the markings are definitely pre-1973, but by how much I don’t know… (Thumbing through books…)
Cheers, Mike/TB379
Yes, the F-4J did have the slotted stabs. Will yours have the RHAW fairings on the side of the intake?