Hello all, since I’m in the home stretch of probably my most challenging build to date, the 1/48 Eduard FW 190 D-9, I’ve decided I needed a “therapy” build. I figured an easy painless build, such as the 1/48 Tamiya P-51D, would fit the bill rather nicely. Over the years, I’ve built 8 of these (several on commission) so I’m aware of its strengths, such as outstanding detail, droppable flaps and excellent fit. I’m also aware there is room for improvement, like the simplified cockpit and lousy two piece canopy design. I figure on this one, I’ll keep with the simple theme by adding a PE set to the cockpit and maybe a True Details replacement seat, both of which I already have. I’ll probably get some Ultracast wheels and use either a spare Hasegawa canopy or a Squadron vacu-form canopy. I’m still up in the air on the scheme, but I’m leaning towards a 78th FG bird.
I’ve had the notorious chrome version in my stash for years, but I’ve never had the guts to give it a go until now. Although on paper the chrome plating sounds like a cool idea, eliminating the NMF step, however, my research indicates that it actually makes for a harder build. I’ve read that the chrome plating won’t take to paint and the seams will not seal with styrene glue. Apparently they pop open regardless of the glue used. Neither is conducive to scale modeling so its generally accepted that its best to strip the chrome. I’ve heard of people using anything from oven cleaner to bleach. I’ve also heard of less caustic options, such as cleaner/degreaser(s) like Super Clean and 409 like applications. I decided to go with an all purpose cleaner/degreaser called “Simple Green”, which I got at Wal-Mart for $6.00. I figured it would work too. I put the sprues into an old cat litter container (clean of course) to soak for a few days. Stay tuned for an update on whether this was successful.
It should work Joe. I used Simple Green to remove the chrome plating from my Tamiya MiG-15. iirc, I let it soak for a day or two, and seems like I used an old toothbrush to “help” it along. Good luck! Like you said, I couldn’t see how a modeler could build one of these without needing some seam work somewhere and then your chrome would be toast. Besides, a “chromy” Mustang? What’s up with that?[:D]
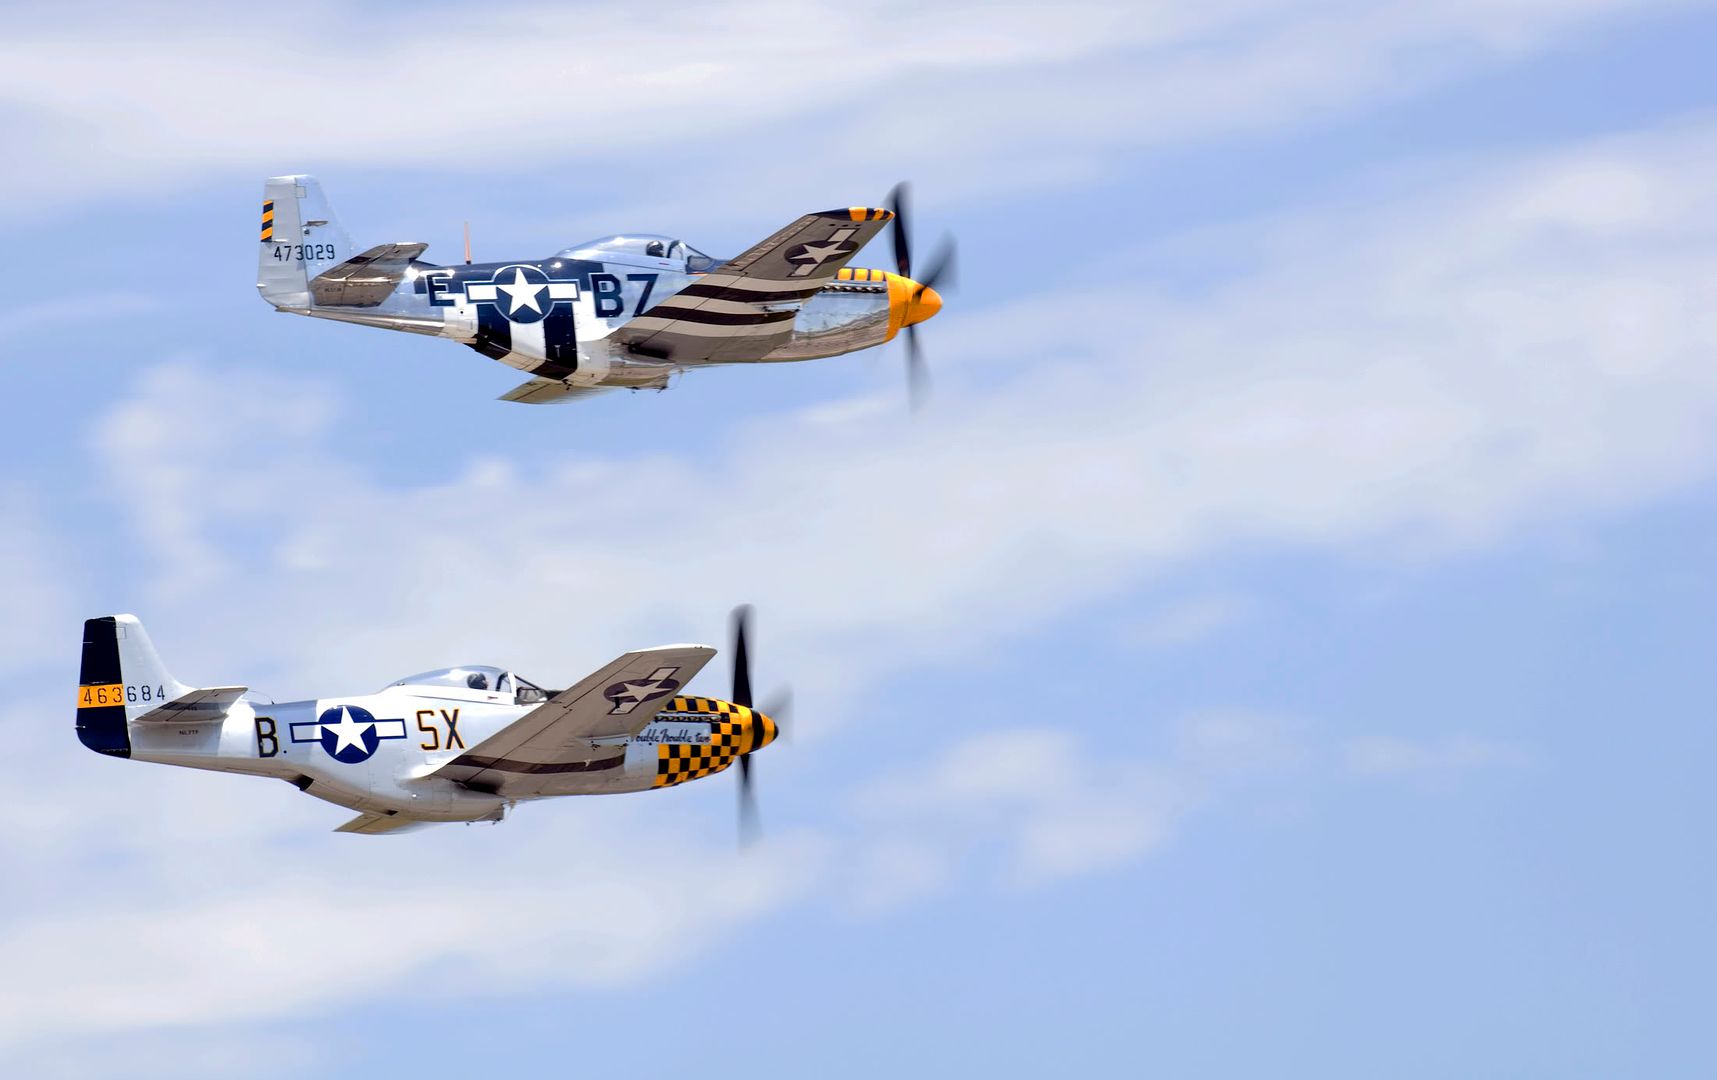
Well, here’s a picture I took at an airshow, a few years ago
As you can see, Bald Eagle definitely has more of a “chrome” finish, when compared to Double Trouble Two, which has more of a painted aluminium finish.
Maybe the tamiya kit wants you to buils a show bird, rather than a warbird. But, considering the finishing work you need to do, a pre-chromed kit does seem fairly ridiculous - unless it’s aimed at kids, who aren’t going to worry about seams.
Simple Green should work fine. Give it about 2-3 days, then all it’ll need is a light scrubbing and a really good rinse. I went that route on my 1/12 Tamiya Virago before it got the Alclad II treatment.
Soaking it in Windex for a day or two will also dissolve the chrome plating- I’ve done it and it works well. I don’t understand why anyone would build a chrome plated kit. I think the statement that they are meant for kids who aren’t going to worry about filling seams, etc. is the answer.
Maybe if you used a cat litter pan with a pinch of cat widdle added to the Simple Green it would help it along! ;<) I’ve also heard of using brake fluid to remove chrome. But you’re probably on the right course with less drastic methods. Good luck, and I hope everything turns out well.
Hello folks. I’m stopping in for an update. The Simple Green worked great after a three day soak. All it took was an old toothbrush to get the milky yellow goo off the parts after the chrome dissolved. The “goo” must be some barrier between the chrome and plastic. Interestingly though, the two main sprues were two different tones of grey plastic. One was a tanish grey and the other the normal Tamiya-like light grey. I would have taken some pics of the process, but a lot of the parts dislodged off the sprues when I scrubbed them. I started painting the cockpit and True Details seat, but then switched gears to the wings guns.
A week or so ago, I was checking out Doog’s Blog and saw the tutorial for replacing the 50 cals with brass tubing. I concur with Doogs that the kit examples are c[cnsod]p…er atrocious and up until now, I have been carving out the kits pathetic examples and replacing them with Quickboost 50’s. I would then just drill out the inboards which were visually different than the outboard 50’s. I believe this was because the weapon itself sat further into the wing. It seemed that Doogs’ idea of using Albion Alloys brass tubing would be more cost effective, and would finally address the inboard gun issue. I ordered the tubing from Sprue Brothers, the multi pack “slide fit” packaging, and gave it a try. I drilled out the kit guns then glued together and sanded the wing edges, paying the most attention to the gun area(s). I left the trailing edges unglued for strategic reasons. I then used the 1.0 and inserted the .8 mm size inside. I loosely followed Doog’s instructions and was speechless (rare) on how good it looked. It took some test fitting and I ended up pushing a few too far in, but since I left the trailing edge unglued, I could push the piece all the way out to bounce harmlessly on the bench and try again. One in position, I spot super glued them in place (a little glue on the tip of an Exacto). Once it was all said and done, I could not figure out why I didn’t think of this myself. Just another reason why joining this forum and getting ideas from others has made me a better modeler. I even used some of the .8 mm tubing to fabricate wing root cannons on my recently completed FW 190. I’ll get to the cockpit soon. Here’s a few pics.
…and thanks Doogs, this one will stay in my bag of tricks.
Looking forward to the build, but I kinda wish someone would tackle the build with chrome on. I’m sure one the uber-builders on this board could knock one out of the park.
Speaking of chrome. I just “dechromed” a Spitfire. I used a very diluted mix of household muriatic acid and water. It was a very diluted mixture because I was afraid it might eat into the plastic as well. But eureka! it worked! Now the parts are showing more detail hidden before by the chrome.
Yes, Tamiya has come out with a chrome plated version of their new 1/32 P-51D Mustang, and added about $60 to the price of the un-plated one, which is a fine kit. I cannot imagine why anyone would want a chrome plated version. I guess Tamiya figures “there’s one born every minute”, as P. T. Barnum said long ago!
I’ve got two in the stash… One Testor’s and one Hawk… The Testors is actually an ex-Hawk kit, they’re identical kits… (Stay tuned for a “Chromed HAWK P-51D Build”, coming soon to an Aircraft forum Near You!)
I also have several of the other “Chrome” aircraft kits that HAWK/Testors released… T-33A, F8F, F-84, P-47D, and theLysander…
The trick to building the chromed kits is is to scrape the chrome plating off the edges to be joined with your X-Acto Knife, or use some sandpaper (sandinf the edges also makes a better bond/weld)… Or, if you get lazy, use CA… It’ll stick metal-to-metal… Model cement won’t… That’s why you scrape… Car modlers have known this for years and years, dealing with chrome parts in every kit, practically…
Any touch-up can be done with Krylon’s “Premium Silver Foil Metallic” rattle-can… It’s the absolute BEST spray paint “chrome” or “Polished Aluminum” I’ve ever seen…
But, and FWIW to anyone, very few operational Mustangs were ever polished… They came from the factory with clear laquer on the skin-panels and for the fabric-covered surfaces, aluminum paint went on, per “Tech Order AN 01-60JE-2- Finish Specifications, P-51D Erection and Maintenance Manual, 25 April 44 (Revised OCT 44)”…
The T.O. also covers all interior surfaces, and leaves any and all paint refs as to cockpit colors from instruction sheets (and a LOT other books, as well as a LOT of posts in here on the subject) null and void…
Hello all. I’m in for a brief update. Work has kept me from the bench but I did manage to get some modeling in last night, primarily the cockpit. I used the superb True Details seat and some Eduard PE on the cockpit, mostly the floor pieces, the trim wheel, side wall pieces, and then the instrument panel. I have mixed feelings on the IP, for I don’t feel its better than the kit part detail-wise. Furthermore, I found that it was tough to get the paint to stick to the etched metal and it was difficult to drybrush for the same reason. Perhaps I should have primed it first or went with the color zoom stuff. If the kit would have supplied an IP decal I would have likely use it instead. To add some interest to what I considered a boring IP, I added that yellow line that runs between the gauges seen on some P-51s. I have no idea what it was there for (anyone know?), but I made it out of slivers of Tamiya tape. I think it looks ok, albeit a little oversized.
I was at my LHS last week and the curmudgeon owner kind of got snooty with me when I inquired about Gunze Paint (touchy subject?). Maybe its just my experience, but it amazes me that some of these guys can’t work on their interpersonal skills considering the LHS is becoming an endangered species thanks to the likes of Sprue Brothers, Squadron, etc. Unfortunately its the only one around so I’m kind of stuck with the tool when I need something immediately. Anyways, one of his more personable employees then tried to sell me on Vallejo Air paints. Being one who is always open to trying new things, he did succeed in getting me to try their example of interior green to see how I liked it. I bought the thinner just in case and a bottle of Vallejo’s dark acrylic wash as well. I wanted to see how the latter compared to my usual wash method, consisting of “The Detailer” pre-mixed wash.
The cockpit was painted with the Vallejo Air Interior Green. I thought it looked thick so I thinned it slightly. The thinner was milky and seemed to change the color slightly. So were already off to a bad start, but I pressed on. On application, I found the paint to be thick and tended to clog my airbrush. I did eventually get it thinned enough to get the pit painted. I painted the rest of the details with Tamiya paints. The P-51 had a rubber coating on the fuel tank so this was painted RLM 66 to simulate rubber. I then ran some solder to the battery. The seat, the floor (in Khaki and Clear Orange to simulate wood) was then painted and it was all sealed with Testors clear coat. Once dry, I then tried the Vallejo wash. Well…any one familiar with the term if it ain’t broke don’t fix it? Well, this stuff looked good when applied, but when it dried it was almost impossible to remove!. It left unsightly brown splotches everywhere. Fortunately it wasn’t fully dry when I removed it from the floor and seat so it wasn’t too bad here, however, the sidewalls weren’t so lucky. They look like s[cnsod]. I almost started over here, but since they can’t be readily seen on the finished product, I decided to leave them be. Verdict?..I’ll heed my own advice and stick with my normal cockpit process…if it ain’t broke, don’t fix it!..[bnghead]. Here’s some pics.
lawdog, I’d say beginning with the seat and aft it looks very good. It’s a little hard to tell from pics on the IP but it seems fine too. I’d say the floor is the softest point but… it’s a floor, so it won’t be seen anywho. Nice work and stick with it!
Thanks Fermis, I always wondered what that was for. Hopefully not a post war phenomenon.
It took me all of ten minutes to get to this point. I’m exaggerating of course, but it was under an hour and this kit is certainly the “therapy” I needed. I didn’t even have any trouble with the lower intake area which I have in the past. I did discover on the waste gate area (albeit to late for the interior) that the Vallejo wash comes off with 91% iso alcohol on a Q-tip. Oh well…I’ll still stick with The Detailer. Time to decide a scheme. Its a toss up between John England’s 357th FG bird Missouri Armada or Urban Drew’s 361st FG Detroit Miss. I will likely built th Armada since I already have the decals.