So I’ve been looking around the site to find an easier way to mask more complex camo patterns. Starting off easy first, Mod Eagle scheme as I have several F-15’s. I have used tape in the past for my F-18’s, but I do not know how to mask the more complex camo patterns of the Agressor aircraft. Any help would be appreciated or a link to a thread thatalready has addressed this subject would be fine too. Thank you in advance for your help.
I use a combination of frisket film and blue tack. If I have a camo pattern in a drawing, I resize the drawing to roughly match the size of the model. Then I reverse the pattern so I can print it on the paper backing of the frisket film. Then its just a matter of cutting out the pattern with a knife and laying it onto the model where you want it. I then roll pieces of blue tack into thin snakes and run those along the edges of the frisket film to give the edges of the painted camo pattern a very slight feathered effect.
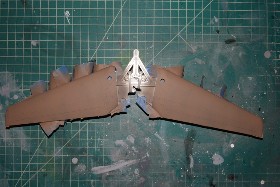
Here are some thumbnails of pics I took during this process on the wings of an F-111E.
I start with the lightest color in the pattern as a base.
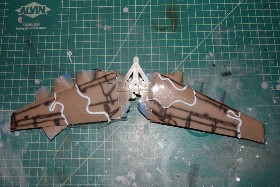
Mask and pre-shade for the next darker color.
Paint next darker color.
Repeat steps 2 and 3 until you get all of your colors laid down and you have a camo pattern.
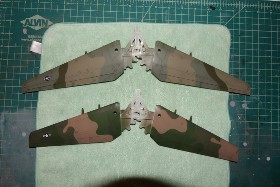
And the finished product with decals, pin wash, and clear coats done. Also have the wings of the FB-111A I’m building in this pic for comparison. Used the same method on both.
Have you considered Aeromask? They send you pre cut masking tape for camo patterns. He has dozens of aircraft in all scales. I just used one on a Spitfire. It couldn’t be easier and the results are outstanding.
I enjoy masking too. There’s something about removing the masking product and seeing the results thats exciting for me. I hate decals. Well, most decals and I’m learning how to mask and paint more items on aircraft.
I’m really becoming a fan of Bob Dively’s Liquid Masking Film, especially for cockpits and ejection seats. So much quicker and cleaner than carefully trimming tiny little pieces of masking tape and then fighting static electricity while trying to get them placed exactly where I want them. I found that I was also able to use it right over the top of decals and it didn’t pull a speck of decal away when it was removed after painting. Doesn’t lift paint from painted metal parts either.
That surprises me a bit. After the in-freaking-credible job you did masking the ejection handles [Y][Y][Y], I assumed the rest would have come as second nature!
I’ve had a similar problem with one of my F-16 cockpits. Its coming out really nicely, but each step of the process of masking with tiny pieces of tape was so time-consuming I lost interest and put it on the back burner months ago. Just had the sudden revelation to try the liquid mask I had bought for canopies on my current (Tamiya) F-16 cockpit and seat. I’m left wondering why on Earth I didn’t start doing it a long time ago. The results so far are amazing…and its easy!! I can mask in minutes instead of hours.
My problem (with the Squadron Haunebu camo and others) is that after spending 20 minutes masking, I discover that I masked the area to be painted.[:'(]
I think we’ve all done that at one time or another. I usually mask with paper templates, and I write on them what to mask and what to paint. On a Spitfire, for example, I’ll write “MASK DARK EARTH, PAINT DARK GREEN.” And if I save the template for future use, the overspray will also remind me.
Never heard of Bob Dively masking film. You airbrush it on, it dries, and you can remove bits with a knife or similar tool? Do I have that right? Looks interesting.
You brush it on and once you get a good technique going, you can get it to flow right up to the edge of what you’re masking. The first coat makes a 100% effective mask, but I go for at least 3 coats before I paint. The reason for that is because the thicker it is, the easier it is to peel off in big chunks instead of little flakes. I let each coat dry about 15 minutes. Once the part is masked and painted, I usually wait for a full cure of the paint and then use a toothpick to lift a corner of the mask, and grab that corner with tweezers and peel it away. Putting a drop of water under that corner makes removal even easier. It sticks to the surface once dry more by just having a vacuum under it, rather than adhesive qualities, so its very gentle to whatever it goes over the top of. Hasn’t damaged paint or decals so far. Worked extremely well for my F-16 seat where I suddenly realized I had applied decals already, right in an area I still had to mask for painting another color. It peeled off the model after I painted and left the decals completely unharmed. So, it can also be a good way of saving yourself from those “didn’t think that through too well” mistakes we all make from time to time. Love the stuff!
I never thought to mask the cockpit. I picked up liquid mask the other day when I grabbed the kits from HL. I’m working on the Revell F-18E since my F-4 Black Bunny is in Knoxville.