I think an Eduard F4F-4. Haven’t done one of these in a while.
1 Like
I told you the differences visually were very subtle “nearly undetectable unless you know what to look for”. That why I was saying not to sweat it……
Even up close to the real thing most people cant see the difference between the -1,-2,-3 until you point them out.
Im tickled you got the right one for your -3 build. I hope to get in there and crank away at mine some this afternoon. I was drilling the holes out in the factory flap and messed them up , i wasnt really liking it anyways as it the material just to thick and that was visible. Im going to have to cut them out and rebuild with some flat stock so it looks more correct thickness wise.
1 Like
Yes, I understood what you were saying about the differences being pretty subtle. The problem was, once I knew it was wrong, I couldn’t unknow it.  And by that point everybody following our conversation knew it too, so I had to at least try to fix it.
Fortunately, a very generous forum member offered to send me the correct part, so it all worked out.
But now you’ve created another problem. I was perfectly happy with the dive flaps until you started showing me how they could be improved. Now I’m going to have to start looking at those more closely too.
Looking forward to seeing how yours turn out!
2 Likes
That sounds like a really cool idea! I’ve often thought about doing something similar with an F-14 coming in for a carrier landing, but I could never quite figure out how to make it look convincing, especially how to support the aircraft in midair without it being obvious. I’d love to see how you tackle this!
save yourself some grief and time, just cut the molded flaps out and glue in some card stock or buy the ed’sred detail set, I don’t have $39.93 plus shipping to get the brass set so card stock for me. I don’t want mine deployed anyway so the detail set would be a waste anyways…
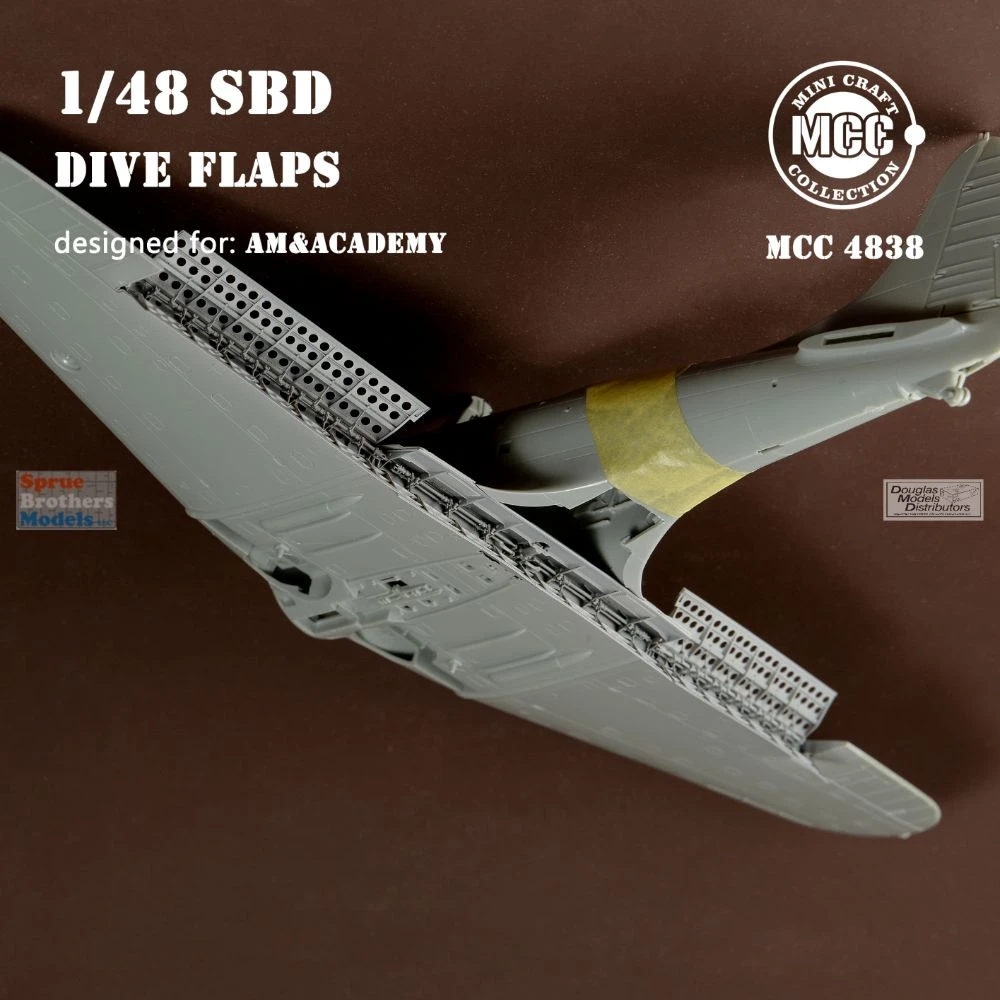
I’ll stir that pot a little on the dive flaps for ya


a little dive flaps love
1 Like
since I’m in school at 56 to get my A&P license to legally work on airplanes with little over the shoulder oversight and as a volunteer at Vintage Aviation Flight Museum and around cessna 150/152/172 all day and also Lear 25’s plus walking around a B-29 alday yesterday at the museum I can say no one and I mean no one ever puts the static wicks on the trailing edges of any of their models…
Sorry, I couldn’t help myself…
2 Likes
Well, I learned two things today! I had to look up what an A&P license was, and I had no idea what static discharge wicks were. Once I saw pictures of them, though, I recognized them immediately. I think I’ve even built an aircraft with them before, but never knew what they were called.
Now you’ve given me one more detail to look for on future builds!
1 Like
you are in luck though as SBD-1,-2,-3,-4-,5 did not use static wicks.
if you ever want to know extreme details of a given subject you can look these up in
TCDS (Type Certificate Data Sheet)
aircraft maintenance manual for the particular A/C.
SRM (structural repair manual)
IPCS (international parts catalog service) I think I got this right
most time available on the net
Oh, great! First you give me a hard time about the cowling, and now you’re giving me something else to obsess over!
I had actually been planning to build mine with the dive flaps deployed, assuming that’s historically accurate. Would an SBD normally be sitting on the ground with them open? That’s something I need to research.
I’m not opposed to spending a little money on aftermarket parts if they’re available and make a noticeable improvement. I don’t want to go crazy with upgrades, but those perforated dive flaps seem like something that might be worth the investment.
Scratch building them sounds a little challenging, especially since I’m not entirely sure what they’re supposed to look like or how they’re constructed.
1 Like
I posted a few pics of them.
when they are prefight inspecting or servicing them they would have both the top and bottom open and the bottom ones also served as landing flaps
1 Like
- Carrier Landings and In-Flight Deceleration
-
Lower Flaps Only: During a landing pattern or carrier approach, the pilot would select the conventional “landing flaps” setting. This mechanism deployed only the lower flap panels downward by up to 40 degrees to generate extra lift and drag for a slow, stable descent. The upper panels remained flush with the wing. [1, 2, 3]
-
Speed Management: If the pilot needed to quickly scrub off airspeed while leveling off or flying in a tight carrier formation, the lower flaps could be partially deployed.
- Defensive Torpedo and Dogfighting Maneuvers
-
Slowing to Evade Zeros: SBD pilots were surprisingly successful in defensive air combat. If caught by faster Japanese fighters (like the A6M Zero), Dauntless pilots would sometimes pop the full dive flaps (both upper and lower). This forced a massive, sudden loss of airspeed, causing the pursuing enemy fighter to overshoot instantly and fly right into the crosshairs of the SBD’s forward-firing .50-caliber machine guns or the rear gunner’s twin mounts. [1, 2, 3, 4]
-
Torpedo Evasion: When attacking ships or dodging anti-aircraft fire close to the water, rapid speed changes using the flaps helped the pilot maneuver defensively.
- Normal Takeoffs
- Partial Lift Enhancement: For short carrier deck takeoffs, the lower flaps were often deployed slightly (roughly 10 to 15 degrees) to maximize lift at lower speeds, helping the heavily laden bomber get airborne safely.
- Post-Flight and Maintenance on the Ground
-
Hydraulic Pressure Bleed-Down: When an SBD was parked on a carrier deck or land base, the flaps would occasionally drop open on their own. As the aircraft’s hydraulic system naturally lost pressure over time after the engine was shut down, gravity and a lack of line pressure would cause the heavy metal flaps to sag open into a drooping position. [1]
-
Maintenance Inspections: Ground crews and mechanics regularly cycled and locked the flaps open while parked to clean, inspect, and service the complex hydraulic actuators, hinges, and internal wing structures
1 Like
| Aircraft State / Action | Upper Flap Position | Lower Flap Position | Center (Inboard) Flap |
|---|---|---|---|
| Parked on Tarmac | Closed (Flush with wing) | Drooped slightly (10°–15° due to hydraulic bleed) | Closed (Flush under fuselage) |
| Normal Flight | Closed (Flush) | Closed (Flush) | Closed (Flush) |
| Landing Approach | Closed (Flush) | Open Downward (Fully dropped) | Open Downward (Fully dropped) |
| Dive Bombing Attack | Open Upward (35° angle) | Open Downward (55° angle) | Closed (Stays shut) |
Great choice! Loved that kit myself!! Looking forward to seeing how yours comes out.
1 Like
I would like to add my own 2 cents here, as far as dive flaps being open of closed.
I have not seen too many pictures where SBD’s were parked on the ground, OR on a carrier Deck with their dive flaps left open. I’m sure there are some that were from time to time, like before a flight or maintenance. However, out on the flight lines, aircraft would have their control surfaces locked to prevent damage from wind gusts. This would even be more so, if the aircraft were aboard a carrier at sea; where the wind gusts as well as the direction the wind came from, could really spell havoc.
I am loving the back and forth and exchange of information going on here. This should be a really fun Group Build!!
Cheers
Freddie
2 Likes
Two thoughts are on my mind as to how to display the craft:
1] In the air just above the carrier deck:
- I was planning on doing some diorama scenes with craft above the ground (hover tanks, hover cars, units just prior to landing or just post liftoff [ STOL, VTOL or Hover craft]) and I decided I’d try several methods to see what I can ‘get away’ with:
A) Clear acrylic rod, just big enough to provide the support necessary with one to three rods to support the craft. I’m hoping this will not ‘shine’ if the craft is reasonably close to the surface.
B) Actual Metal Wire, painted a reasonably suitable color for under the craft (again, this will depend on height relative for craft to surface) such that the stronger metal will be thin enough to easily overlook.
C) Styrene stock, either tubular (for the greater strength) or square tube (same reason) to provide as little overall tubes to support the model, again, painted with a suitably ‘hard to notice’ color gradation under the craft to make it wasy to overlook.
Those are my three primary experiments to be considered.
2] Coming in hot for a landing.
I may decide to provide a ‘just touched down on the deck’ moment with tires screeching and shedding some smoke, tail hook engaged in an arresting wire and a barricade just in front of the plane sort of scene, thus avoiding the issue of how to present a plane in flight.
This scene would provide me the ‘escape clause’ of not having to have the plane in the air, while providing a very ‘dynamic’ sort of instant of time where the plane is shedding velocity, so the tail is high with the arresting hook engaged, the arresting cable in tension across the deck surface (and pulling from the hook to the outer edges), tires smoking from the sudden acceleration of hitting the deck and being forced into a roll with the prop mere feet from the upcoming barricade netting.
I know, it sounds great, but that’s a lot of work. I’m going to focus on the plane first. My tests on cheap flight deck material are still ongoing. I really like the flight deck landing scenario though. If I get to it, then I will most certainly NOT attempt a set of carriers as a second idea – I simply won’t have the time for it.
As to the flight deck testing. I have made some very decent planking/timber sections set for 1:48 scale and have managed to make a passable fair tie down plate at appropriate intervals (thanks to those deck plans I found) using a silver ink pen I use to make my map edges and compass rose colors.
I made a game world for my D&D addiction and I made a set of world maps that include a nice Compass Rose in a section where there is only ocean and I use a fine black outline ink marker, half the compass points are in silver and the other half of the points are done in gold ink pens. I mean each compass point is half silver and half gold with black lining to seperate them – trust me, it looks pretty cool.
Anywho, who, whoo! I am using those markers (sans the gold) to make the tie down plates and the silver is just a test (I will later use a steel or silver paint on the project deck) to see if making the tie down marks will stand out well enough to make it worth doing. So far, it’s – promising.
I am looking forward to seeing the progress others make. With all these SBDs planned, I think I’ll have to do a Devastator or a Hellcat.
1 Like
Thanks, Freddie! That’s pretty much what I was beginning to suspect. I like the idea of displaying the dive flaps open because they add so much visual interest, but I also want the aircraft to look like it would have during the war. So I may have to rethink that one.
And I agree, this is exactly the kind of discussion that makes group builds fun. I haven’t even started cutting plastic yet, and I’m already learning things!
Here is a photo from one at a museum, though that is hardly likely to be a wartime representation.
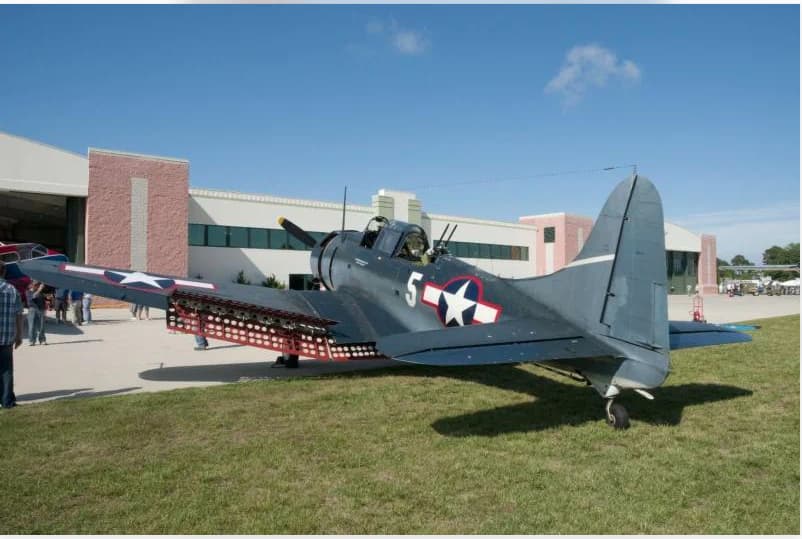
2 Likes
If they were stored there are locks that will keep them close and had to be removed before flight as the locks were not operation from inside , after an hour or two the warn seals in the actuators would allow the hydraulic fluid to leak past the shuttle valve and the landing flaps would slowly droop. The more war warn the a/f the faster they would leak down, even in the short time to refuel and rearm.
Remember these planes were used hard and things like shuttle valves would not get fixed/replaced until they nearly did not work.
1 Like
As with so many things, the devil is in the details! Capturing a moment in time like that and making it look realistic is extraordinarily difficult, at least from my perspective. If you can pull it off, though, it would be really something! I think that’s a little beyond my skill level at the moment, so I’ll be watching and cheering you on with great interest!
One small thing, though. I noticed you mentioned a Hellcat. Unless I’m mistaken, the Hellcat didn’t enter combat until 1943, so it would be a little too late for Midway.
1 Like
Whoops! I meant WILDcat. As you said, “The devil is in the details.”
As to the overall difficulty level, yeah. I am never afraid to at least make the attempt. Even if I can’t ‘pull it off’ I will definitely learn things that I wouldn’t had I never even tried.
I, too, will be watching me closely. The supports concept is one I have been mentally toying with for over a year now, and I haven’t even got a model kit, a base or the rods to give it a go – yet.
Originally I was coming up with ways to support something like a hovercraft of some sort (or a Star Wars style ‘speeder’ ) so it looked like it was floating above the ground and having the supports hidden in some manner.
I am not sure I can manage it for a flight deck landing just as they ‘pancake’ onto the deck, though I’m certainly gonna give it a go. If not, I am pretty confident I can manage the arrester cable and barricades instant without too much in the way of ‘beyond my ability.’
I came here after a very long break. However I have been kit bashing, scratch building and diorama making for quite some time and cobbling things together isn’t that tricky for me. Getting it historically accurate? Well, that’s something I haven’t ever really bothered with, so THAT will be the single most difficult part of this whole thing.
2 Likes
I think I’ll do a TBF-1 Avenger out of a 1/48th Monogram TBF. It needs some modification, but it does have a trough for the nose mounted machine-gun. That and some windows, center-seat, landing light position, etc. and I’ll be set!
BTW, does anyone know what the designations for the Midway Avengers were? I know the one that made it back “8-T-1”, but what were the others? Something like “8-T-4” or “8-T-5”?
Gary
PS> I found a set of decals which list the numbers as “8-T-1 thru 8”. Without further information, I’ll go with 8-T-4.
2 Likes