Cheers for the comments. I’ve been looking at shades of Brown and think that Tamiyas NATO Brown looks perfect? I have about 2 bottles unopened in the paint drawer and it looks ideal.
Any thought chaps?
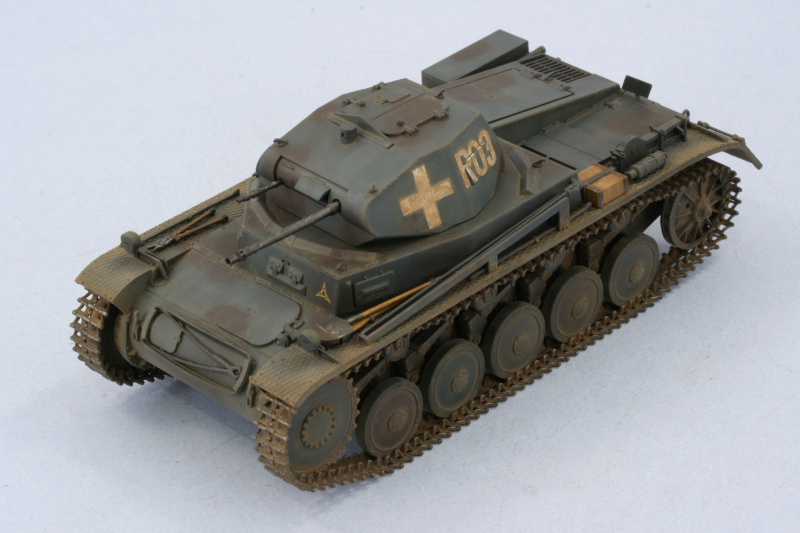
Anyway, making great progress. I’ve not had masses of time to expend on this build recently so it’s been nice to get this turret out of the way - it was an enjoyable assembly and I’m looking forward to getting some colours on this now.
I know I had planned to have the turret interior visible but have deided to keep it simple.
As you can see the tools remain unattached as do the two large tool boxes, antennae and antennae trough. I’m going to paint the basic assembly and wheels as you see her now (the antennae can be painted off the tank to be fitted later to prevent damaging the Brass RB antennae getting bent) then I’m going to decal her and handpaint the tools and trough - the trough has a woodgrain effect that might benefit from some tidy brushstokes.
Following the grey and brown scheme I’ll put the tools on and weather it as one. There are two large toolboxes that I plan to paint with a bare metal finish to add some visual interest.
Anyway, the replacement barrels look great and dropped straight on - you obviously just need to snip the plastic barrels off and drill a small hole in the gun breeches to drop the new barrels in.
Tomorrow I’m working from home so I’m going to be pressed for time. I plan to fit the two main headlights with the blackout covers on them and also fit the wiring to them and I’ll lay down a layer of primer to harden up nicely during theek. After that I’ll start on the Friuls - hopefully next weekend the build will be ready for some paint.
Some photos:
Upgrading the barrels:
The build, antennae and antennae trough. Also the wire for use on making the headlight conduit runs:
Looking good I think? The new barrels definately do the trick!
I was quite happy with the original Tamiya gun barrells but those metal ones really do add a real finesse to the model which looks great. I look forward to the rest.
The RB stuff is so cheap it’s a no-brainer if you want this kit to look a little better. The kit barrels are fine and slide moulded so have open barrels but are lacking detail In particular the cannon only has dimples and no holes on the pepperpot muzzle brake. The antennae, of which I have several in 1.4m and 2m lengths are only a pound or so each. If you are crap at strectching sprue (like me) they are perfect and have the required taper to the tip like these German vehicles would have had.
I’ll be working from home this afternoon so will only be starting the Friuls. If it’s not busy I cann see a few areas that need a tidy-up and some filler.
I might prime her too but depends on time. I’ll post an update later.
I found one site which suggests for Tamiya useing XF 10 and XF 1 mixed in a ratio of 5:1. They also suggest Vallejo 822. But i have no idea what vallejo range that is. I will be very interested to see what you come up with as i have been trying to decide what to use for this as well. I don’t think any of the Xtracolour range will be suitable, so i will have to go Acrylic.
Obviously I’ll be laying the Panzer Grey basecoat down first so I’m going to paint the base of the tank and use that as a test bed. I’ll try Tamiya Flat Brown, Tamiya NATO Brown and Vallejo Chocolate Brown.
Bill is a source of good knowledge re this shade so hopefully he’ll help.
I think it need to be very dark brown which really rules out the NATO (unless I add some black to darken). I have Gunze Wood Brown which also looks like a ‘possible’?
Update for yesterday:
Just quickly I assembled and teste fitted the Jack and toolboxes, fitted the headlights and added some basic fuse wire conduit runs to the headlights - basic but look fine.
Friuls have been started and are damn tricky being so small!
Hope you like her so far (sorry for the slow build rate) and painting commences next weekend!
I can’t offer any advice on acrylics unfortunately. All I can do is point you to the actual color chips of the Dark Brown used and then it would be up to you to try to find a close match either with an existing paint line or by mixing your own. FWIW, I use Testors Panzer Schokoladenbraun (enamel) straight out of the bottle for when I’m applying a 2-tone scheme. It’s a very dark brown to begin with so if you start there with that tone you may wish to lighten it depending on the weathering you apply afterwards.
Of course if you apply lighter shades in your weathering vs. darker, you work in the reverse. That’s what I did with my Tamiya Polish Campaign Pz II and it ended up like this.
Ben i have been doing some checking useing the vallejo paint guide and the numbers given on the site i found don’t seem to correspond with the vellejo RAL colours, so i am not 100% certain.
Bill, is the Schokoladenbraun you use the same you would use for a 3 colour scheme. Origionally that was the colour i was thinking of.
Testors designates its Schokoladenbraun as being part of the '43 Panzer scheme (the three tone) but I find it to be much too dark for rotbraun and mix my own lighter color. It is, however, a virtually perfect match when I hold it up against the color chip for Dunkelbraun in the '38 scheme. Go figure! HTH!
Still slow progress due to my workload plus we have soooo many people off sick with a stomach Flu I’m having to work 2pm-10pm today so the day on which I’d wanted to get the German Grey basecoat on I’m restricted to assembling Friuls. In theory manning the emergeny work phone from home on Saturday is notoriously quiet there’s always the risk of being stuck on a 60 minute phonecall with someone - a call that will no doubt come when my airbrush is fully loaded and in use - not good!
On the plus side it’s double time now so the offer of this shift was not to be sniffed at [:P]
Like I say I’ll be doing Friul assembly during work time today now and I’ll start painting tomorrow.
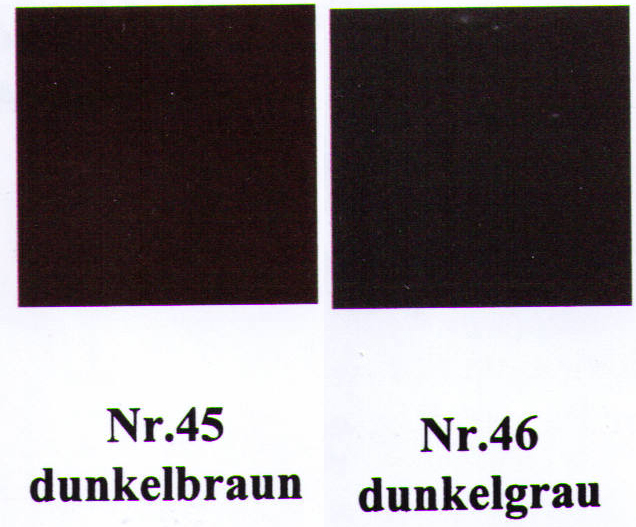
I have just had a delivery of two brown colours and have just taken a sheet of plasticard which I can wipe down later with Cellulose so it’s not wasted
The below photo:
In the centre is a quick squirt of TS-4 Tamiya German Grey rattlecan spray that I had and around it is a cemi-circle of some browns that I have, you can see their names and colours quite well.
Scroll about halfway down to see the painting stages on the link.
I think the Vallejo Chocolate Brown is ideal and I’m sold on it BUT would like you chaps to look and see what you think - the colours go from very dark browns to light browns (there are several photos):
I’m not going to start mixing colours - close enough is fine as it’s going to very dusty.
I don’t know myself, that tank brown looks darker. I have a bottle of that, un used so far, and its darker than i expected, looks to dark for the late war tri colour scheme to me.
The Tank Brown is a useful colour but isn’t ideal. Imo the Chocolate Brown looks A-OK!
Tank and Chocolate Brown seems to be the general favourites.
It’s definately not a shade that would be suitable for a late war Tri-scheme but for the early war grey/brown needed for my Panzer II either will do. I’ve looked at the colour cards posted on here and it’s not far off perfect - definately a very close match. Under the weathering and dust it will look fine.
It’s good that you’re “thinking ahead” to how the weathering will impact the final color. Pick the one that you think will give the best pallette to work from and go with it. [;)]
I’ve tried my hand at most basic Cammo schemes but am yet to try this one - being a BIG fan of these early war machines I thought it be best to get this colour spot on (or as near as dammit anyway)!
Bill, as-ever your own site continues to aid in my work. We obviously share a taste for similar builds! Hopefully one day we’ll share similar talent too [;)] Your work of late has been truly impressive!
I’ve really struggled for build time in the last couple of months due to work, work, work and oh, more work! People off sick, no-one to cover shifts and as a result I’m shattered at the weekends (when I’m not working and have build time I find it hard to get really motivated to build as I’m so shattered) >:( AAGGHHH!
I’m not meaning to sound ungrateful in any way as I know there are so many people that need work but it’s the sheer number of hours and the build time that is eluding me that is really getting me down at the minute. Ho hum! This bloody hot weather doesn’t help as I HATE it! [:XX]
Anyway, on a positive note. It won’t last long and overtime will be down to two extra shifts a month. The Friuls are nigh on complete and next weekend is totally free (and we have a UK Monday Bank Holiday on the 27th August) so I’m hoping to make an impact next weekend.
One question regarding the additional armour (bolted on plates around the drivers visor). I’ve seen some models with the tiny gaps between the plates all filled. Should I really be filling these gaps in or leving a little visual gap between each plate. Surely WWII tanks with bolted on armour would not have perfectly interlocking plates like the woodwork of a master craftsman?
It’s no problem to fill the gaps but I’d like to read your thoughts on this subject? Pictures from the time are ‘difficult’ to read!
No worries Ben, I’ve been accused of influencing other builder’s stash acquisitions in the past, so it’s no surprise to see you’re suffering from similar effects! Appreciate the kind words, don’t sell your own abilities short…you’ve come a long way in a short space of time yourself! [B]