I am decanting and spraying through an AB. Last few times I have sprayed, the paint has applied like sandpaper. It goes on very grainy. I used to have good luck with this paint but lately, not so much. The can I am drawing from is maybe a year and a half old. I wonder if by decanting over that time it has altered the paint somehow.
Question: Has anyone ever used flow improvers and/or paint retarders with lacquer based paint? It seems this paint is drying too quick. Just wondering if those additives will mix.
Although I haven’t used Tamiya Fine Surface Primer, I use decanted Tamiya Grey Surface Primer. What are you currently thinning yours with? I use MEK to thin mine and haven’t had any issues so far. I’m using a Paasche H airbrush with a #1 needle/air cap and shoot it at about 20 PSI. The other question is how did you mix it and your thinner? I have mine in a 4 ounce mason jar and stir it with a wooden skewer, then I mix it with MEK in a bathroom-size paper Dixie cup before it goes into my airbrush. I guess its possible that age may be an issue, since I haven’t had my decanted Tamiya sit for more than a few months before being used up…but when it is, I just decant another full can, right on top of the old stuff still left in the jar. If you’re decanting only enough at a time to use at that moment, that might also be a factor. No idea how it reacts when you do it that way. I didn’t want to deal with decanting every time I want to use it, so that’s why I decant full cans into a 4 ounce mason jar. No issues so far, except for the time I mistakenly put alcohol in the Dixie cup instead of MEK. It didn’t like that…turned it into grey cottage cheese. Never have to use flow improvers or paint retarders with it. Just plain old MEK does the job beautifully.
I agree that doing it a bit at a time may be the problem. It’s unlikely that the mixture is uniform and probably heavy in solids by the end.
After watching a few YouTube videos, I decided to vent the pressure, then cut the cans. If you make the initial puncture near the top rim very small and don’t agitate the can, it doesn’t make a mess at all. The pinhole will slowly vent pressure for a good half hour.
Once all the pressure is gone, I cut the can, stir the contents and pour into Tamiya 46ml jars. A 180ml spray will yield just over 70ml of product. After letting it gas off, put 35ml into each jar and fill to the 46 line with Tamiya Lacquer Thinner for a 3:1 mix.
Tojo, yours may be the easiest solution. I guess why I don’t spray from the can is for fear of going too heavy and melting the plastic. It doesnt sound like you have that problem though. I may have to try this. [Y]
A small tin snip goes through it very easily. It’s thicker than a beer/Coke can, but not much. I’d imagine even a heavy kitchen shear would do just fine.
i never thought of decanting the entire can in one sitting. I need to consider that as an option too. I have been doing as needed and I am seeing some horrific results. The worst was when doing my Jonny Quest Dragonfly build. I had massive buildup near the wing roots. Vortices probably contributed to that but granular build up was evident throughout the fuselage. In the case of the wing roots, the paint turned yellow, and I am using white primer! The more we banter, the more I think it’s because of how I decant.
The saving grace in all this is that I was able to sand the problem away to a nice smooth finish. But, something is not right, and I need a better plan.
I agree with Tojo and Bakster. I have been using this stuff for years, sprayed directly out of the can, and always get beautiful results. Just keep the can moving and spray lightly.
I do not feel it is necessary to go through all that trouble as discussed here.
Is this safe? Puncturing a pressurised container doesn’t sound like a good idea to me - they carry warnings against doing just that. Just my 2 pence worth (we don’t have cents[:)]}
I’m sure one could make quite a mess or possibly rupture the can in dramatic fashion if done in haste. I use a needle sharp automatic center punch set at low impact and make the first hole near the intersection of the top and side seam where the can is strongest. I guess a paint infused shrapnel injury is always a possibility.
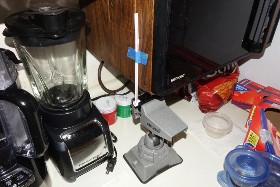
Well, there is always my method, which gets all of the paint out of the can in the way the can was designed to be emptied. Its safer and won’t make a mess. Drilling the hole in the mason jar lid and installing the grommet takes less than a minute, and the lid gets used over and over again. Attaching the straw to the paint nozzle with epoxy involves less than a minute of work. Spraying all the paint to transfer it to a jar takes about 3 minutes. The rest of the time required doesn’t require any intervention, so you are free to do other things while the epoxy cures…and later while the propellant comes out of solution. No need to use sharp metal tools to create sharp metal edges either. [H]
As for decanting versus spraying directly from the can. You get a lot more out of a can of primer by decanting and airbrushing, because you’re not losing a bunch of it to the air and to overspray. Almost all of it goes right where you want it. [2cnts]
I’m definitely willing to try your method, but having trouble visualizing the orientation of the straw. I’m picturing the nozzle being blocked by the wall of the straw. Obviously, that’s not the case. Any chance of a photo?
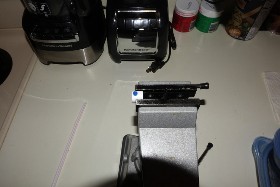
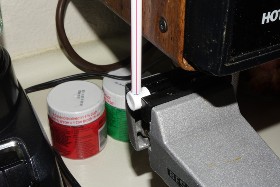
The nozzle cores on Tamiya cans stand out from the rest of the button/nozzle assembly and they are very close to being the same diameter as the inner diameter of the party straw. I gently clamp it in my table-top vise.
In my case, the side of my ancient microwave oven makes a great place to tape the straw so it stands straight up after setting it over the nozzle core.
Then I mix up a small amount of epoxy, and run a bead of it around the base of the straw. It will just kind of naturally form a fillet.
Did this all just now tonight. It actually takes about 5 minutes to get everything together and get to the point in the last photo. I’ll post more pics tomorrow of the whole thing on the can and plugged into the grommet.
Exactly. My posts in this thread were in response to the OPs original question about decanted Tamiya primer. Decanting and airbrushing works best for my situation because I don’t have to coordinate that activity with whether or not its too hot, too cold, too windy, or raining outside. Might be why the OP is doing it too. I’m pretty sure its not because he thought it would be easier than simply spraying it out of the can. Its no more complicated than gluing one piece of plastic to another piece of plastic though, and only needs to be done every six months or so.
Firstly–I want to thank every one of you that responded! I really appreciate that you took the time and that you are sharing your knowledge! All of you have me reconsidering how I approach priming. I am leaning towards my on the go decanting as the problem. I may be gassing out certain things that in the end affects the remaining paint within the can.
I love Tojos simplicity method, but I am still interested in Eaglecash’s decanting process. Sometimes, there are small tight interiors you need to get into that could be difficult to reach using a can. I am currently working on a project like that. Maybe I am wrong…maybe it would work.
Either way–as of now-- I am still interested in decanting. EC-- please DO finish with your decanting process. Btw–McDonalds soda straws are a perfect fit for the Tamiya nozzels. It’s like the engineers designed it that way. [:|] If I am careful, I don’t even have to secure it because it’s a press fit situation. But, securing it is a wiser idea and I have found that wrapping tape around the assembly works too.