Coming right along. Good progress, nice work. [Y]
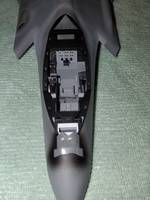
Got the exhaust nozzle all painted and put together. The way it all goes together is pretty slick. The final set of feathers on it go in really snug, so you have to gently push the sets apart that it slides in between.
After finally dragging my F-4B project across the finish line, along with my first attempt at working with an all-resin model (the Anigrand Firefox-which is stalled at the moment while I figure out how to blend the rear part of the fuselage with the forward part), I am back on the F-35.
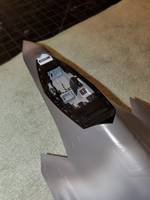
Took a little while to work out how to mask around the weapons bays and main gear bays. I was driving myself insane with all of the tiny strips of Tamiya masking sticker sheet that I was cutting and placing, and I was only about 1/5 of the way through that. I’m now convinced that the way stealth aircraft actually work is by the incoming radar pulse seeing all of those facets and compound curves…thinking about how best to reflect from them…and finally throwing its hands up in the air, letting out an exasperated scream…and returning to the transmitting station in frustration. Its how I was feeling. But then a really simple solution came to mind that worked. I decided to get my airbrush down to a fine, pencil-sharp line, and paint the white parts around the perimeter of the door openings first…and then cover those openings with the doors (which, with Tamiya’s precise engineering, fit perfectly). Then it was just a matter of carefully laying down thin layer after thin layer of the FS36170 Camouflage Grey around the doors, using the correct angles to avoid blasting paint into the gaps around the doors. I ended up with white and grey exactly where I wanted them.
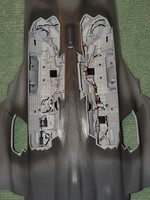
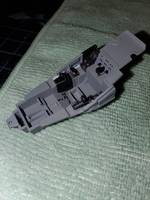
Inside view:
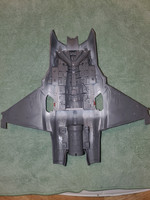
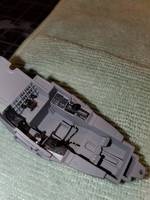
Outside view:
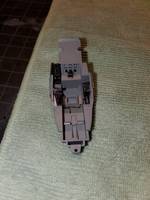
Exhaust tube mounted:

Looks sharp! Great progress. I sure hope they do a B & C.
The weapons bay on this kit is incredible. Nice work Eagle.
Thanks guys! Now its on to pulling the pylons back off the wings to get them painted the lighter grey. Had them temporarily mounted with white glue to act as masks to keep the plastic underneath clean and bare for permanent mounting later with Tamiya Extra Thin. Once I get those permanently mounted, the second piece of interal structural support with the main gear wells can go on. Definitely liking how this whole thing is engineered.
The whole point of stealth is the send the radar waves screaming in all directions EXCEPT back to the transmitter![bgr]
Got the cockpit all done and mounted in the upper fuselage. Eduard released their Space and LOOK kits, so I bought them both. Their stuff is OK, but I still prefer the Quinta sets. The colors on the Quinta sets aren’t grainy like they are on the Eduard sets, and the grey parts are a lot closer to the right color, but who knows if or when Quinta will release a set…so I went with Eduard to keep things moving. Overall, I’m pretty happy with the result so far. Probably not even going to use the LOOK instrument panel because it doesn’t look as good as the individual decals in the Space set, and the Space set gives me the choice of a cold and dark cockpit.
Well, for a while I was wanting to work on every model except the F-35 because of the masking issue, so I guess that fits too. [clwn]
It has been a little while, but I have slowly been making progress on this. Not a lot of time for modeling in the past few weeks…been in the process of finally buying my dream house in the country. I’m starting my move out there this weekend. [H]
Got the upper and lower halves of the forward fuselage together finally. They went together leaving just a few, tiny gaps that were easily knocked out with the super glue/black Sharpie method. But, even the small amount of sanding that had to be done took some of the paint off the edges surrounding the black area of the canopy sill. I was going bonkers trying to figure out the best way to mask that area so I could re-paint the grey that had been knocked off. “Easy” enough on the sides and rear, but the front end has the stealth faceting, as well as being white instead of black. I decided to mask the canopy and use that to mask the sill area, but had no idea how I was going to temporarily seal the canopy onto the aircraft to prevent paint from finding its way under the canopy frame. I was planning on going to Michaels tomorrow to get modeling clay, but then an idea popped into my head that was along the same lines as what I recently started using to protect decals from masking materials. I used toothpaste as my temporary canopy caulk, and the results were nothing short of amazing. I was even able to get a sharply defined line between the grey and black (as well as the faceted grey and white areas) by using damp Q-Tips to clean away the bead of excess toothpaste that oozed out when I pressed the canopy into place. Here is the result of that. Such a simple, trouble-free solution to a complex problem!
FINALLY got all moved into my new house and got things squared away enough in my new workshop to pick back up on the F-35 last weekend. The fit of the intake tunnel assembly into the forward fuselage was a little wonky, but with a little work it came out pretty well. I’m really loving Apoxie Clay for things like this…lets you fill gaps between parts, and then scribe a nice, even line between those parts without a lot of brain damage.

Did some test fits of the horizontal and vertical stabs, along with the LEFs and TEFs. The fit on all of those items is typical Tamiya.


Well, my wife bought me the kit a couple of weeks ago! Definitely a build you don’t want to hurry through. The engineering is amazing. I like it better than the Tamiya P-38F.
Eagle, you might want to check this out: Eduard EX931 RAM paint mask. I bought the mask set from Sprue Bros. I think painting is going to be easier than the kit decals. Mask set for the top and bottom.

Nice! Congrats on becoming a Goblin owner! (heh…not an official nickname for the F-35, but maybe it’ll catch on) I got Eduard’s mask set for the newer F-35s with the Z13 overcoat. I haven’t decided if its going to be easier to use the masks or just go with the kit decals. The Z13 aircraft aren’t quite as complex a masking job, but I had already started on my plan for painting with the Have Glass Grey first, and then putting the decals on top…and then Eduard released their mask sets which are designed for the lighter, Neutral Grey going on first. [sn0ps]
Oh well…I’ll figure something out. Not really sure how much I like the Eduard set anyway, since they elected to use vinyl for some reason, instead of the Tamiya-style paper masks they normally have. Something I ended up picking up though, to help with masking the leading edges of the intakes, was this set of masks I found on Ebay:
https://www.ebay.com/itm/225327856131
They’re really nicely done, and its all the Tamiya-style paper material. Something I wasn’t expecting when I bought it was all of the extra masks they have in the set. There are also masks for the GBU-31s, the wheels, the canopy (inside and outside), the exhaust nozzle, and the extra pods that Danish Goblins carry, all included in the kit. The GBU-31 masks will definitely come in handy, since I’m building mine in full, fangs out, “beast mode”.