Tamiya 1/48 StuG III Ausf. G: Calling her DONE! (10/07/11)

Hello folks,

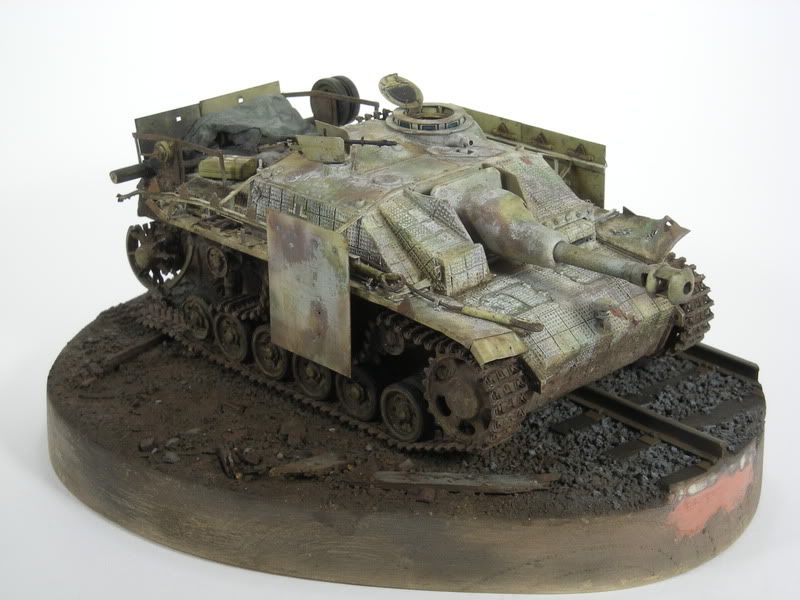
I haven’t managed to squeeze in any bench time over the last few weeks mainly due to work, but now things are back to normal I found myself surfing the web the other day at a favourite on line store and really liked the look of the 1/48 Tamiya StuG III Ausf G with the later ‘Saukopf’ mantlet so I thought it would make a good little build to get back into things and to get warmed up for the Panzer III GB!

Links to kit details:

http://www.perthmilitarymodelling.com/reviews/48/tamiya/tam32525.htm[](http://www.toystars.com/media/catalog/product/cache/3/thumbnail/9df78eab33525d08d6e5fb8d27136e95/3/2/32525.jpg)

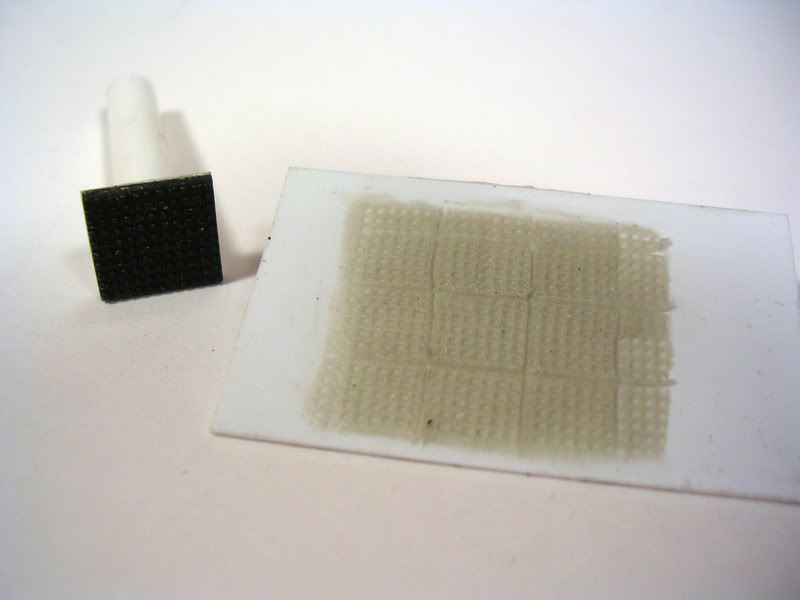
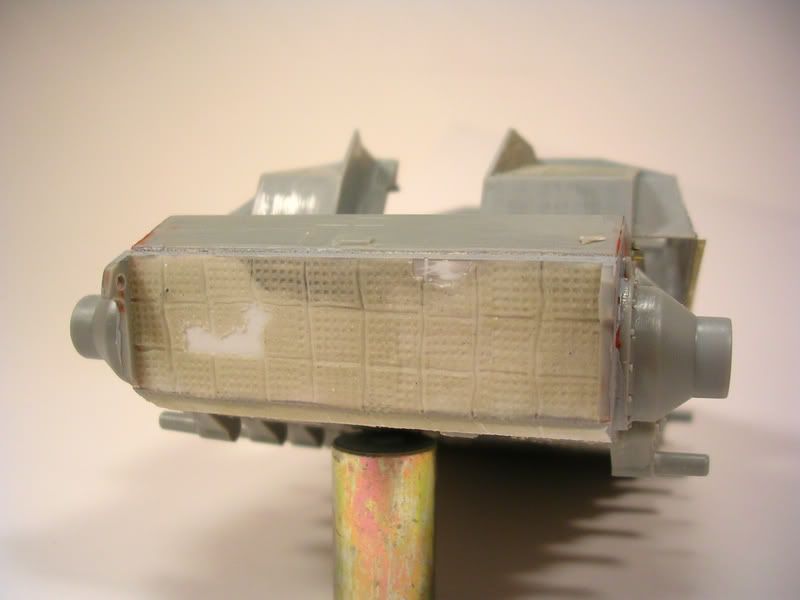
I’m going to be building OOB apart from the standard replacement barrel which I have already sourced from RB for a few pounds. I’m going to be going for my favourite heavily weathered look with this one and hope to be adding some White Milliput Zim. A good friend here in the UK has provided instruction on making a suitable1/48 ‘Waffle Pattern’ Zim punch from thick Styrene sheet cut into a 2mm x 2mm square with suitably placed razor saw lines i.e. two cuts across and two down leaving the required correct pattern - he’s tried it and it looks great - he wants to see how I get on as I have this kit too.

I won’t be going for an all-over super Zim job but just some around the casemate and front areas - I’ll see how it goes as it’s something I’m yet to try doing!

I’ve spent the last two hours on the kit and the hull tub is sorted, all the wheels are done and the bult of the upper hull is nearly complete too. Tomorrow I’ll be getting the Mantlet and barrel fitted and she’s about done. I knew it would be a simple build but I’m hoping to have more time to expend on weathering and working with this Zim as a result.

There is a good Cupola, no moulded on tools which I hate (all are separate) and a three quarter figure for optional use. I might use him - not sure yet. The upper hull is one piece that, when complete, is simply attached to the lower die-cast tub via two screws. This is handy as it means I can work on the tracks without the uper hull to get in the way and the upper hull can have all the Zim done then fix together following painting of the basecoat, wheels and track assembly to start proper weathering!

I’m not sure about markings or colours. I’m thinking of keeping decals to a minimum and instead of a normal DY I might try some Gunze Sand Gelb which is a bit darker.

Hull Tub, RB barrel, sprues and White Superfine Zim Milliput:

Upper and lower sections and dryfiited together:

Thanks for looking guys,

The BASIC assembly might be completed by tomorrow - time to bring on the Zim!

Kind regards,

Ben [t$t]

Looking good so far Ben, the tool idea sounds like a neat way to get the necessary stamp for the waffle pattern, look forward to seeing the results. [B] As an FYI, the zim pattern was present on the lower hul as well right down to the suspension arms, so you might give some thought to that as well in terms of how you tackle the zim application.

Good luck Ben its a beautiful kit, I have one in the stash myself.

Terry.

Looking real good Ben! Perfect kit to kill time before Pz III GB rolls out… I will be watching this with interest because I will apply zimm to my Pz IV Ausf H tomorrow if I am brave enough. [:S]

Thanks guys,

The little tool works great Bill - I tried it on some Blu-Tack last night!

I’ve been printing out some photo ‘walkarounds’ and have been noting where Zim was applied. I’m going to try for the casemate sloping areas around the Mantlet, the area where the two front hatches are and the front area down to the base of the vehicle on that flattish area. Also the rear of the casemate inbetween the Antennae mounts.

I wasn’t going to do it but I think some patches of Zim on the lower hull will be required (like you say) but I don’t know about the Casemate side walls? I’ve only ever used standard Milliput for gap filling and have never used the superfine white stuff which I have now. I’m assuming it won’t ‘take’ to a smooth surface so I’m guessing I’ll least have to roughen it up a bit - can I run some medium sandpaper over the area of application? Will that suffice?

Also, decals? Will this stuff dry ROCK hard? I’m thinking about decals and setting solutions - they won’t soften it up again will they? Can I just put my decals straight on and bed them down?

Andy - I found a link to a great page on different ways of Zimming, here’s the link. I think the Waffle pattern isn’t right as it has 4 ‘sub squares’, I thought it should have 3 inside the main outer square but apart from that it’s a helpful page.

http://ilovewood001.tripod.com/modeling/zimmerit.html

Hey - If I can manage to do this on a little 1/48 build then I KNOW you can do it on a 1/35 Panzer IV [;)]

WIP - I’m working from home this morning until 2pm then I’m going to complete the upper hull less the Saukopf Mantlet and barrel. I’ll also do the tracks - I’m going to make them so the they can be removed for painting like I did on my JSU-152.

Update later!

ATVB

Ben [t$t]

Hey buddy! Thank you so much for the link to a great website on zimmerit. It looks like it is going to take at least five days to do this. Owe you [B]!

Hello guys,

Just a quick update as I’ve been working from home today and have only had a couple of hours spare build time [N]

Anyway, I’ve got the upper hull.casemate to a point where I can’t do much more as things like the Front Notek will hapmer the Zim application. The Notek base is on but not the actual light yet. I think I remmmber the PMMS saying that there should be a drivers pistol port cover which is missing on the left side so I need to add that from a little disc of sheet Styrene. Apart from that the only modification required is to the single Periscope as it has a flat face - it needs drilling out and a lens painting on.

I’ve taken a few photos with the Mantlet dry-fitted and with the RB barrel in place - it looks good.

I’ve also had my first go at making a proper 1/48 Waffle Punch tool. All it comprises of is a short piece of old paint brush stem and a 2mm x 2mm (ish) square of thick Sheet Styrene with two horizontal cuts on the face and two vertical ones. I tried it on some white poster putty and it works well in this small scale.

I’m back to work tomorrow for what is going to be a busy week (from what I can gather) [N]

Not to worry though because week commencing Monday 4th I’m off work for 7 days - should be ample time to get this StuG nigh on complete but there’s no rush [Y] If I can get the Zim on and a basecoat along with some painting of the tools I’ll be happy. Next weekend I’ll get the tracks built up and make them removable. That should be easy as there is a long run that goes under the road wheels and a single top run over the return rollers then it has 4 double link pieces at each end around the drives and idlers so pretty simple. I just need to keep the glue away from the wheels and drive wheels and leave the final end unconnected so they can be taken off with ease for painting both the tracks and the hull and wheels.

‘Zim tool’ with some impressions in poster putty:

Everything ready to go - the Mantlet and barrel are dry fitted at present:

Make sure to check out the updates next weekend guys no doubt some of you will be interested to see how it goes [whstl]

Have a great week everyone - we are forecast 90 degrees farenheit in London tomorrow so it could be a scorcher here tomorrow too as London is only 90 miles away from me- I hate this hot stuff as my office has no A/C, only 12" pedestal fans and it just kills me!

Andy; Best of luck with the Pz. IV Zim! [:P]

ATVB

Ben [t$t]

Ben,

The putty will dry rock hard, no question about it, so nothing to worry about in terms of it interacting with a decal setting solution. As for the pattern you’ve come up with, it’s not as “regular” as a true waffle pattern. See below for how Atak rendered theirs (which is the common/accurate style for Alkett).

The pattern is also the same as that seen on the casemate, you can see that the “rectangles” that make up each “waffle” have a 6x6 or 5x6 grid pattern to them as the pattern repeats over the different surfaces.

You will also need to apply zim to the rear engine deck surfaces and side air intakes, this shot should help in that department:

The real fun will be applying it accurately to the hull front, glacis, and nose, as you have to work around the various surfaces like the transmission hatches, the driver’s visor, etc. For those areas you might have to make a smaller version of your main stamp tool to work in those spaces.

HTH and sounds like you’ve got a good block of time to work on this one coming up!

Cheers Bill,

In fact this page off your site was one of the first I printed off when looking into Zimming my build.

I wasn’t actually even planning to Zim this build at all but realise it does need some to ‘work’. I’m hoping to do the front areas and casemate sides and the very back above the exhausts. Also I’ll try and do some patches on the hull wall sides.

Hopefully it will sit nicely and will look good but for what was supposed to be a quickie build before the GB starts I doubt I’d worry too much about getting the patterns right and covering every exact part. It’s a little build for my cabinet which I’m going to be finishing on my week off just to get my eye in for the GB as I’ve not modelled properly for over a month now! That said if I find it easy to apply and work with I’ll do as much as possible - I can’t guess yet as I’m yet to even try applying to the vehicle!

I want to do a full Zim job and should I do that I’ll either use ATAK (which my Friul guy stocks and it does look great) or Milliput - but I want it in 1/35.

I’ll see how it goes - I’m looking forward to trying it out but if it gets too messy and starts taking ages (which it shouldn’t) I’ll probably just build OOB.

I’m not usually one to give up easily [whstl] so I’ll stick with it - a Zimmed 1/48 build will look superb!

Thanks for taking the time to put up the photos for me and I’ll keep the updates coming.

ATVB

Ben [t$t]

Sounds like a good plan Ben! Sometimes the “space/time” fillers often end up being more involved projects than you want them to be if you don’t keep a handle on them. [:)]

Replicating the waffle pattern in 1/35 is a tough challenge in its own right…so kudos to you for trying to tackle it in 1/48 even if it just turns out to be a test-bed/practice platfform exercise in DIY zim. [B]

Cheers Bill,

I don’t want it to spiral into a crazy Zim project but like you say there aren’t many Zimmed 1/48 builds around so I’ll definately be having a crack at it - it’ll turn heads at least!

I can’t see any reason why the casemate can’t be done (the front hatches might be tricky) along with the front of the build down the front piece of Die-Cast, not forgetting the lower hull sides behind the suspension.

The tool works - it may not be perfect but it’s a start! A friend of mine here in the UK has this kit and is looking at doing the same as me. He’s going to try and make some tools from his resin moulding kit and hopefully he’ll pop me a couple of different ones in the post.

I can imagine this would be fun in 1/35 - it’s going to be a PITA getting it right in this scale but I’m game. The shape of the casemate and flat parts will help a lot.

WIP update very soon!

ATVB

Ben [t$t]

I can defiantly sympathize with what you’re attempting. The waffle zimmerit is difficult to do without the right tools. The biggest problem is getting it in scale. Almost without exception the Waffle patter dies that were commercially available when I did mine were out of scale. What you’re needing will be even smaller. I would suggest making your die with a photo etched saw. A regular Exacto type saw will leave far to wide a kerf.

When i did mine (in 1/35) I used Apoxy Sculpt which I find MUCH more friendly than Miliput. It’s softer and finer grained. I made black marks on the plastic with a sharpie and once i’d troweled the Apoxy Sculpt on there thin enough to see those marks I knew i had a uniform depth. The stamp I used was acquired by pure luck. It was a non-skid pad off of a walking stick that I purchased at Walmart.

and with paint on

I wish you the best of luck but make no mistake, it will try your patience… [:)]

Hey Guys - a quick WIP update!

K-dawg - that’s a mighty fine build and some great zim work to boot! [Y]

I’ll be attempting to Zim the areas frontal areas like on yours, the front and rear section of the fenders and some patches behind the running gear. Also the air intake sides and the rear of the casemate.

I’m going to try it out on a bit of thickish Styrene first. I’m thinking that I’ll either apply with thumb and fingers and smooth over with a chisel-tip blade and I’m also going to try rolling sheets out very flat between baking paper with a bit of talc to stop it sticking. I’ve borrowed a rolling pin and some different types of greaseproof paper from Anne, the nice lady next door!

I’m thinking rolling out a flat piece, cutting off pieces that I need and simply laying them on a ‘roughed up’ surface of the tank. The pieces will be roughly pre cut to size and can be trimmed up. There are no large areas to cover as it’s a 1/48 build.

I’ve got a great tool made from a 2mm x 2mm thick piece of Styrene sheet. I used a Scalpel to cut the grooves into it and it leaves nice ‘Waffles’ that look pretty much to scale [H]

If it doesn’t work at least I know I tried and I’ll just build it OOB but even some small patches of Zim will be a bonus.

The idea of this build was just to get my ‘eye in’ before starting on Panzer III For the Group Build I’m taking part in. Before I started this kit I hadn’t sat at the bench for over 4 weeks so needed to find my flow again - luckily I’m doing fine and this could be a nice little build, especially if the Zim works well!
If it doesn’t I’ll zim what I can and complete it as an OOB build then build the Pz III. After that is my new Bronco Comet and then the Dragon Sherman Hybrid Firefly which are currently in my stash. I did promise myself a few Allied build this year!

Anyway - onto the build:

I’ve completed the assembly now. The tracks are assembled (link and length kit tracks which look great with the built in sag). I worked my way around the hull then left the last join untouched so it could be removed for effective painting later - I like this method and it’s very easy.

The only thing left off is the Saukopf Mantlet which I’ll affix after the Zim as a barrel would just get in the way right now. I’m going closed hatch as the 1/48 figure is beyond my painting skills and the figure isn’t great anyway so the hatch has gone on!

Finally, I’ve drilled out the flat face of the single gunners periscope.

It’s been a very simple assembly and a joy to build. I’ll be painting it with Gunze ‘Sandy Brown’ or ‘Sand Gelb’ lightened with a bit of Gunze Flat White. I may think about some form of hairspray whitewash later on?

Todays progress:

All the running gear now assembled and ready for colour!

Track runs assembled and ready for painting and fitting later on:

Kit barrel, replacement RB barrel, Saukopf Mantlet and I used a piece of small scale braided wire from my spares tub to make a tow cable as Tamiya only supply string (note the uncovered air intakes at the rear-not right):

I used some leftover piece of plastic ‘grill’ from my Tamiya Cromwell to make two air intake covers. It would have looked so wrong to leave them uncovered imo. Thet may not be to scale but are a big improvement:

This gunners Periscope originally had a ‘flat facia’ with no hint of a lens so I drilled it out with my Pin Vice - a BIG improvement:

Thanks for looking guys,

I’ll be attempting the Zim tomorrow so wish me luck!

I’ve booked next week off work as I need a break from that place. I’m not planning on doing anything - just modelling, chilling and prescription relaxing so we might have some good progress made next week. I’d like to think there there will be colour on her and I’ll be ready for starting weathering next weekend.

Happy 4th July for Monday by the way my American friends! [blns]

WIP update tomorrow!

Kind regards,

Ben [t$t]

Those tracks look great! I agree with you about the grills… maybe be out of scale but they look alot better than the kit part. Good luck with the Zimm… I am still working on my Panzer IV applying Zimm. Pain in b*tt… but it has been fun in some way. [:P]

Hey Andy,

Thanks for the [Y]

Make sure you show some photos of your Zim work and provide any helpful hints on how you did it as it’s my turn tomorrow! [;)] I’m lucky as I’ve only got some very small areas to apply the Zim to!

Re the grills - that plastic ‘grill’ was supplied with my 1/35 Tamiya Cromwell and I had that left over. Obviously ibeing from a 1/35 kit it’s out-of-scale BUT after painting and stowage has been added I’ll be hoping it will just blend in. Tamiya would have had you just leave the intakes exposed i.e. big gaping holes which just wouldn’t have happened so something needed to be done. I have some small sections of PE grill which would have been better but I had nowhere near enough and all in odd shapes.

Looking forward to seeing your Zim work!

ATVB

Ben [t$t]

Sure, you can find my WIP in Ostfront. I posted my work doing Zimm putty this morning. Remember it was for a 1/35 scale Panzer IV…

/forums/t/130500.aspx

Good luck! Oh, sorry we Americans kicked your British butts two centuries ago… Happy July 4th! [B]

Hi guys,

Well, I’ve just spent the last couple of hours applying (or trying to apply) some Milliput to my little StuG III G to add some Zim to it.

Well, it’s my first attempt and it is a 1/48 build so it’s pretty small which is some consolotation but it was bloody difficult! The easy bit was the piece of armour which I had stuck to the front below where the Notek base sits - I could work that part easily and it came out well. The rest is ok but a bit rough.

In the flesh it looks ok but it’s hard to replicate that look on the camera. After some tidying and sanding and with some all-over priming it should look ok but it’s not something I’d want to be doing reqularly - next time I need Zim I’ll try some of the ATAK stuff that bill uses to great effect (if they make a set for the model I’m building at that point anyway).

Anyway, Zim is on and for a first ever effort I’m pleased - if it was 1/35 it might have been easier! I’ll definately need a better tool for next time as it kept clogging up and it was difficult to get any sort of pattern.

Tomorrow I’ll get some paint on her.

The separate piece of armour plating that came out fairly well:

Everything else - not so good but should look ok after painting and sanding - like I say in the flesh it looks a lot better:

Thanks for looking guys,

WIP update tomorrow - I’ve got next week off work so I’m hoping to get a fair bit done this week!

ATVB

Ben [t$t]

I like that side…

http://i806.photobucket.com/albums/yy343/Hinksy1/Zim030711005.jpg

Don’t hesitate to use painter tape to protect the area where it doesn’t require Zimm to make it easier for you to clean afterward. Looking forward to see this finished so you can get your b*tt over to Pz III GB. [:D]

Hey Andy,

She’s looking okay Andy. Like I say the photos turned out poor and look messy but in the flesh she looks the business - for a first attempt! [whstl]

Anyway, I’ll let it cure over night and lay some primer the get the AB going to lay the basecoat and decals will go on later tomorrow too.

As I’m off next week I’m planning to spend a few hours on her every afternoon so by next weekend I reckon she’ll be about there.

I really want to bust my new Pz. III open for the GB but I want this little StuG looking tip-top and don’t want to rush it. Looking forward to this GB though, should be good!

By the way folks - there will be a few places on this stuG where the Zim hasn’t been applied i.e. in the fiddly little corners so it will look like parts have chipped off. What colour would the paint be under the Zim? I’m assuming primer red?

ATVB

Andy [t$t]

Hiya folks,

Happy 4th July my American chums! [blns]

A quick StuG update:

As you know the Zim is on and it’s not too bad - it will be fine when it’s primered and painted.

A quick question - what colour would this StuG have been where the Zim had been chipped away? Would it be Primer Red?

You know that front section that I showed all on it’s own in the first photo on my post yesterday? Well it wouldn’t dry - it was still totally soft and tacky this morning! I scraped it off and re mixed a little ball and re did that bit. It’s a lot thinner now in that spot - the waffle pattern doesn’t look as good but at least it should dry now. I think I either picked up the wrong bit of putty (for those who haven’t used Milliput it’s an epoxy putty so there are two separate sticks to mix up - you just take an equal pinch of each stick and knead in your fingers for 5 minutes) i.e. just one half of the mixture or I didn’t mix it together well enough?

The rest dried fine so I’m now waiting for the front section to dry before laying some primer on it. The wheels and tracks are primed so I’ll be getting some paint on her tomorrow.

Photo update later!

ATVB

Ben [t$t]