Thanks guys! I finished stripping it last night, and have to rescribe a couple of the panel lines I missed the first time around, then it’s back to the paint shop!
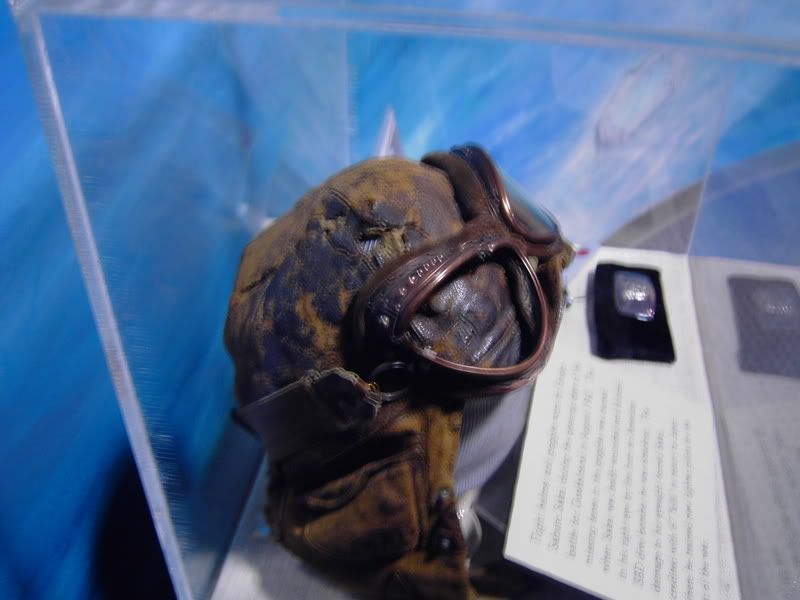
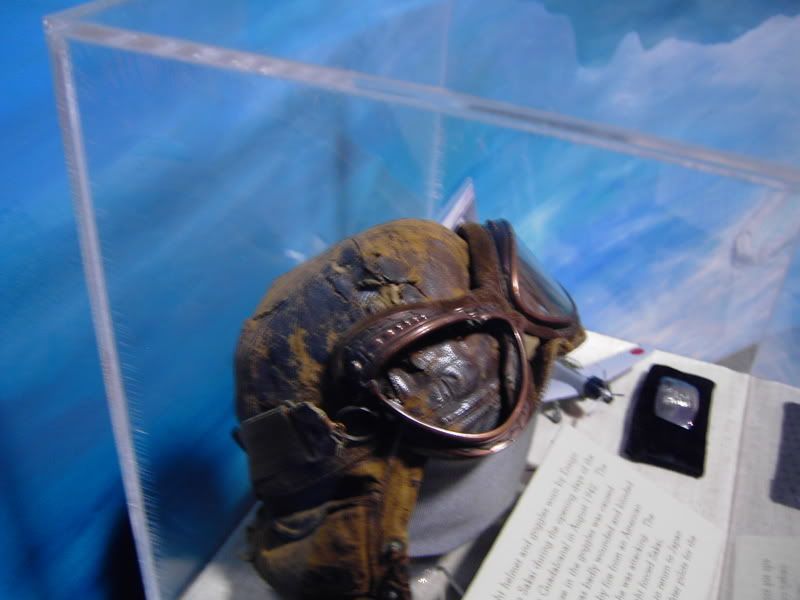
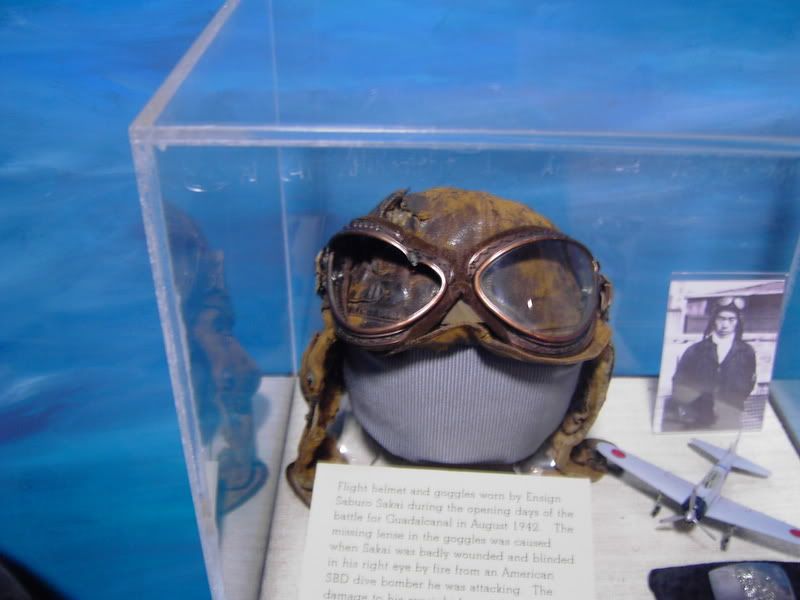
I got to see Sakai’s flight helmet a couple of months ago in Fredericksburg, Texas. The pics are a little blurry, but here yiou go…
Henry
Whoops!!
I went on vacation, and got back expecting to find a finished Zero! Yikes.
You’re a patient man, Frank! Mine would have definitely hit file 13.
Can’t wait to see it restarted/finished!!
Great pics, Henry. That has to be very cool to see in person.
Good luck with the repaint Frank. To be honest, I thought the first one was pretty great!
Henry, being in the presence of Saburo Sakai’s flying helmet is…wow! Samurai is one of the greatest WWII pilot’s memoirs.
Henry,
Thanks for posting those pics! I would really love to see that helmet in person someday.
Andy and Justin,
Thanks guys. I started painting it again last night, getting a lil’ case of deja vu!
Mike,
Got your care package in the mail today, thanks again! [bow]
More than happy to help, my friend! [tup]
Looking forward to seeing that Zeke, and your FAA bent-winged bird as well!
Today, I did some pre-shading and pre-highlighting, and then put a few light coats of the main color on. I think that the pre-shading might still be showing thru a lil’ too much. I might decide to add another couple of coats of the main color, what do you think?


Just my [2c] here, but I agree with you on the pre-shading. I think alot of people overdo it on pre-shading, but maybe that’s just me. Subtle is the goal, right? Great progress, by the way, keep the pics coming!
Looks real good so far, but if it were me, Frank, I’d be toning it down just a bit too, maybe with another light coat. Is that the RLM 02 that you used on your first go 'round with this model? I really like the way that color works there.
I think you guys are right. I’m going to give her another coat tomorrow, maybe a lightened shade to show some fading.
Mike,
Yes, that’s the same Gunze Sangyo RLM02 that I used in the first round. Can’t wait to get the final coats on so I can start decaling! [:D] BTW, I really like the finish you achieve on your aircraft, would you mind sharing your techniques with the clear/decals/clear coats? I’ve usually had good results with the Microscale system, but am always on the lookout for better ideas. Thanks Mike!
Future/Microscale for me. I even use Microscale Micro Satin for my final seal.
Frank & Mike can you guys share with me the art of pre-shading? The whole works, why, and how of it. I have heard people talk about it but have no idea how to do it.
Roy
Be happy to, Frank! I’ve had good results with the microscale system too, so I pretty much just stick with that. This is the sequence I usually use…
- Preshade 2. Top colors (pastel applications if needed) 3. Future 4. Enamel wash 5. Decals (micro-set, then decal, then micro-sol) 6. More Future 7. Flat coat (usually Pollyscale flat or satin coat)
That’s pretty much it.
I’ll try, Roy. Of course it depends on what you’re preshading. For aircraft other than fabric-covered machines, I just spray a line of flat black or dark grey along the panel lines and lightly spray the top coat colors over it until it barely shows, going a little at a time so it’s easier to monitor the gradual effect. With WWI subjects, I start with a very light tan or grey base coat, mask the ribs with thin (1/16" or less) masking tape, then preshade over the masks with the black, remove the masks, and apply the top coats. It really does a nice job highlighting the rib detail. What preshading does for me is give some depth to what would otherwise be a very monochromatic finish. Hope that helps. [tup]
I’ve noticed the colour of a lot of your pics is off. Have you tried messing with the white balance settings on your camera? Try setting it for inddors or flourescent[sp?]
Model looks great, I have a bid in on this kit at ebay. If I win I will be looking at this thread. [;)]
Roy,
Usually, preshading works best with lighter colored camo. I usually start with dark brown on the lightest colors and only use black with darker colors. The nice thing is that you don’t really have to worry too much about making the lines perfectly straight. When you overspray the camo colors, the unevenness seems to go away. I also put a light gray or white cloud in the center of panels, seems to help out with the later stages of highlighting. Just spray some darker lines over the panel lines, a lil’ white or light gray in the center of panels, and then build up your top coats lightly until the lines BARELY show thru. It really sounds more difficult to do that it really is. There seems to be a split between people who use it and like it, and those who don’t. It really is up to you whether you want to do it or not. One last thing, it seems to look better (at least to my eye) on monochromatic schemes. When there are lots of different camo colors, it almost seems to “clutter” the paint job. Just my [2c]. Hope that helps!
Thnaks guys, I will try an dput it to use when I start painting.
Roy
I put another layer on her to tone down the pre-shading a lil’ bit, and I think it looks much better. I also tried painting on some of the insignia for the first time. One of them had a slight bleed under, and another one didn’t get quite enough red. But, I think I can blend them in with the weathering. Overall, I am very happy with them. Nothing looks painted on quite like actually painting them on! Another couple of days, and I can put on the decals I graciously received from Ruddratt (Thanks Mike!). Almost there!
