I have not bought the tirpitz yet. As a matter of fact I came across the revell Germany platinum edition tirpitz and decided that I will be buying that one once my KGV is nearing completio.
Meh, overated battlecruiser design that was out of date by 1939.
Build this.

HMS Rodney.
9 16" naval rifles. Firing at flat trajectory, one hit to the face of Bruno turret on Bismark blew it out and the resulting splinters killed most of the personnel on the bridge of Bismark.
Bill
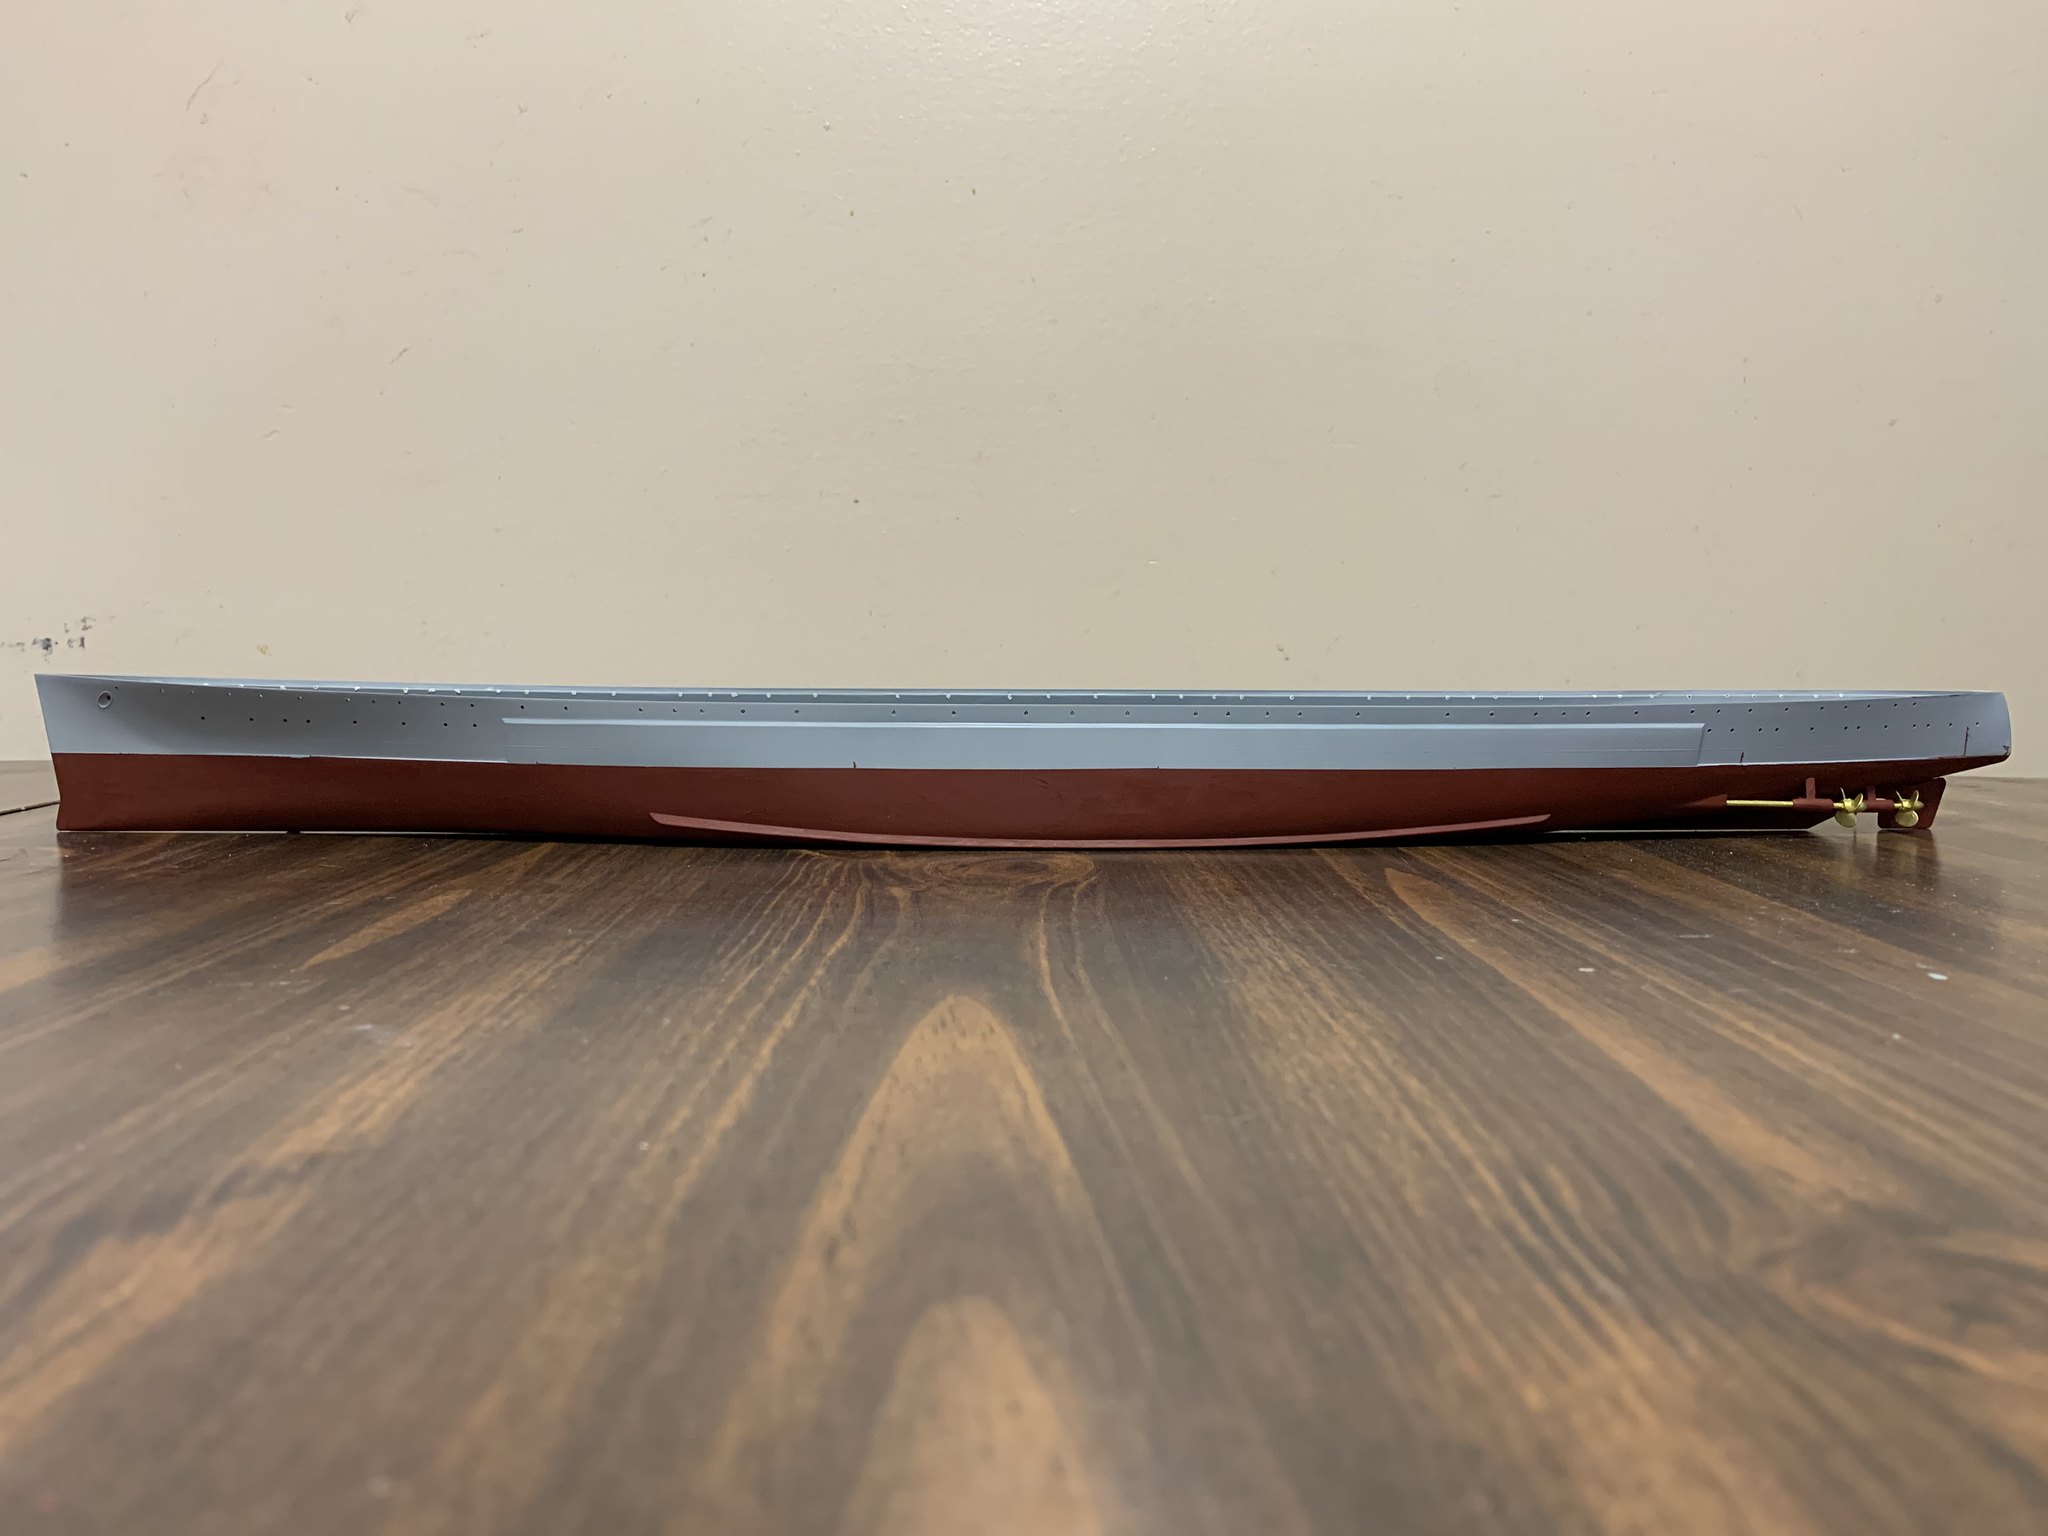
The Queen Elizabeth is done. I spent some time the last couple of days starting on the KGV. As mentioned above I have already drilled out all of the portholes and primed the hull. Yesterday I masked off the upper part of the hull to paint the lower red/brown section. I used 10mm tamiya masking tape for along the edge, and then added 3m blue painters tape over top of that.
 Untitled by Matthew Brumage, on Flickr
Then I started painting away!
 Untitled by Matthew Brumage, on Flickr
Here is the lower section of the hull completed.
 Untitled by Matthew Brumage, on Flickr
 Untitled by Matthew Brumage, on Flickr
 Untitled by Matthew Brumage, on Flickr
There are countless models in museums with brass shafts to the propellors.
On some capital ships a tube connected the shaft struts to the hull boss, which would be painted in hull color. Others had the shafts pained in bottom color. Some were in bare metal–which wants finding photos to decide. KGV could put about 27,000 shaft horespower per shaft, so you needed steel to deliver that 230 rpm to the screws.
Not my kit, not my pick–not a bad way to add color to the fairly anonymous bottom of a ship kit. (Which ought to have all kinds of aperatures, like the condenser intakes and outputs, for just one example.)
Hmm, interesting. I painted it according to Tamiya’s instructions. Would repainting it into a gunmetal, or a gray be more accurate?
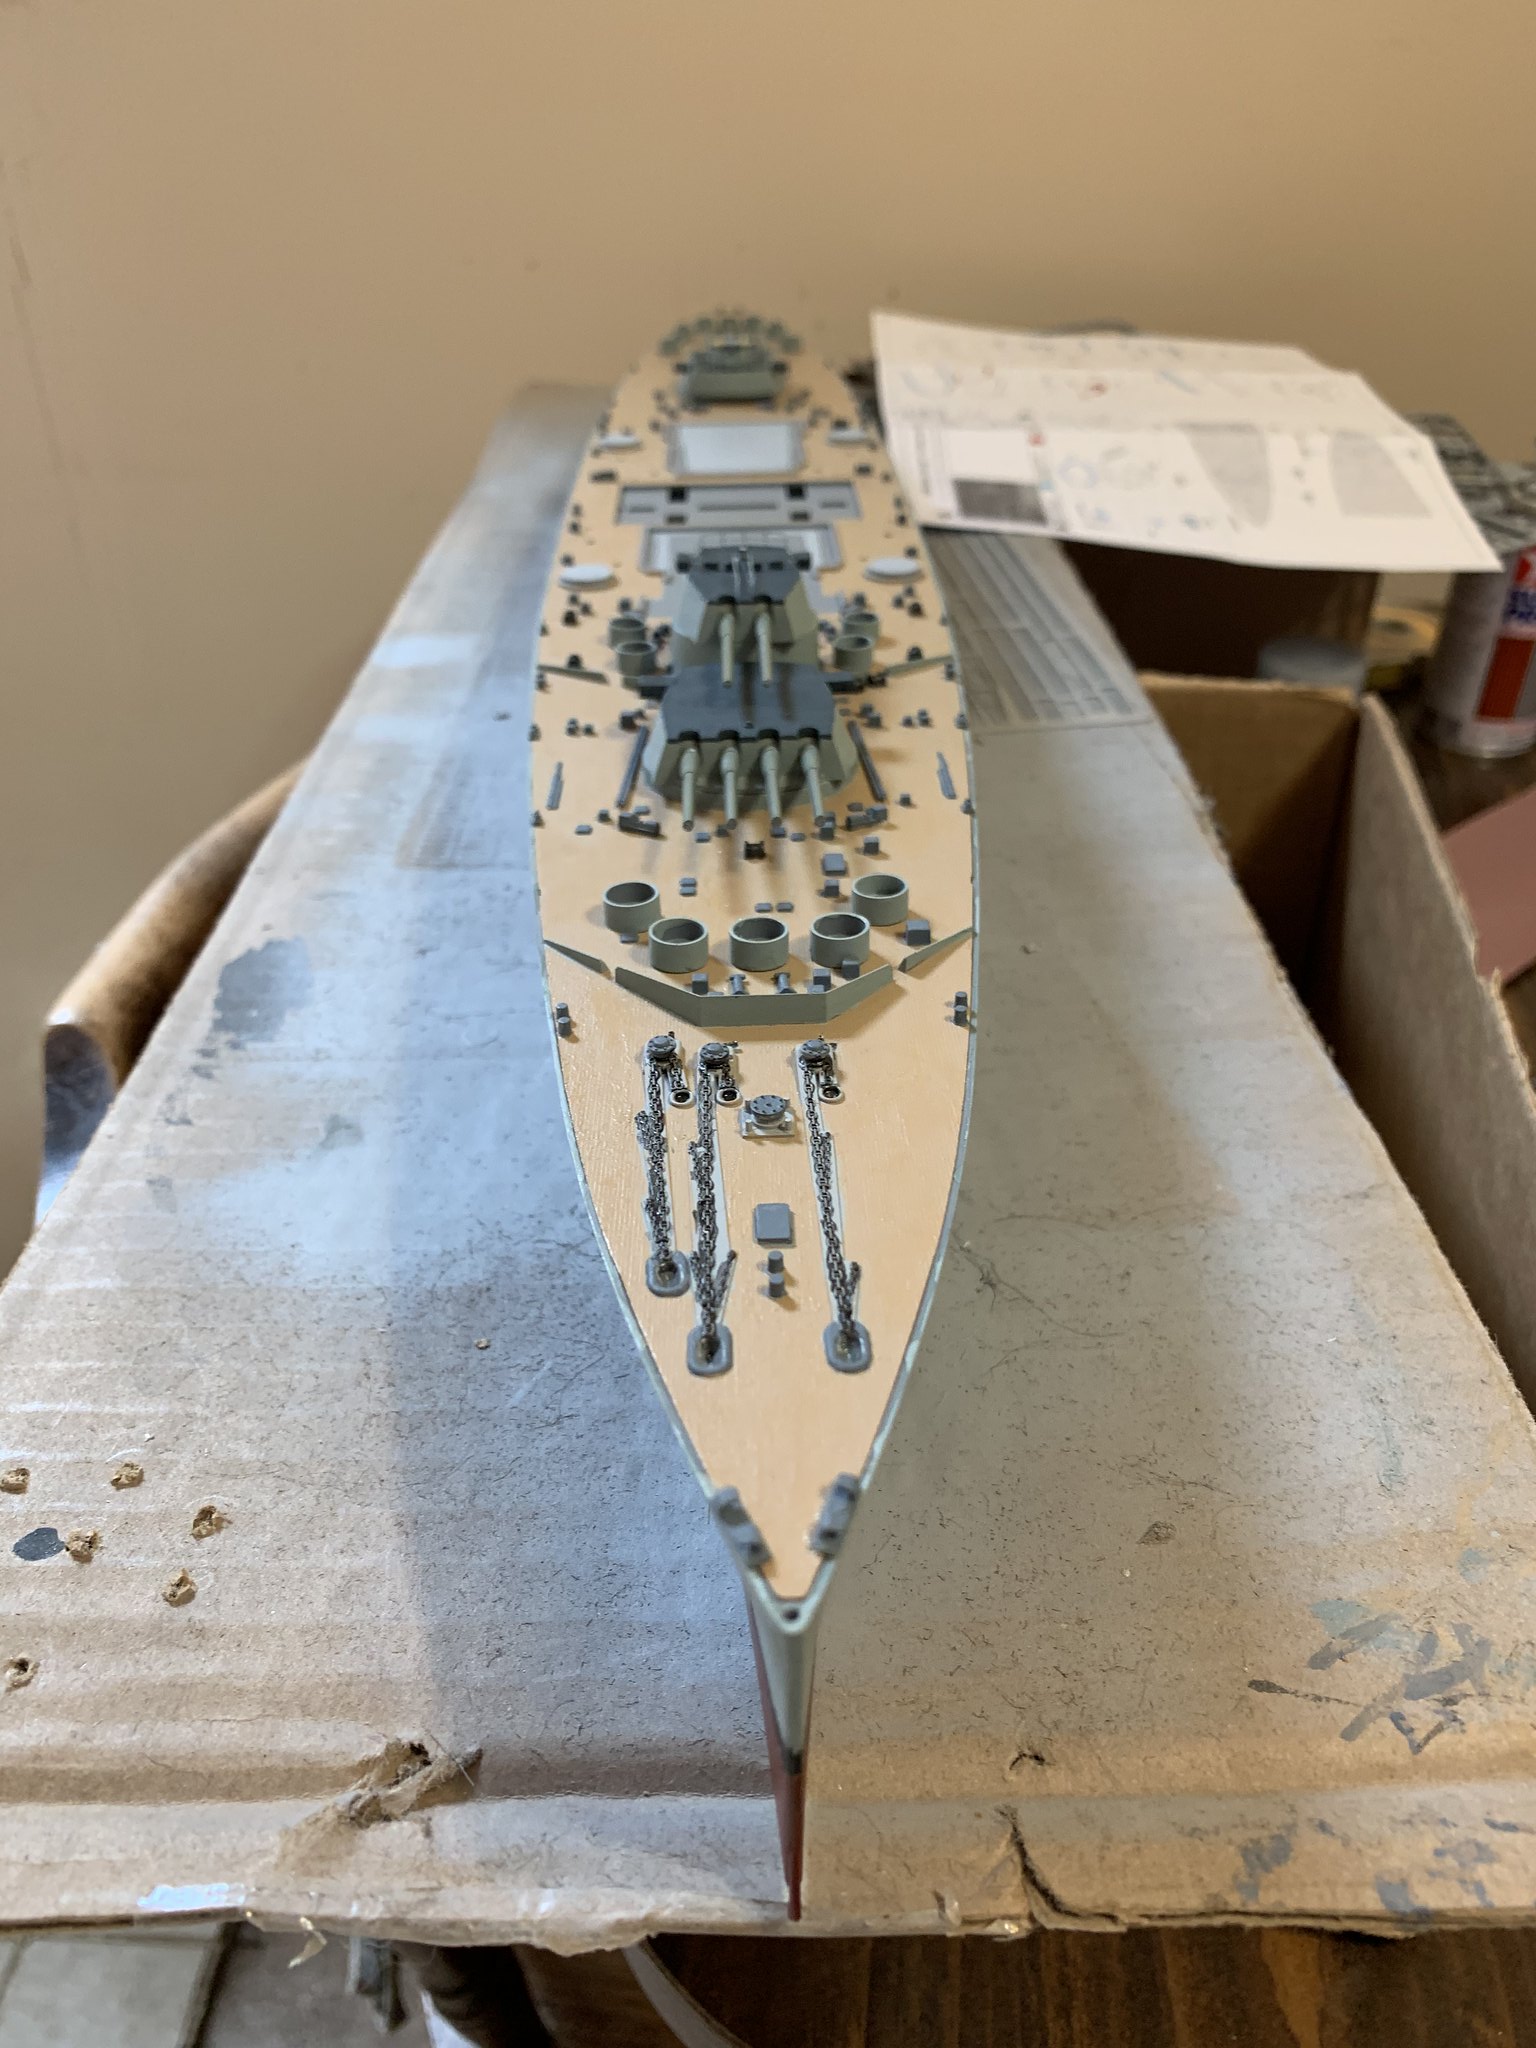
Over the next couple of weeks my main task will be masking off the the fore, center, and aft decks of all accents. My goal is to only leave the decking itself showing for better paint application of the deck paint. This will be a daunting task as the deck of the KGV is littered with small pieces. But i will do my best. I am doing this because on my QE build I noticed that when I went back over the deck to paint the little parts that I got quite a bit of the decking paint on these small pieces. Then I would paint them, and end up geting that color on the wood colored decking, then would have to touch that up. It was a real pain.
So my new course of action with the KGV is to mask off as much as i can, leaving hopefully just the decking. Then once it is dry, mask off the decking to paint the small parts scattered everywhere on the deck. To keep my sanity, I will probably tackle each section one at time. So i will start with the fore deck, then once it is done take a break and work on some other parts of the model, then come back and do the center deck. So on and so fourth.
I sense frustration and sailor talk in my near future. But i am dead set determined on making my KGV an outstanding model, and correcting as many errors as humanly possible that I made on my first model. (the Queen Elizabeth)
Red like the hull.
Full stop, full speed astern. Masking complex objects is difficult, flat surfaces is easy.
Paint the deck. Mask around the base of the furniture and mask the rest of the deck; paint the bumpy stuff.
So the tube that is attached to the screw should be painted the hull red? Just want to make sure i am understanding correctly. After Mac’s comment I looked up a bunch of different completed KGV models. Some are like mine, where the tube is painted the same color as the screw. Others the tubes were painted the same color as the hull, and others they were painted in a gray.
Never use a built model as a reference unless you are familiar with that builder and there’s some provenance provided, as I and others provide.
In fact, many model companies create directions from previous models.
The finish on the bottom of ship models is fantasy in any case. Fresh out of drydock, that’s the way I model.
At sea for a while, covered in marine growth.
Bill
Well that sounds much easier! Hahaha. So go ahead and paint the decking, then once its good and dry, mask the decking around the furniture pieces sticking up and paint them… Makes much more sense that way. Thanks for saving me a headache!
Today I painted the shafts the same color as the hull. The model will be set on the back burner for a few days now due to work being crazy. I go on vacation next week and plan on spending a few days of it working on the KGV. I will be around and wtill post up progression pics when I have them.
So question for you photo etch guys. Should I paint an object, let’s say a turret of the main battery, before glueing on photo etch? Or should I put the photo etch on before painting the gun?
I bought a new glue for my photo etch. I got Zap SLO-zap ca. Hope it’s decent stuff!
If its all the same color attach 1st and spray everything together,that’s the way I do it with armor
With me it depends on the location. Ordinarily I like to put on PE as a last step (especially railings). However, if the subassembly it goes on is near the center of the ship and hard to reach because it will be surrounded by other stuff, I will add the PE as a last step before mounting the subassembly. That is after I paint the subassembly.
To give the glue something to stick to through the paint, I use a pinvise and small drill to dimple through the paint at points within the footprint of the PE, and scrape the paint off the PE on its mounting surfaces.
I always prime it in its fret.
If it is being attached to a base of the same color, it makes sense to glue it on and then paint, in most but not all cases. For instance, a waterproof door attached to the side of a deck house.
On the other hand, a railing close up against but not touching the bulkhead behind it might better be painted both side; the narrow sliver of deck it sits on painted deck color and then the railing attached.
Thyese things get complicated, so I usually go the extra steps painting separate parts. If glue shows up later, it can be touched up.
Others suggest attaching it unpainted to a surface of a different color, masking the area around it and then painting the PE. Not my preference, but another way to go.
Hope everyone is doing well! I have been on vacation since Friday. Made some progress with the KGV. On my way to the beach right now, I will post up some pics on Sunday!
Update time with come pictures!
Here was the decking all painted
 Untitled by
The aft deck attached, and can also see my very first go at PE railings! Turned out pretty good I think.
 Untitled by
 Untitled by Matthew Brumage, on Flickr
2 pounder pompom added to the rear gun.
 Untitled by
 Untitled by
 Untitled by Matthew Brumage, on Flickr
All decking attached to the hull and all 3 main battery guns done.
 Untitled by
 Untitled by Matthew Brumage, on Flickr
I am currently working on the rear superstructure. There was a seam in the center where the 2 pieces of plastic met. I decided to use my tamiya white putty and fill the crack.
 Untitled by
Here are some pics of the rear superstructure so far dry fitted to the deck.
 Untitled by
 Untitled by
Untitled by
Now I still have to finish painting the hull, and touch up a few spots. I will do this before I permanently attach any of the superstructure. I will also give it a coat of Testors dullcote too.
She is sloely but surely getting there!