Tamiya 1/35 DAK Kubelwagen *Christmas Update*

So, I’m at my dads place. One cool guy who taught me war history and modeling and all that. We got a rather rare band between us… But anyways… It’s on the southern end of Norway, while I live with my mum in middle Norway… For those who don’t know, I’m 17.

I didn’t bring all my modelingsupplies, and with all the other things going on, I wanted a rather easy kit. I’m also a slow builder… [:)] Another fun thing to mention, is that where I usually live with mum, the closest store that even sells kits are in Trondheim, 100 miles away. Here, it is just 100 meters away. So I picked up my summerproject there.

I am also building it for the Junior GB, but like to share it with you here… Also, we are searching for people who’d like to help the younger crowd by giving away a kit or two. Please, contact Boba Fett for more info!

So to start…

I spent two hours modelling outdoors. It was purely gorgeous!! First time I ever did that.

The kit is a multi-kit kit. Including a figure that comes in 17(!!!) parts. Quite alot, considering the two other figures are in 4 parts each… It further includes a radio and a tent, and a Kübelwagen, with the worst winter road tyres you can ever imagine…

It’s a rather new kit, moulded in 1997, decals printed in 1999 and box printed in 2005. It’s a typcal Tamiya kit, being very well moulded, lots of details and not too many parts. Erwin Eugene Johannes Rommel is a little special, consisting of 17 parts. The two other figures are more typical Tamiya figure, 4 parts. It’s actually way too little to satisfy me, but will work just fine!

First part was the chassis, or undercarriage, and I cleaned it (Some mouldline going along the edge) and inspected it. Found one ejector pinmark (A circular mark) that I guess will be noticable once completed. I filled and smoothed it as greatly as I could. The filler (putty) is the grey spot:
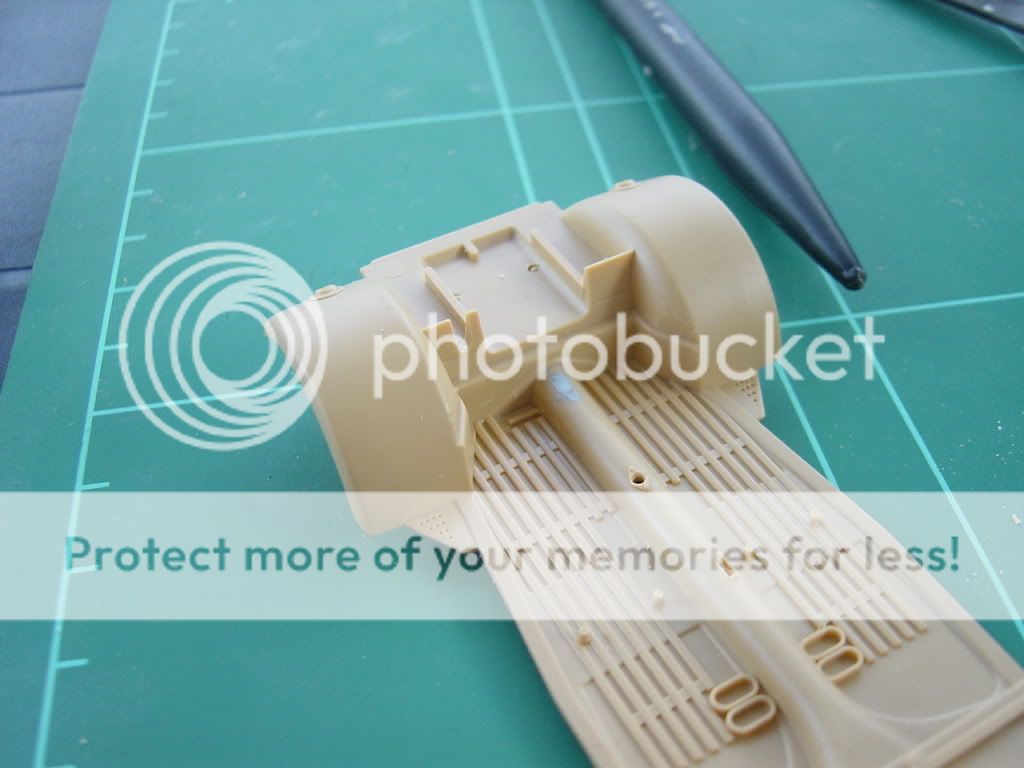
Here’s three parts attached to the underside…

I’ll explain. The front axle, and the rearaxle (plus gearbox) and a little cover that goes along the middle of the boyd and cover both axels, are all one part each:

And one very happy outdoor modeler. Photo taken of my dad, who is building a PAK 36 beside me:

I attached the steerwingwheel rod, pedals, hanbreak and similar… Also the detailed engine walls. No engine is provided, however. I believe it is detailed because of the Kübelwagen Engine Set that is sold seperatley that you can buy from the same producer; Tamiya.
The Steeringwheel rod was a little bad. Or, I made it bad. When I was scraping the mouldlines away and removing some STUPIDLY placed ejector pinmark, I made some dents here and there on it. I smeared it with Putty, and sanded it nice and smooth again…

Here you got the sidepanels. Each sidepanel consists of two parts. The top panel is cleaned and assembled, bottom panel is neither:

Here you can see the bonnet, that already was assembled as shown in the other post, the rear panel and the two sidepanels. Those will make the frame of the kübelwagen Typ 82. The parts are all cleaned and ready to be assembled:

After quite some fiddling about with mounting one and one part onto the chassis, I discovered it was just as good and even easier to assemble them seperately… So here you got the frame:

And the mounting went painlessly:

It’s really awsome now, eh? I can’t believe how great and awsome this kit is. I will most ceratinly make more of these!!

I did encounter some lining up errors, but just very, very, very minor ones. It’s probably because I drytouch everything before I even touch the glue! [:)]

Questions and comments are very appriciated!

Enjoy!

-Lasse
Hey Huxy nice little build you got going cant wait to see this guy all painted up.

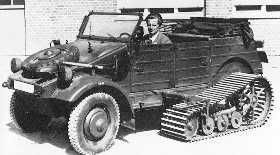
I do plan on adding one of these guys to my collection but I plan on converting it to the half tracked experimental version like the one seen here

With my luck though Cyber hobby will announce their upcoming release of one a week after I’m done[sigh]

THAT LOOKS SO AWSOME, imagine pulling up to school with one of those babes. The girls would be all over you, (telling you your a dork)

Yeah, but you would know the truth, wouldn’t you?

[(-D] lol jim, nice build huxy

Ha ha, thanks Brian.

Hey Lasse,

That’s great, modelling time and quality time with your dad (and a hobby shop 100 metres away). Can’t beat that. [8D][:D]

Hey Lasse , looks like you really doing that kit some justice. Your photos are excellent, especially when you see the actual size of it beside your hands. When I work on kits these days I have to use magnifing glasses. Getting older sometimes sucks. Nice job so far, keep at it.[tup][tup][tup]

Looks like you’re moving right along with this one Lasse! You’ll have it done and painted in no time at this rate. [tup]

Outdoor modeling? The weather must be nice in Norway.

I live in Florida, 100 degree F and 100% humitity…air so thick you have to chew it before you inhale. I avoid the outside at all costs.

It does look like a lovely day and it is obvious you and your dad are enjoying it! Good for you both.

She’s looking good Huxy. Are you painting her in DAK or Euro theatre colors?

doc

Oh boy, 100 meters away from your local hobby store… lucky you! But for me… it will be a bad idea or my wife will find many charges on our checking and credit accounts.

I have the kit… but its the older kit that I got via eBay… I think it is atleast 20 years old because the color prints on the box have pretty turned into blue. It will be good for me to follow your process…

And do not forget to put on some sunblock lotion… global warming is coming to Norway! [(-D]

Thanks for the comments everybody!! Sorry I didn’t reply to any questions before, but I honestly tought it wouldn’t be this long till the next update…

So, the questions first…

Cedric: Don’t tell anyone, but I got a optivizor nearby for those extra tiny parts…

Tom: I’m quite glad to say that when the sun do shine in Norway, the air is never thick… [:)]

Charlie: It will be DAK colours… I could paint it italy, but I simply won’t [:)]

Andy: 100m from the closest hobbystore at my dad, yes… Living at my mum place in middle Norway, it’s suddenly a 100mile away… Online stores in the UK has for a long time been my “local” store [:)]

And global warming is not coming to Norway according to experts… They say that if global warming countinues, Norway will end up in a new iceage… More snow, just a plus in my opinion!! [:D]

And thanks to the rest for all the kind comments!!

But here’s a new update on our North African ride.

Here’s the back of the seats… You all can see those bleedin’ ejector pinmarks? Removing these was a real bugger. Thank god it’s only two seats!

Here’s the seatframe, the lower part… You can see one ejector pinmark on the lower middle beam this, and a little tiny one on the bracket infront… I’ve already started sanding here, but you can still see it. The small one didn’t need removal as the seat itself would cover it entirely:

Here’s the big one removed, and the tiny one is a bit more visible:

Here’s the back of the seat all cleaned… Phew!!! That was a bugger to clean!!

But all this scraping did leave quite alot of plastic dust and such on the part… Easily cleaned like this:

None glued to the car yet, but here the seats are done:

The rear bumper too. Here you can see the box behind the hooks making them easier to glue:

Here’s the enginecompartment door… What do you see up in the corner? Yes, me + knife + no focus…!

How to fix it, and make new hinges? Well, we carefully glue a piece of white plastic card ontop, let the glue set, and then sand down, and carve out the hinges:

I feel that I’m getting a little too bad at photographing, as I had to do the same thing on another door… Meh…

I am currently in the paintingstage, but I have yet to photograph it, and my next photo will be my first since the last you saw here! I’m horrible right now, I know… Sorry!

Hope you enojyed it, comments and questions are appriciated.

-Lasse [#toast]

Awesome build Huxy! Doesn’t seem like your a slow modeler because your already to the painting (when i would be on step 2)! Can’t wait to see it painted up. BTW your workbench looks like mine… cell phone at my side [:D]

Moving right along Laase! While the Tamiya kits are often held up as the paragon of kit fit/engineering, the ejector marks are often something that has to be dealt with as part of the bargain. Looks like you’ve got that under control though! I hear you about accidentally removing details…can’t tell you how many times I’ve been slightly distracted and snipped something off thinking it was a sprue attachment nub or similar and having to improvise a replacement as a result. [(-D]

Anyone interested for an update??? [:-,]

After coming back home some well 4-5 weeks ago, I finally got to do a little work just a few days ago… School started too…!

I got done giving it a brush-applied basecoat, and did an overall wash. Next will come a pinwash, and then drybrushing.

It was all applied over a solid primercoat of Citadels Chaos Black spraycan. This is the only picture I got of it, as I didn’t take any untill I did paint the outer shell!!

Then it was all painted with the bascoat. All by brush… The black hole in the back isn’t painted because it will be covered by the back seat:

Underside:

Burnt Umber oilwash was applied overall to get a nice dusty look, which I hope to appear after drybrushing:

It took 5 minutes to get to this stage, last night:

I applied the rest this morning before I went to school. All the wash all in total took 20 minutes. But no more picture because of little time, so I will end here.

Questions and comments and all that are highly appriciated!

-Lasse

By the way. I am done drybrrushing it now. Pictures to come!

Wondered what had happened with this one Lasse, good to see it’s still making some progress.

Welcome back! You are almost there… did you mix Burnt Umber oilpaint with something to make it thinner? I haven’t tried that approach yet but it looks easy enough. Maybe I will buy the oilpaint next time I shop at LHS. I usually use enamel and arcylic paints only.

Bill: Well, here comes another update!

Andy: I use acrylics only, with a few expections of Oilpaint for wood, and washes.
I take some oilpaint, some white spirit (Regular oilpaint thinner works too) and mix it. For washes, I take very little oil, no specific ratio, but little oil! [:)]

Wash AND drybrushing completed:

Hood:

Another angle…

Underside:

And even the engine!

I started with the seats. I felt that it lacked some texture, so I finally got to try the glue-paper-on-it trick. It turned out very well. Here you see paper glued on one seat, and another seat lacking paper. It was glued on using woodglue:

Left one is trimmed, the right one is trimmed and got the basecoat of Citadel’s Scorched Brown:

A little highlighting:

And completed. Tried to give it some woren look, I say it came it nice:

And the back of them:

I also did the backsofa aswell. Not that worn, but somewhat:

Now we all know how hard it is to cut out thing parts, especially steeringwheels. Well, I cut of the sprue:

And with the heartbeats in the throat, I carefully cut it and…

I made it!! I cut out that part all good! Woooh!!! [:D]

But the instrumentpanel… Not primed, just dashed on the paints required:

And after quite some arguing with the colours, I finally got it. I do like this piece, but the picture magnifies it to look… weird… Oh, I did also do some touching up right after this photo:

I also installed the backsofa:

And the instrumentpanel… Do notice the painted handbreak and such, plus the bare metal weathering… And do indeed notice the wooden floor:

Now that’s all for now! Hope everything is to your likings, and I would love any questions, comments and such! [:)]

Thanks for now!

-Lasse

I can also add to all this that my plan is to load this Kübelwagen up with loads of supply, as it is roaming the desert to hand out weapons and supplies to infantry. This will compromise in both Axis and Allies weaponary/equipment.

[#toast]