I’m taking a break from my usual subjects & venturing into the world of autos for the third time in too many years to count! My question is about tail lights. I’m doing a van & I know about painting the inside of the plastic to get away from that “painted look” so they look like they have color behind “glass”.
The problem is that I’ve run across is that the ones I’ve done previously look very flat & sometimes cartoonish themselves. Just no real detail to them. Does anyone have any tips that can help me make the tail lights (& then maybe headlights for that matter) look a bit more realistic?
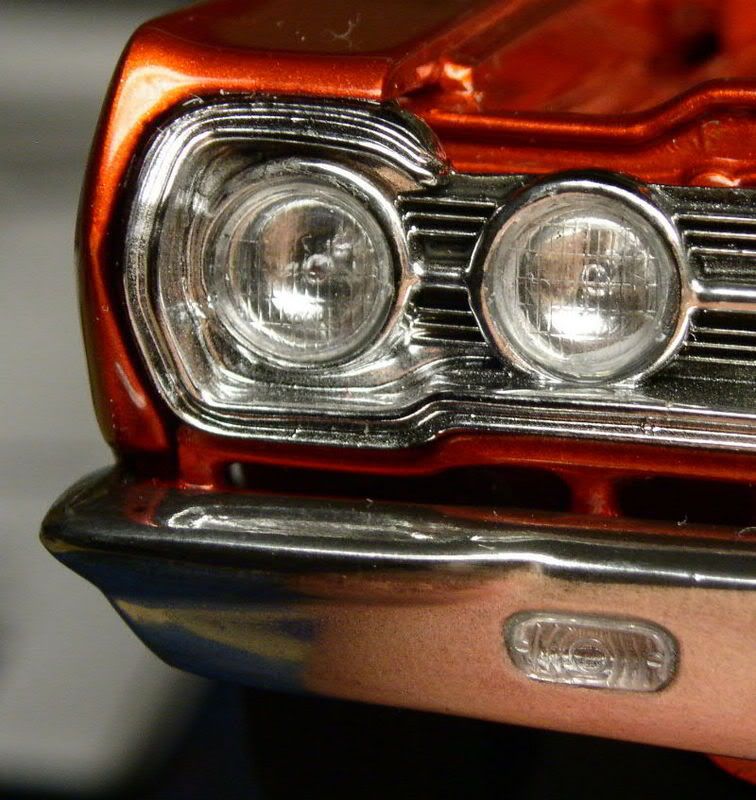
Here’s a shot of the area in question. The lights are pretty huge & will be a feature that will be looked at easily, so I want to do a good job on them. Please ignore the broken length between the tail lights! It’s since been fixed! [:I]
Hi, I enhance the look of lights (both front and rear) by coating the lens with self-adhesive chrome tape and then adding bulbs. The bulbs are made from drawn-out pieces of scrap clear sprue. I gently heat it in a candle flame and draw it out until it`s like a thread. Next cut off a short length and hold the end at the BASE of the flame until a bubble of the required size forms. Drill a small hole in the lamp body and thread and glue the spru into place, then cut off any excess at the back. I find that painting fog lamp bulbs yellow gives a really pleasing effect. Jim
Thanks for the tip, Jim! It seems like that is a great tip to use! I’ll post pics when I complete my try. For the tail lights, do you just thin your paint to tint the lens red?
Thanks! [:)] That was a real fun build! Kind of a “What if… Doc Brown didn’t have enough money to buy the Delorian”. I made it a blue bug as an homage to the one we had when I was little, living in Indiana- hence the '85 Indiana plate.
To tint taillights I would use tranparent paint (like “candy apple red”) applied to the inside. I haven’t done this on taillghts but it works great for tinting windows.
At one time, Testor’s “Colors by Boyd” line had transparent colors called “Stop Light Red” and “Turn Signal Amber.” They may still make them.
Another way to make bulbs, which I used to great effect on my 1932 Chrysler Imperial, is to dip a very thin piece of wire (I think I used #30 florist wire, or even thinner, if I recall correctly) in white glue, then put the wire glue-end down in a small vise until it dries. The glue balls up naturally; it might take a bit of experimentation to get the right size. Drill a corresponding hole in the socket, cut the wire to fit, then insert inside the pre-drilled hole.
MV Lenses for locomotives come in different sizes and fit inside stock headlight buckets. They reflect the light and look good behind stock head light lenses. The clear sprue method looks really great.
Wow, all of these are great ideas! I’ll have to look for those paints & I may try the florist wire idea!
Here’s how my tail lights turned out. I made a box to mimic the inside of the light assembly. I painted the box three different colors of silver, giving the colors a hard, masked edge to hopefully mimic a faceted interior.
Then I streched some clear sprue over a flame till I got a thin rod & trimmed it to the size I needed, then “bulbed” the tip by bringing it close to the flame. I glued it in place, colored the tail light with red food coloring & Future & volia!!
It looks so cool!!! I put bulbs in both the red & white sections of the tail light. I still have yet to trim the assembly in silver to get rid of those chips, but I’m real giddy with it. The clear glue dried a bit chunky, but overall, I’m still pleased. I still have to put in some wires leading out of the back of the box & down the roof line, like I saw in one of our cargo vans at work, but that shouldn’t be too hard.
your post on tail lights made me look for the paint I use on car tail lights and parking and turn signals. I saw one answer on boyd’s paint, not sure if still available but testors model master has both turn signal amber #50323 and stop light red #50324 in acrylic in 1/2 oz bottles. Should be available at your lhs.