For father’s day I am building my dad a model of a ship he served on as a plank owner while in the Navy. I’m Just looking for ideas on how best to display it, im currently planning on using a board (stained and such to look nice, with a plaque saying the years he served on board and such), so I just need ideas on how to mount it best to the board, or if anyone has other ideas of how to display it. Thanks for any ideas.
If its a full hull, either on pedestals or something that looks like drydock keel blocks.
In my opinion, the keel block idea works best for big big ships like modern aircraft carriers or battleships. Otherwise they look kind of precarious, and they usually have big flat bottoms.
For other types, pedestals can be everything from minimal- clear plastic rod, to ornate brass.
You will see lots of good examples on this forum.
Hope thats a little helpful.
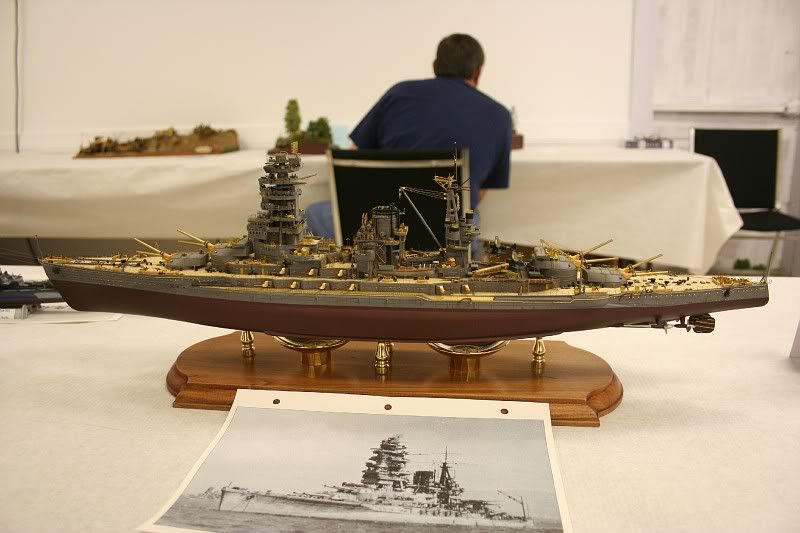
I’m a big fan of keel blocks, like this (model by Stephen Allen)

Thanks for the suggestions. Do either of you glue it dow, or does it just it sit there.
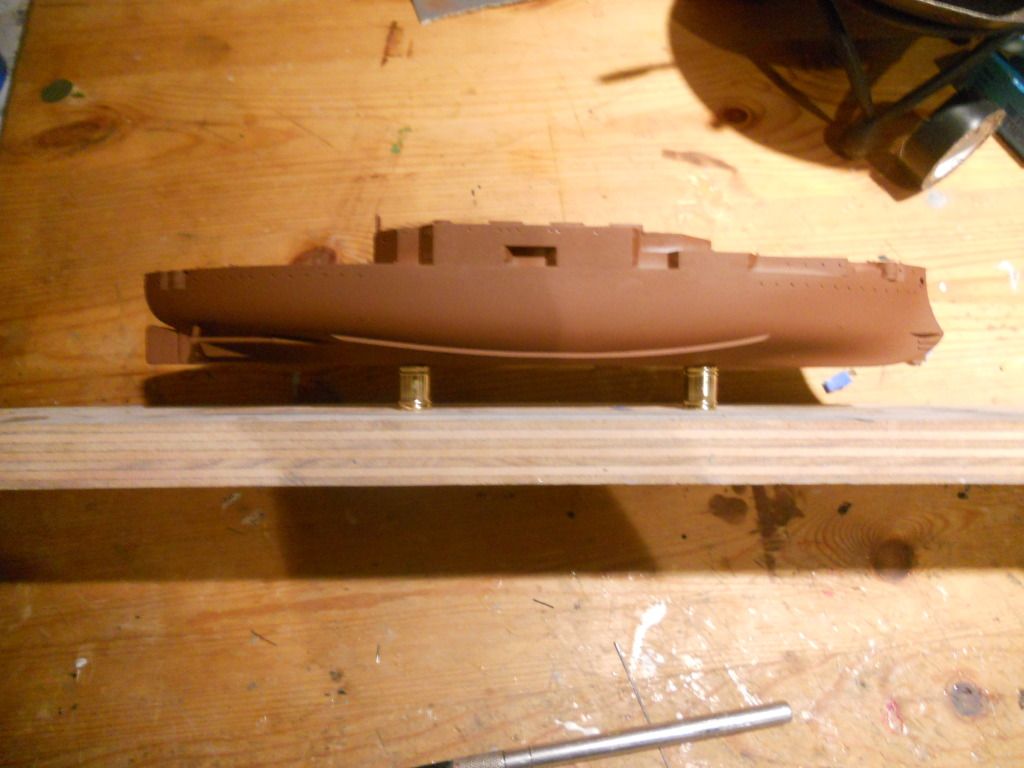
I use pieces of clear acrylic dowel, usually 1/4 inch, as stanchions. These are available at many hobby shops. I drill quarter inch holes in bottom of hull at about 1/3 and 2/3 stations. I cut small blocks of wood and drill holes the diameter of dowels to put inside hull to brace the dowels rather than rely on thin hull glue area. I drill holes in the wood base at the same time to make sure I get same distance between holes. The dowels are cut about three inches long, to give about 2 1/2 inch distance between base and bottom of hull.
Another popular trick is to use lamp shade finials from hardware store as fancy stanchions. The tops of the finials need to have slight rework.
If you’re building a base for a finished model your practical options are limited. For future reference, the time to work out the mounting system is before you start the model. As Mr. Stauffer said, if you’re planning on using pedestals of any sort you really need to build some sort of mounting into the hull to receive them. That can be a block of wood, as he suggested, or a pair of good-sized nuts stuck (really stuck) inside the hull bottom. I really like those clear acrylic posts for twentieth-century warships. But the “keel block” method is also nice-looking. If necessary, you can carefully epoxy the model to the blocks.
Suggestion: give some thought to the type of wood you use for the keel blocks. Poplar (which is sold in strips at Lowe’s stores - at least here in North Carolina) is good for the purpose IF it’s painted black. (Poplar frequently turns green as it ages.) And if you make the blocks out of walnut, cherry, or ebony you’ll have a downright beautiful display piece.
Having the model mounted to a base from the get-go is really helpful. If you can get the model mounted first thing, then cover the base with saran wrap so it doesn’t get paint on it. It really helps the handling. In general ship models really don’t do well being touched. Too many little things to bust off.
I usually glue nuts into the bottom, and run a countersunk bolt up through the bottom of the base with a short piece of tubing as a spacer. So actually I can use a temporary base and replace it last thing.

My usual habit is to make a temporary base - just a pine board with a couple of holes drilled in it for the pedestal mounting screws. When the model’s finished, I replace the board with whatever the finished display board (or diorama base, or case, or whatever) has been selected.
such matters are worth serious attention. The way a model is displayed has a big effect on its effectiveness.
I very much agree. When I drill the holes for the pedestals, I drill out a strip of wood for a pattern. Then I make two bases, The first is a working base, made from cheap particle board, the second is the hardwood base that will be the display base. I can work on this at my leisure while building the ship. I mount the pedestals as soon as the hull is painted. Then I can insert hull and pedestals in the working base. I do not glue them in, just press/set them in. The base keeps the hull off the bench surface while I add decks and superstructure. Finally, when ship is just about done, at rigging stage, for instance, I remove it from the building base and mount it in the display base for completion. I do this before rigging, and maybe final small, fragile PE parts, so that I will not damage anything during the move between bases.
Thanks for all the advice and ideas, this is only my third model ( I just finished a B-17 and a P-51) and the first time I’ve built a ship. To clarify it’s a modern warship, the USS Essex, a helicopter carrier. Are keel blocks available at hobby stores or would I need to make them myself? Once again Thanks for all the ideas and help, I’ll definitely use it. I’ll try to update everyone on my build.
I’m afraid you’ll have to make them yourself, but it’s easy. If you don’t have a table saw, you’d better buy some strips of wood in the size you want. Study some photos to get an idea for lengths and spacing, and take your time laying them out. Again, I suggest poplar if you want to paint them, and either cherry, walnut, or ebony if you’d rather varnish them. If you have trouble finding a source, try www. Woodcraft.com (search for “square dowels.”)
Good luck.
The next question I would ask is what is the pattern?
I personally use stanchions but the block approach is an attractive one for a big beamy ship. Otherwise you need more than one row of stands fore and aft and it gets a little weird.
But the practice of modeling blocks bears no resemblance to actual practice or only a distant one.
Initial construction docks usually contain elaborate fixtures to hold the parts together during assembly.
Subsequent dry docking is a very busy and usually somewhat messy looking affair. The dry dock master who is a true expert in things big and heavy devises a layout of towers of various height formed from prepared pedestals, cribbing of timbers and all manner of pads that correspond to the main structural members inside the hull itself.
Our task is a different one than avoiding breaking the back of the ship. Here we have the happy task only of making something that looks attractive and properly substantial. The example posted is a nice one. The modeler has used square shapes in one piece crossways, and spaced them closely. They give the effect of supporting something big and heavy. You can see though where if the blocks were spaced their own thicknesses apart, it would increase the apparent weight of the ship.
It looks to me as though they are cut to sort of mimic the plan form of the ship. This has a certain grace to it, however I would probably make them all the same length as it would look a little more " real" to me.
But it’s entirely a matter of taste.
Most but not all ships at least as the model companies make them have a keel of constant depth. Some don’t though and this needs to be considered, esp on something like a schooner.
As far as attachment I think it’s always a good policy to make the base solidly attached but removable in some fashion. A couple of self tapping screws from underneath the base plaque should do it, in drilled pilot holes of course.
Two more thoughts and then I will shut up. Make the base bigger that the boat. And be really careful drilling holes on centerline if it’s a join between two hull halves or fuselage halves etc. Really bad things can happen if the drill bit bites. Start small and go carefully.
Good luck I look forward to seeing your model.
Now that we know your subject, I gave it a little thought and will offer an opinion, which you of course are free to feed to the cat if you wish.
It’s one heck of a busy little model. I think you are building the 1/700 HobbyBoss.
There’s also that big opening in the transom, an LCAC or two to display.
I would go really minimal. A nice piece of wood, and I think the clear rod design would be best. Let the details of the model be what draws attention. You could also position an LCAC on its own little stick.
Believe it or not, the spent brass shells from a firearm are excellent - all you have to do is drill out the bottom of the casing and polish it up - the bottom lip for the brass ejector makes the base look like shells from a ship - have done it 2x now and have been happy with the results
 Alot of brass
 ![]() As a matter of interest, the two Japanese saki cups under the hull were issued in 1936. They also have the Royal Chrysanthemum crest engraved in their centers, the crest that became so famous on the bow of many of the Japanese battleships of the time.
As a matter of interest, the two Japanese saki cups under the hull were issued in 1936. They also have the Royal Chrysanthemum crest engraved in their centers, the crest that became so famous on the bow of many of the Japanese battleships of the time.
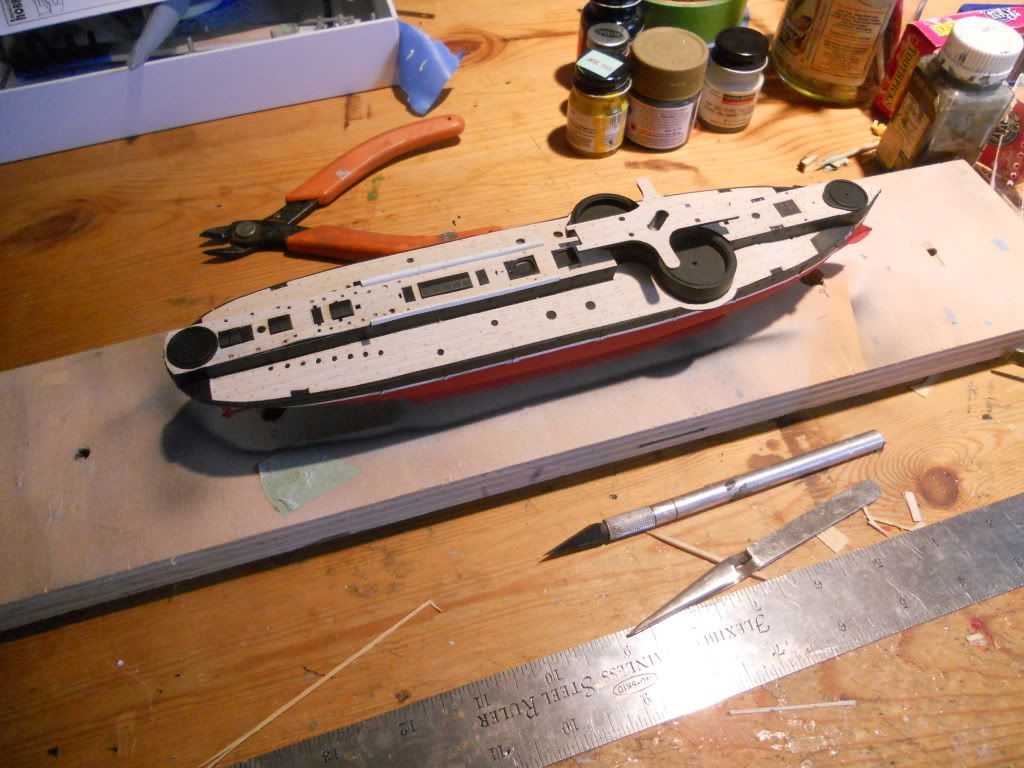
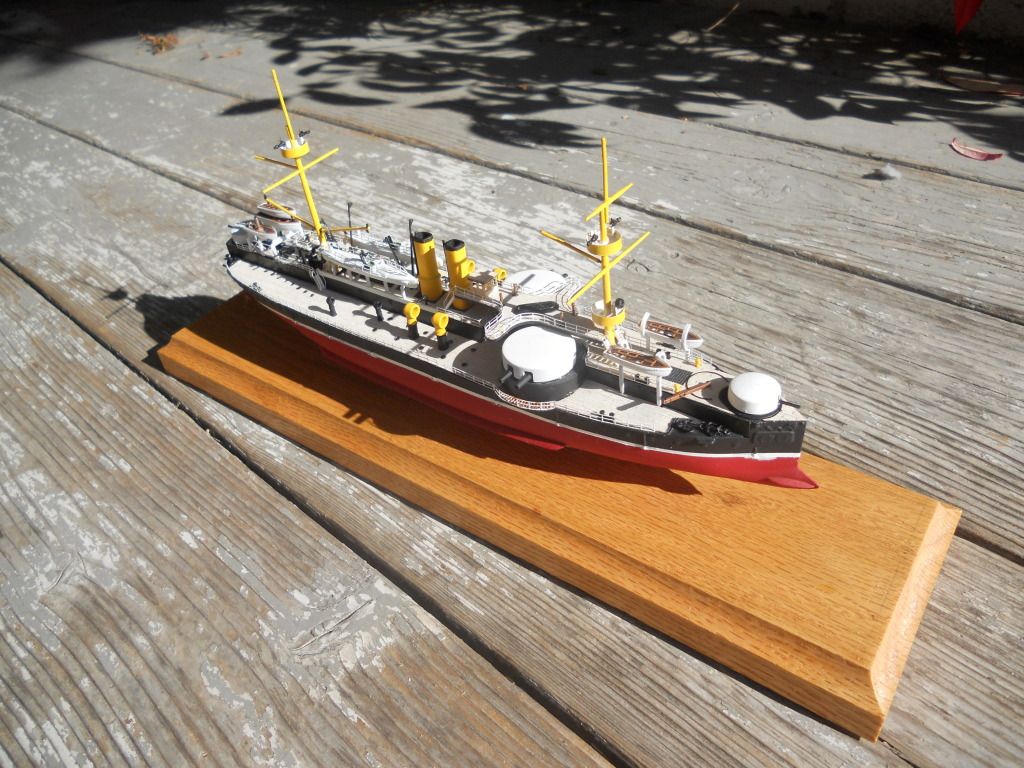
Thanks again for all your ideas, at this point I plan on using keel blocks for the display. I have so far gotten the superstructure built and have started on the hull. I figure I am maybe 45% complete with it. I am attaching some pictures ( I hope it works, never posted pics before)
If you haven’t fastened the decks down yet, you still have time to drill a coupe of holes for mounting screws or bolts. Highly recommended. You won’t be sorry if you build in a method to let you remove from and replace it on the base.
A touch of reality: 
This model has a two piece hull, upper and lower half so I lucked out on that, I can wait until it’s just about done to do the mounting.
I’ll suggest a little advice based on experience.
- Having the model on the base is a must during construction. A temporary one like a piece of pine shelf or plywood. Mine is a 6" x 12"!piece with a row of 1/4" holes down the middle.
Otherwise the details just keep breaking off and as you go you have to rely on your eyesight to judge if things are level and square which means your model needs to be steady.
- Those split hulls are more of a problem than a help. At a minimum they need to be glued together before painting the hull. There’s usually a step between the parts that may need a little smoothing.