Thanks Joe! I’ve got a little time yet, before I’m to that point. I’ve put in a request to my contact, so hopefully that’ll pan out. I really don’t care one way or the other, I just want to make sure I get it as close as possible. It may be like Bvallot told me in our discussions: It may be that the only way to know for sure is to talk to someone who actually saw the plane at the time the photos were taken. Of course, that was 70 years, two months, and two days ago, so I suppose that wouldn’t be a for sure deal either, unless he had a camera with color film in it at the time ![]() It’s just kind of got to the point that it’s just bugging me, simply because I want to know… ONE WAY OR THE OTHER
It’s just kind of got to the point that it’s just bugging me, simply because I want to know… ONE WAY OR THE OTHER ![]()
Sorry, I’m just catching up to this conversation here. With the kind of sun the Pacific would’ve seen in the summer months (or AT ALL lol), it wouldn’t surprise me at all how quickly paint fades…especially without some kind of industrial clearcoat. Ray’s right about what I had previously thought was a mis-register of the mask while painting the insignia. I was seeing two different values of grey and apparently after staring at it for hours on end…I had convinced myself that blue was the only color and the difference in value was a mistake in painting. Here’s a photo I found just yesterday and it’s the only one so far in color.
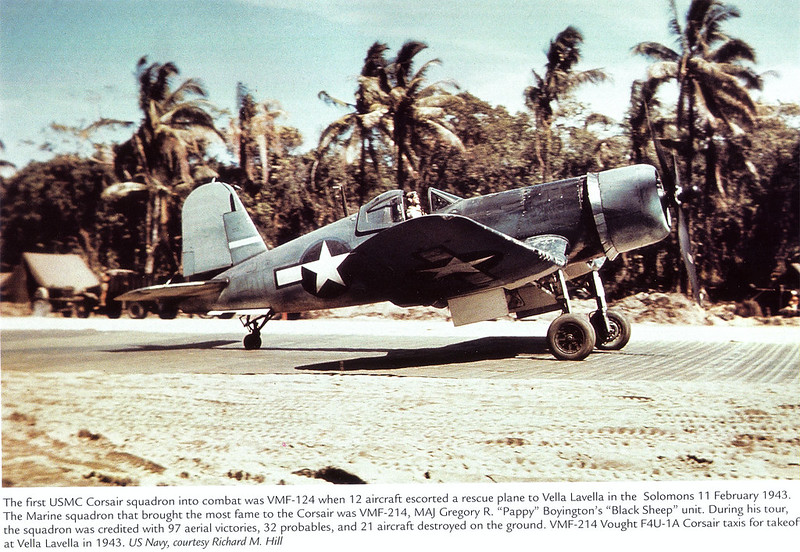
Vought-F4U-1A-Corsair-VMF-214-Black-Sheep-prepares-for-take-off-Vella-Lavella-1943-01-1 by brittvallot, on Flickr
The blue is clearly lighter in color towards the top which may have just received more light and energy at the angle it appears on the fuselage and as a result fades more quickly. No doubt many of you here have painted your home more than once. And of course the paint you use in your home to paint your walls is different from what went on these planes…but you normally have to prime over a dark color to put something else on top without it showing. So would it reason to believe that a red underneath this blue could be altering this color at all? Would the red allow the blue to look that light where it’s faded?
Any guesses out there? Anybody think these landed on LaVella as red?
Also, Ray…check out the 8th photo on the site I sent you. That ought to make you scoff again. I just don’t know what to do now… =P lol. Of course it’s a sim skin…but still.
Yes, but very hard to say as they were used planes, and with the ops tempo, some might not have been painted with a red surround until it was required to overpaint with blue. Here is one that definitely had red showing for a time: from Wiki
http://en.wikipedia.org/wiki/File:F4U-1_Lt_Rinaberger_VMA-214_at_Espiritu_Santo_1943.jpg
By December-January, they would have been overpainted with blue.
Here is another of the same aircraft in color:
and to show that markings were not always done to the T.O.specs, take a look at the F-4U with the starboard star:
http://en.wikipedia.org/wiki/File:Vella_Lavella_airfield_Dec_1943.jpg
Well, the good news is that the picture with Magee will go to the Astro lab at Texas A&M-Commerce. I’ll send it in the morning. She’s got several programs that they use to convert black and white pictures (all their, if not all pictures taken through a professional grade telescope, are done in black and white) to color. If anybody can give us an idea she can… It looks to me, after looking at the pic bvallot took, that the red was painted over with a lighter blue than the roundel itself. However, their is a pic of the paint scheme on 883 on the website he provided showing that the blue on one side had possibly worn off, or was poorly painted, two others were not in much better shape, and the forth was just the roundel itself, with no bars… I think I may follow this scheme depending on what my contact finds out… Gonna get real close to my air brush on this one. I’m thinking about creating templates and doing these by hand…
Looks great to me,great detail painting
I’ve been able to get a little work done on 883 the last few days… I did end up re-doing the engine by adding the ignition wires using thinned sprue… They don’t look as good as lawdog’s did, but I think it adds something to it. I also added a little more greying and some Tamiya smoke to give it a more weathered look…


I’ve also got the cockpit, body, and the initial wing setup installed. Also, I’ve removed to rudder…


I was able to get the rudder ready for reinstall as well. One of the pictures shows the tail wheel in a left hand turn, so I thought it’d be cool to add this to the rudder as well. Here’s how I did it:
First I cut off an old label tab from a sprue tree and shaped it:


Then I heated a brass rod and inserted it into the scratch piece:


Then I glued the piece into place. I also added another spacer towards the top of the tail section. I did go back and add a litter filler then took a micro-file to the piece in order to get a perfect fit. Unfortunately, I didn’t get a pick of this last detail…


I added some filler to a few gaps in the tail section and rudder and sanded them down. I’ve also rounded the front of the rudder a bit, in order to give it a more natural look… Again, I neglected to take a picture of this last part.
Then I finished adding the wings. It was a bit of a pain in the rear and the seams don’t quiet match, so I’ll have to go back and add a little filler and a do a little sanding to get everything just right…

That’s it for now. Still waiting to see if my friend at the university will be able to convert the pictures for me. If not, I’ve got something to go by that ought to work rather well. More to come soon, Raymond
Okay, I got the photobucket links fixed. I’m not sure what’s going on with them, but it seems to be something every time I turn around. Oh well, it’s free so I can’t complain to much…
Looking good Ray. I had trouble with the wings too. Had to finagle them a bit. I added sheet styrene to the inside edges to make a lip to give the pieces something to glue to. Its gave it strength too.
Joe
How’s she coming along, Mr. G?
I’ve actually got some pics I need to post. I laid down the initial paint yesterday, and I must say it’s looking good. I was going to try and get some stuff up today, but it just didn’t happen. Thanks for asking! To answer your question: Soon, very soon ![]()
=]
Looking forward to seeing it! Hope it’s still a fun build for you.
Sorry guys… I took a bad fall a few years ago that’s really screwed my shoulders up. I’m looking at a second surgery on my right one in a few weeks, and my third one over all. Add that to a nasty case of diabetes that doesn’t help the matter, and well… I have good days and bad ones, which might help explain the gaps in between postings. Not looking for sympathy, just trying to give an explanation… So, Devil Dawg, yes… it’s still a fun build for me, though I’m having to stand back and think about how to approach a few things at this point…
That said, I’ve been able to get a few things done, mainly sanding, reshaping and re-scribing, priming, and laying down the initial coat of paint. Here’s a pic of the priming and pre-shading:

For the paint layers I worked from light to dark, using Tamiya’s white with a bit of base added. I’m thinking about maybe going back over it add a little grey to it, but I’ve not decided. For the intermediate shade of blue I mixed Tamiya’s Sky Blue and Medium blue, and for the darkest blue I mixed Tamiya’s Sea Blue and Medium Blue along with about 25% of their Base to give it that oxidized look.


This pick is a little darker than the actual shading…

I’m a bit stumped on the decals right now. I can’t decide whether to try and make stencils for the roundels or use what came with the kit. I’m having to go with an existing paint scheme that shows that the two insignias on the side (at least) where painted over with a lighter shade of blue. This makes sense if you look at the original black and white pictures. Unfortunately, my contact at the university was not able to make an accurate re-creation of these. I’m also thinking about using the decals and going over the borders with a wash of blue… Hopefully, I’ll make up my mind in the next few days and pull the trigger (the real hard part) on it, so I can wrap this baby up… Any ideas would be helpful. Thanks, as always, Raymond
Sorry to hear about your medical issues Ray. I’m glad you could make it back for some bench time. I’m liking the paint so far, especially the fuel staining that was on 883. Only thing I would do is make the lower wingfold a hard line, that is unless you have a pic that shows otherwise. I would just use aftermarket decals, its the easy way out. You could always try those Montex masks for the insignias too.
Joe
That’s lookin’ swell, Ray!
Looking good, Ray!
And sorry to hear about the medical issues. I can sympathize. Sometimes you just have to push through it. Good luck!
Gary
Dittos, Ray. Sorry to hear about the shoulder. I had no idea about that when I asked if the build was still fun. Sometimes, when I get deep into a build, it kinda gets “unfun” for me, and I have to put it away for awhile, then come back to it. So, I was just wondering if you were feeling the same way with this build… Anyways, I hope that the docs take good care of you. You will definitely be in my prayers for healing.
And that Corsair is lookin’ mighty fine!!
Ray, if you’re unsure about the cutting a mask to paint the insignia this go around…you could just move on through and put down your clear coat of future or what have you and place your decals down. Later, when you’ve put the flat on to seal everything…just tape off what you want to look a little different and paint those strips. When you’re happy with what you see, hit it with the flat again. =]
Just a thought. I’ve made a few last minute adjustments that way and they’ve worked fine for me.
Britt, I’ve got a couple of workable ideas. I have one a go this afternoon, and it worked okay. I actually just copied the decal sheet onto a testers white decal paper, cut a little white bar stencil, then airbrushed the boarder. I actually liked the effect. The trouble I’m having is cutting the roundels out to my satisfaction. What I may do is use the actual decals. The boarder and bars are separate from the roundels. So, what I’d do is apply the boarder and bar, the lay down a layer of clear, then either hand brush (with an extra fine brush) the blue, or mask then air brush the blue. What do you think?