Alright, this is my first armor build ever so try and be nice. It’s an 1/72 Airfix Sd.Kfz.234/4 with 75mm gun. Here is a small “bio” on it:
The Sd.Kfz.234 armored car was a development of the basic 231 8 RAD, a normally turreted armored car. The early eight wheeled vehicles proved particularly effective during the North African campaigns where they were used for reconnaissance and policing duties and with their faster speed an advantage over the tanks, it was decided to mount in them 50mm and later 75mm guns. To accept the heavier armament the turret was removed from the Sd.Kfz.234 becoming in effect a self-propelled gun mounting either a short or long-barrelled 75mm gun. Weighing approximately 10 tons and powered by a 12-cylinder diesel engine giving a maximum road speed of 50 m.p.h., the Sd.Kfz.234 could be driven from either end having two steering wheels. Overall length, excluding gun, was 19ft.
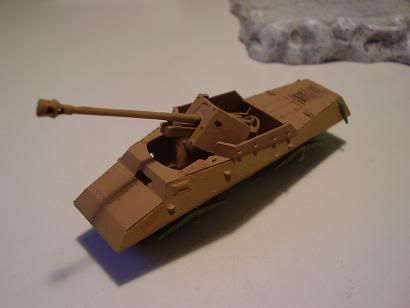
Test fit with the gun.
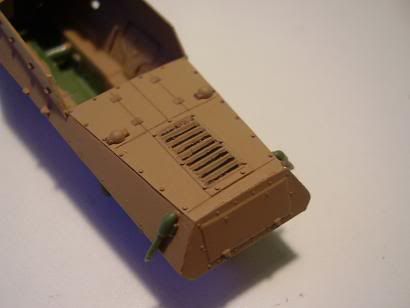
The tan is all handbrushed. When I get to the camo spots i’m gonna try and airbrush them. If anyone has any ideas for weathering toss them out as i’m clueless. Besides the obvious dirt/mud that would build up underneathe and on the wheels.
I don’t know if that’s the camera, but it seems your back grill is a bit rough. Maybe you should try smooth out the edeges on the grill, do you see what I’m talking about??[?]
For weathering you could do a burnt umber wash, to bring out details and etc. If you need help on doing a wash, their was an article on that in the last issue of FSM July 2008.[:)]
Remember that the kit mudguards are inaccurate. The kit was based on the SdKfz.234/4 on display at Bovington in the early 1960s. This in turn was war booty, and lost its mudguards somewhere between Germany and Dorset, so new ones were fabricated at the Royal Armoured Corps workshops. Lacking accurate references, they assumed they would be the same as those found on the SdKfz. 232.
to see what they should look like. They’re fairly easy to scratch-build from 20 thou plastic card.
And yes, it is pretty small - 7.8cm or just over 3" long, not counting the gun. Remember also that the kit, though nominally 1/72, is actually 1/76. Think in terms of 1 1/2 HMMWVs
yes I’ve built the Airfix Sd.Kfz. 234/4 about a dozen times since it first came out in the early 1960s. It’s a nice simple build, and looks attractive when finished. The crew figures are especially useful. I wouldn’t bother over-detailing it, becaue there are other 1/72 kits of the SdKfz.234/4 out there, especially the Roden one:
which are better-detailed and more accurate, and thus a better starting point for an accurate model.
I’d use the Airfix kit for three things:
to practice scratch-building those mudguards
for painting and weathering practice
as a source for the gun for the Italeri kit of the same subject. The problem with this kit is that the gun comes from the ESCI Pak 40, but Italeri have mounted it in full-recoil position, so you can’t really amke an accurate model from it. This is a pity, because the hull and running gear on the Italeri kit are excellent.
As far as plastic card is concerned, check out your LHS first. It’s the sort of thing that any even half-way decent LHS should stock. You might want to check out the model railway section - one of my LHSs keeps it there. Failing that, any internet model shop will have it is stock. It’s a fairly basic modelling material. But try your LHS first - the shipping costs on plastic card can be high relative to its value.
One final point. Dragon make a very good SdKfz.234/4 in 1/35. While I’m normally wary of using other kits as referecnes, the Dragon kit’s so good that in this case, I think its worth making an exception. Check out these piccies:
Josh, in the UK they call sheet styrene plasticard or plastic card. You’re hobby shop might have it, or you can order it online from most hobby shops. Usually it’s Evergreen brand; comes in all shapes and sizes for pretty cheap.
Very very awesome links and info! Thanks for the help guys. Unfortunatley, it looks like this is another that has to go “un-stock-OOB”. On the upside it’ll give me some much needed scratch building experience.
Ok guys. Well, I want to get this done by this weekend so I can hop back on the AC (gasp!) for awhile before the 251 GB (sigh(of relief)) starts up.
I’ve decided to just stick with the kit fenders for now and later scratch the original fenders on OR, leave it be and buy the Dragon 1/35 234, (which seems more appealing!).
I’ll post up some pictures when the wheels are all on before the wash and then tomorrow i’m going to take mikael’s advice and do the burnt umber wash. Which will be my first wash ever too. Seems like a decent build for firsts seeing as the kit isn’t accurate and only cost $5.
You know, after you’re done with this, you should treat yourself to Dragon kit #6221. Do a big one (1/35) to go next to this little guy - and you shouldn’t have to worry too much about accuracy issues with the DML release. [;)]
coming on quite well. As to how long you need to leave Future to cure, it depends on the nature of your wash. If acrylic, 24 hours is fine. If based on oil paints or enamels, then 72 hours is the minimum safe time. You don’t want the wash eating through the Future, and lifting the paint underneath.
And yes, the various Dragon 1/35 Sd.Kfz.234s are very fine kits, light-years ahead of the Airfix 1/76 jobbie.
Thanks for help guys! I got the Future on and it’s setting up.
I did go buy Gamblin “Burnt Umber” artist’s oil but after reading that they need a 72 hour Future dry time and wanting to finish it by Friday I picked up PollyScale F505300 German RLM 61 Dark Brown. It is almost EXACTLEY the acrylic equivalent of Burnt Umber.
So i’m going to go with the acrylic wash this time so that I can have the model done by Friday.
I’m glad you took my advice to do a wash. Remember practice makes perfect, so your wash may not be perfect the first time around. Try practicing on a past finished model or something like that. That’s what I’m doing, since I’m doing my first ever washes for my SU-76M. So far they came out fantastic on a past finished model.
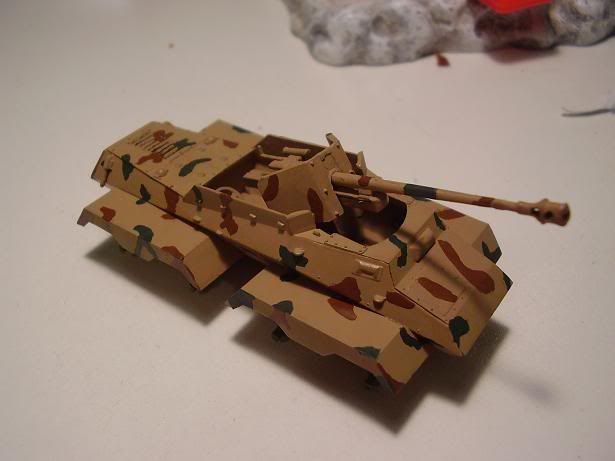
Alright well … [%-)] … didn’t work like anything i’ve read. Since the base tan is Tamiya acrylic I decided against using the acrylic wash and used the oil wash instead.
There was absolutely no capillary action happening. So instead I just used my 0000 brush and carefully ran it along the panel lines and rivets. Then used an cotton swab with the SMALLEST amount of thinner, (I even wiped the cotton swab off on a paper towel), to wipe the excess wash off.
The green arrows in the picture are where I thought it worked pretty well, the red arrow is the first panel line I did and probably used to much thinner on the cotton swab and it ate the Future and slightly smeared the paint.
I’ll have to post another picture to show how small the detail really is.
I know its a little late but you asked previously about where to buy plastic card. I have found Tower Hobbies stocks alot of it. Fair priced as well. I used them when I needed card for my rammtiger. They stock a couple of manufactures.