Hello all,
i will be sharing my building journey with all of you… sorry, most of the build was already done but feel free to comment as i progress in this beautifull hobby of ours…
Cheers…
Hello all,
i will be sharing my building journey with all of you… sorry, most of the build was already done but feel free to comment as i progress in this beautifull hobby of ours…
Cheers…
Dear friends, is there any how-to guide available for adding pictures into post? Clicking on insert image, gives me “source/desription/size” …
Appreciate any assistance.
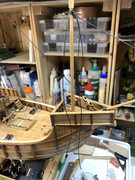
Here is my current state of a build…
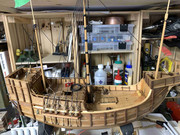
This is an Amati kit, 1/65 scale. I have started this build one year ago, with intention to work on this and Pinta kit (Amatin, 1/65 scale) simultaneously, finishing the same work on both models. For example, working on basic hull on Pinta then work on basic hull on Santa Maria…
Will see how this works… never worked on two models at the same time…
Happy modelling…
Yes. Go to the Feedback, Help and Testing section of the Forums and post the question in the Forum Technical Assistance forum. There are frequent threads on the subect there, you may find answers in previous threads,
Hello!
Welcome to the forums! Looks like you managed to post a picture here - congratulations! And the ship looks very nice, too. One thing that bothers me are those super tight gun ports - this doesn’t look right to me…
So what’s the next step? Good luck with your build and have a nice day
Paweł
Hi!
Did You know that Columbus finished his voyage with only two little ships! That’s right! The Santa Maria was run aground and wrecked during a storm. The survivors built shelters of the wreckage of her. When he returned they had all perished!
Very nice work! [Y]
I also think that the gun ports are very tight. Those guns jumped around when fired. I’ve never seen them that tight on any ships.
Stay safe.
Jim [cptn]
Thank you…
Thanks Pawel…
The beauty/challenge working on these “older” ships is a lack of trusted informations, plans, etc so i had to follow whatever Amati had on the table to make this kit.
Guns itself are very tiny as well and they do have some rooms to vibrate without hitting the openings… But yes, you are correct, it does look slightly out of proportions… and Pinta’s gunsa re even smaller… Maybe Amati is reading this forums…
I saw plenty of different SM plans, all over the place with different hull shape, rigging, even with ratlines (which i decided not to put on even dough they are on kit plan) because i was not able to find any reliable source confirming ratlines excisted at that time. But to allow sailors to climb up, i installed a rope ladder in front of the main mast…
I am continue with build so will post few more pictures…
Happy modelling…
Yes, before this build i spend some time researching and was able to get one book in spanish explaining a life at the SM and how she ended up being a shelter… and what happened to the crew.
Trying to image the way of life back in those days…
Correct Jim, i will blaim this to the kit plan but they do have some room to wiggle.
Cheers
I think she’s a beauty.The model is probably based on the repilca in Spain that was built in1990 and is a general interpretation of a 15th C Caravel.
Here’s that ship:
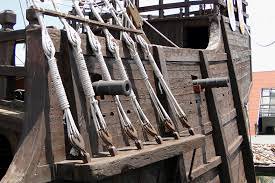
Amati made the ports round, but it looks ok to me.
Bill
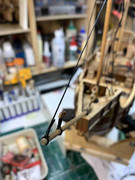
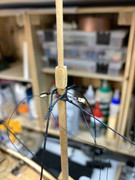
Continue working on stays… foremast first… first had a simple seizing slide up to the stay rope and then run rope around the bowsprit two times…
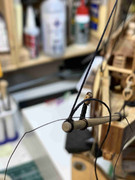
Then the seizing was slide down and tighten, secured with a drop of CA. One side of the seizing rope was twisted around stay 6 times and again secured with a drop of CA. Excess seizing rope and stay rope was cut with scissors.
On shorter side of stay, I added another seizing loop and secured with a drop of CA.
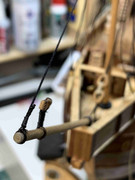
Next were stays for mizzen mast. I was not happy with one I made before, after testing with lanyard, I noticed stay block will be positioned too low and will not be that visible. I removed blocks from stay but that, did not leave me with enough rope fix the block again, so decided to remove existing…
The new stays are done with two ropes, seized together. One side can be completely done and secured with CA, but the other side need to be left loose so it can slide over the mast.
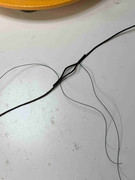
The work was done with assistance from 4 hands…
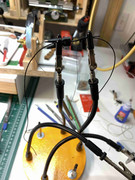
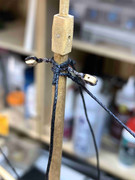
Again, simple seizing rope was added, tight and secured with small drop of CA. One end of seizing rope was twisted around the stay rope and secured with CA. Excess was cut…
It was then attached to the mast…
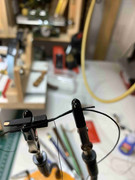
… and seizing loop was push towards the mast and secured with CA; few runs around the stay rope and another CA drop.

Excess stay rope was also cut.
Now I have enough rope to complete the work…
Happy modelling.
Thank you Bill, appreciated.
Thanks Bill, appreciate your comment.
Cheers