I just started the U.S.S. Salem for Modelpalooza this year. I can see it’s going to be an exercize in patience. The stern was not lining up and had to be forced into place, and that’s the first step. The instructions are a bit strange and I noticed the partds listed on paper don’t match the parts on plastic and the numbers are very small.
Eventually I will have to paint this thing and I don’t think I can go with the small color chart they provide as my sore does not carry the companies listed and I’m not sure I trust their instructions.
It basically calls for a red lower hull and some color for what I think are the life rafts and some kind of grey for the hull. I think she also carried a couple aircrafe od some kind and color but I haven’t found them yet.
Any idea what the after WWII colors for this ship would be? I think it said that the bags aroung the guns were supposed to be black but somehow this just doesn’t seem right
Any help is appreciated.
At the moment she can be visited along with a coiuple other ships and has the Salem witch on a broomstick on the side of the bridge. That would make a nice touch.
The Salem wasn’t commissioned until 1949 so you won’t find her in WWII colors. As early as February, 1945 the Navy obsoleted the purple/blue pigments used in the early war (cost & availability) and went to neutral grays. The first gray was called Gray 27 and I believe it ended up being called Haze. Gray 26270. You may choose to go a bit lighter, but that is the tone range you want to be in
Liftrafts would have been painted the same as their location on the ship–but, for modeling purposes, a lighter shade of gray “scans” better.
Sky Type S is pretty handy for fire hoses. Life rings will be an off-white (the current museum ship has red ones). The museum ship’s decks are a faded white maple sort of color; deck tan likely will serve for a 1949 appearance.
Bill has a good description of the general look. We had a thread here, ages ago, with a spiffy description of Model Master paint colors. Using Neutral Gray FS27260 (or 37260) for verticals is generally good. Then, metal decks/horizontals generally in Gunship Gray FFS36118. Flight decks are all over the place, from an Anthracite gray to NATO Black.
Oh, and do not use “Hull Red”–especially not Tamiya’s, as that’s an IJN color. USN antifouling was(still is) a bright red sort of color.
Originally designed for 4 floatplanes, two catapults aft with hanger in hold, accessed by elevator. The aircraft were obsolete by the time the ships were completed. Salem was never fitted with catapults. In service, she carried one utility helicopter.
Thank you for responding, all of you. Now, if there’s anyone else wantint to respond, I will keep reading. In the meantime, To quote a certain Captian, I have a ship to attend to, arivous.
Interesting choices, I’m betting on the first one.
I started working on the ship. There are many little piecesand more sprues that I figured on. The numbers on thesprues ar very small and I need a magnifying glass to read them. There is one piece that I have yet to find for the back of partof the superstructure. It shows in the instructions but has no number, I may have to fake it. There are several small intakes scattered around as many even smaller parts just waiting to be lost.
The aft part of the hull was warped and had to be forced into place and re-inforced to keep its shape…I hope. Overall fit so far is a little bit above fair
As work slowly progresses on the Salem, one again I find a problem. This time it’s with the waterline. There have been problems with using tapefor the red and grey colors and I think I need to find decal sheets to make the sepreation line. The problem is, I can’t seem to find any. Does someone have a solution to this problem?
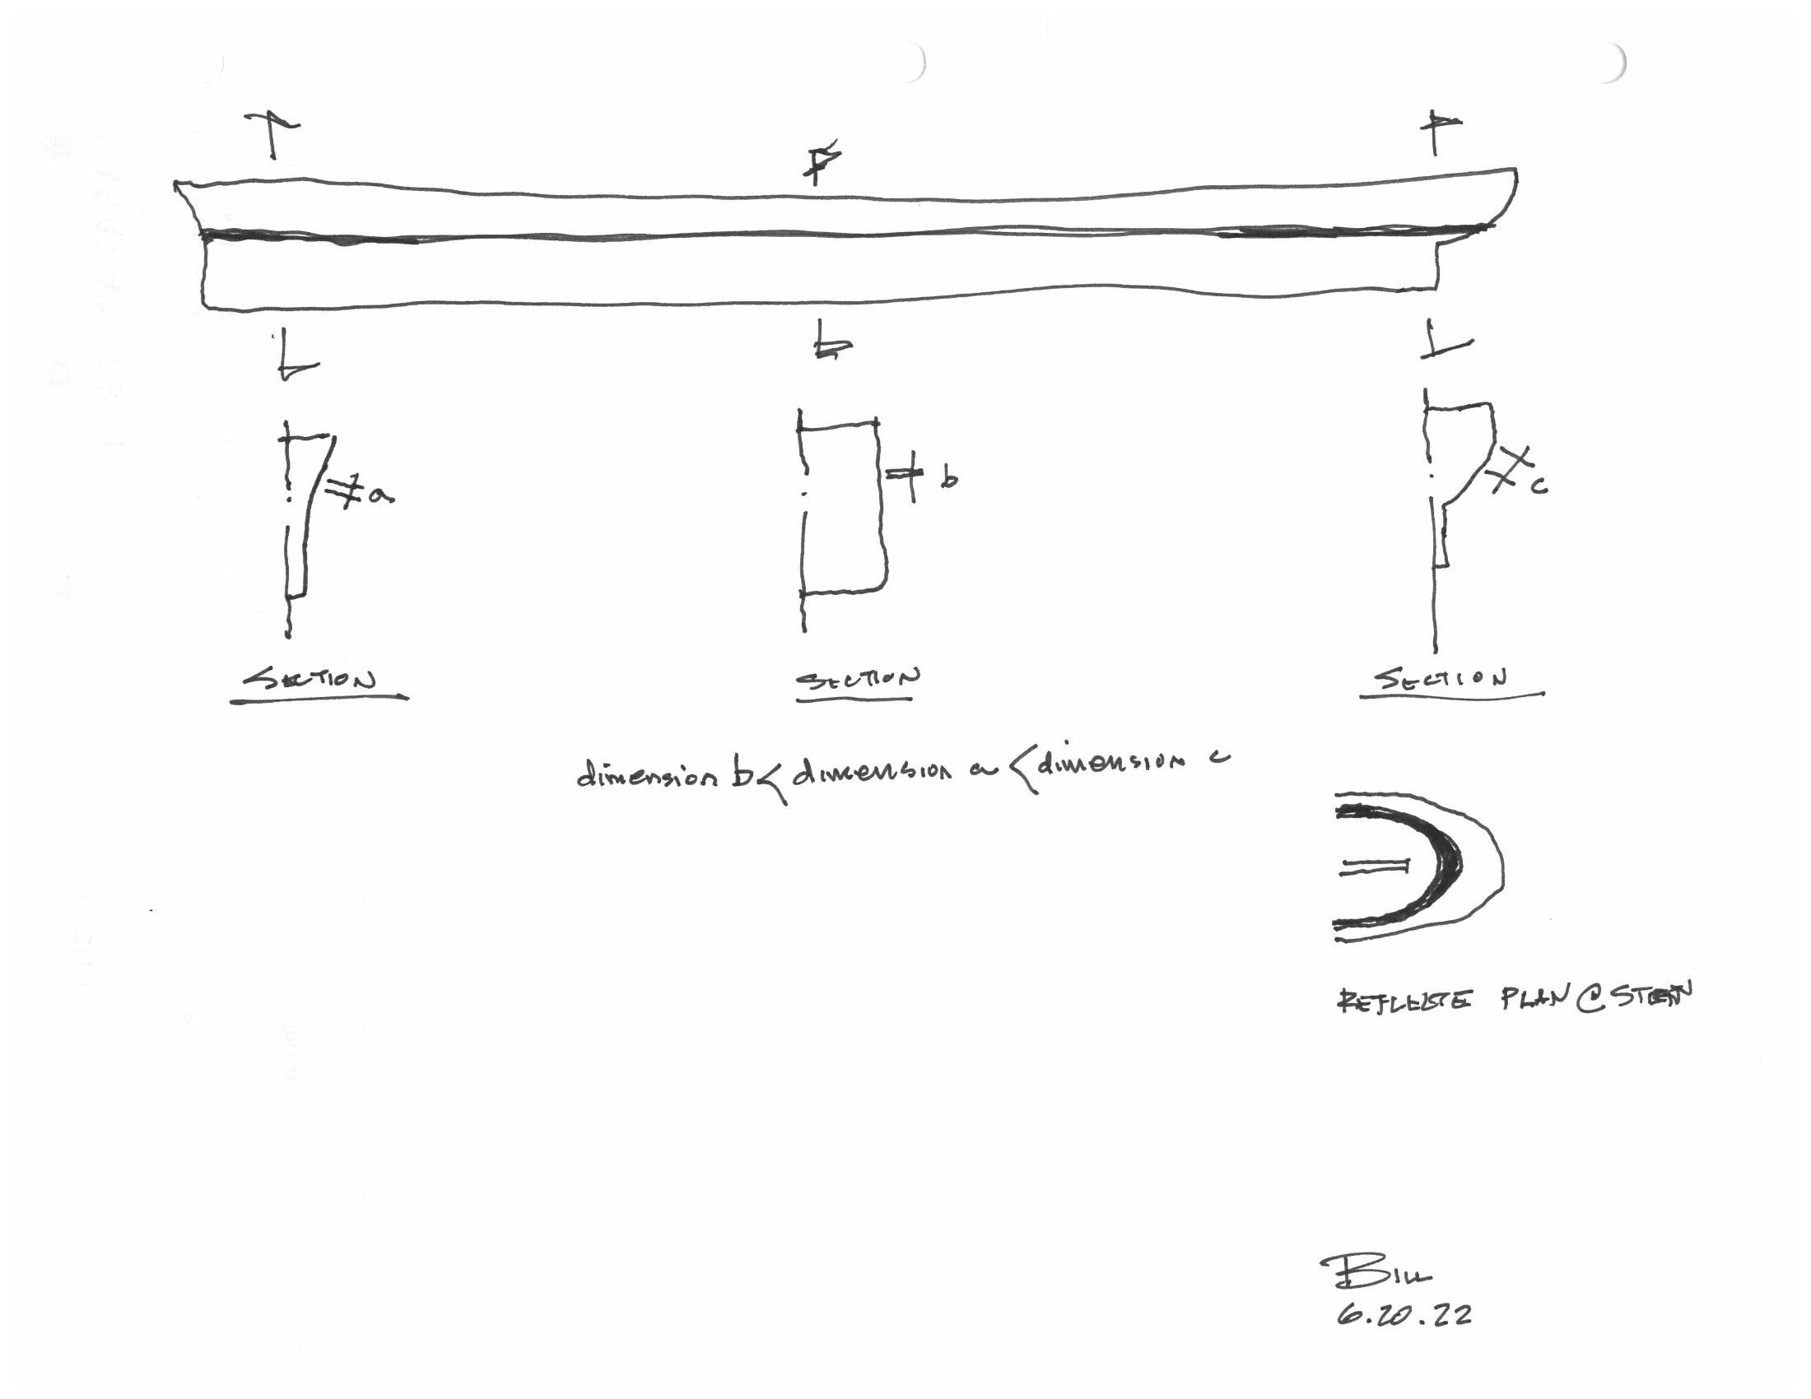
Decals work for the greater part of the length, howver at the bow, and most importantly at the stern, the angle of the hull from vertical inreases. The boot stripe or topping, whatever it’s called, maintains a constant datum at the top and bottom but increases it’s true dimension in those areas. See crude sketch.
That might mean aligning decals for the top and bottom edges and then filling in the gap with more decal or paint.
Now you see why I tell everyone I am teaching to do this. Take some LEGOS or other stuff and make a jig base that puts a #2 drafting pencil at the upper waterline.Then slide the rig from bow to stern gently leaving a nice line behind. Then, Lower the pencil to where the Bottom of the line would be and draw that line too. NEVER let the pencil push to hard or too light .Those lines are where you tape for top and Bottom.There is the Fact that Bill mentions and the jig will help you there.When you look at the lines drawn you’ll see what he is referring too!
When you measure from top to bottom do so at directly Midship.That way the lines will be accurate! I do this also. I will sometimes, Using A very flexible plastic rule or cheap auto striping tape, Put this on the top and bottom of the lines. Then Very carefully and not with much pressure, Draw the backside of an X-Acto knife along the stripe. That way, when you get ready to Paint you will have a fine line to follow with your tape.
To make a seasoned stripe (been at sea for a while.) Paint your line Coal Black. Then mist the bottom color slightly over the lower edge. This will give the effect of Salt Water Erosion of the painted surface. If it’s (The model )1/350 or smaller don’t bother, just paint the line Charcoal, otherwise it will be to stark against the other paints. Also, Based on what Capn’Mac said. When you peint the bottom there are two colors you can use.Good old Testors Rust. Or, The Same, Tinted lighter with a bit of white.
What I do is take an eyedropper (Glass.) and draw about one inch into the dropper, Carefully let as much as you can, go into a mixing cup or palette. Then using a clean dropper(Glass) take about a sixteenth of an inch of the color Insignia White(flat), and drop it into the Rust. Then Mix well, Stir till you have a nice pale shade of rust with NO streaks. Thin the amount you need, transfer to the airbrush cup and spray.
I would guess around 6 feet at midship. At 1/350 that’s 0.20 inches.
Do you prefer the hull deck side up or keel up? I find that the latter works well as you can rest the hull on cross blocks that the bulwarks rest on, so long as you shim one or the other to get the keel level.
Bill, I usually make sure the Keel is absolutely level with the work surface, Deck up if you will. I learned to do it this way many years ago on my R.C. and R.C. Sail vessels. I always seemed to get it right that way. With a good Scale ruler Midship shouldn’t to hard to set. It just takes patience and care. I was gifted with eight scale rulers someone bought me on line. That has helped tremendously. Yes, that is a small distance but it should be do-able!
As you know most of my vessels are now, 1/87 (H.O.) Or 1/160 (N) scale I still do a lot of larger and smaller ones as the Lightbulb goes off. So I am not trudging along on any one ship for too long I find, that although that leads to clutter in the shipyard, it staves off boredom. I do quite a few in 1/100 because that way I can fudge on Museum displays as well. I did one in 1/48 for a client in California. I ain’t never gonna do that again!! Especially since it was a model of the U.S.S.Hornet) Now a Museum Ship in Alameda, Ca.).
Keel up-Deck up? I think I will let it be said that what works, do it. I do in fact do it both ways if the little ship permits it. There are some that at 1/350 I have put keel down, But getting them Level, Port to Starboard was a downright B*&#H, that is the biggest problem with Keel-Down. But easier to fix than you think. A spirit level at midships can be found that is light weight and you just place it on the hull Dead Midships, after leveling fore and aft and then stabilize and draw!