Very cool. Where did you get that telly app? Does Droid offer it?
Joe
Very cool. Where did you get that telly app? Does Droid offer it?
Joe
Joe, I just looked it up on my phone’s app service. It seems this particular company is only iPhone friendly for now. I’m sure you could find it’s equivalent out there though. It was just a couple of dollars, but it’s money well spent. Basically costs one jar of Tamiya paint. =] I’ll continue to post my mixing ratios for anyone out there who happens to wants to try or modify what I’ve done here.
But put out a search. I’m sure there’s something out there. =]
The color certainly looks good!
Thanks GAF. It’s taken a lot to get to this part. =]
Well, I’ve finally gotten to put some green down on this Hawk. I’m less than a month out from my wedding so getting to the bench to put some time in has been difficult to say the least. So without delay…
I went to work on masking off the upper surfaces to paint the Curtiss Green. Boyington’s Hawk was said to have a slightly different camo scheme along the left cockpit area of the fuselage and along the left vertical stabilizer. I found some sources online showing this as well as the decal instructions from EagleCals supported this also. I drew out the masks by hand onto regular printer paper and cut them out with a number 11 exacto blade. I left tabs for the wings so that I could better attach them. It seemed to work out pretty well.
 image by brittvallot, on Flickr
 image by brittvallot, on Flickr
Some of this felt a little too sharp. So I rounded off some of the edges where I thought appropriate from other photos of the Flying Tigers. After it was all said and done…this is what I ended up with:
 image by brittvallot, on Flickr
 image by brittvallot, on Flickr
As for Curtiss Green (DuPont 71-013): it’s generally agreed that FS 34092 is a good match. FS 34079 is close as well for this medium green color. With the fading that occurred from weathering and fuel spilt on the planes, it seems that this color ashed up on the AVG Hawks too. I’ve elected to start with this mix for Curtiss Green:
 image by brittvallot, on Flickr
I will come back over this with some darker green and weather over that with a layer diluted with some Flat White and Buff.
 image by brittvallot, on Flickr
 image by brittvallot, on Flickr
 image by brittvallot, on Flickr
 image by brittvallot, on Flickr
Next up, I’ll put a couple layers of weathering down by painting with something similar to three layer paint method. Then, she’ll get a coat of Alclad’s Klear to get her ready for some decals and more weathering. =]
Thoughts and comments are always welcomed. =]
Sweet Bv!! Love where you’re going with this!!
Steve
Thanks Steve. I’m beginning to feel more and more like I’m back in my own territory. =]
I got a little more time in tonight and managed to take care of some weathering with the airbrush. I started with mixing a little NATO Brown and NATO Black together. This was made to be very diluted. It didn’t quite have what I was looking for so I added about the same amount of Hull Red to it. I put this down first from front to back over the wings the same as you’d paint condensation marks. I took this one out of Lawdog’s playbook. I really like how it turned out. I didn’t add too much here just yet. I was very pleased with the darker tinge that this color was putting down so I took advantage of trying it out over the Curtiss Green to put more character into it. It was giving me just what I was looking to end up with down the road a ways so I took advantage of applying it now while I had it up and ready. I lightly touched up some of the more typically weathered surfaces with this color.
Once I was done with this, I pulled out some Buff and diluted it quite a bit too. I very lightly added some condensation lines over the wing surfaces and also hit a couple of areas that were highly weathered in photos as well. This color helps add the chalky, ashy look that the early DuPont paints were known to do. It was working out pretty well, so again I opted to take care of it some now so that I don’t overdo something later.
 image by brittvallot, on Flickr
 image by brittvallot, on Flickr
The next thing I moved on to was weathering the walkway along the wings. I tried out MiG’s Chipping solution again with some improvement. This time I put a coat of Alclad’s Flat over the NATO Black painted skid walks in an effort to seal it. This did help some it seems. After working it some, I did manage to lift some of the paint but these Tamiya paints just don’t look like they want to play with the solution MiG’s come up with. On the left side, I did end up having to put a couple of light washes of Tamiya’s Flat Aluminum (where I tore up the Alclad underneath some) and a little NATO Black to suggest the skid walk where I wanted it to show and some more Curtiss Brown back to cover what I didn’t want to show. In the future, I’ll likely continue to find a better way to do this but so far I’m pleased with the outcome.
 image by brittvallot, on Flickr
 image by brittvallot, on Flickr
Here you can see the formation light painted in and the fuel/oil caps painted as well. For the caps, I didn’t want anything too brand new. I never like painting a warplane with pretty, clean colors so I used Flat Red with Hull Red to dirty this color up a bit. The other cap has been shown pretty exclusively to be yellow, but in actual photos of the Flying Tigers it seems to be worn completely off to a metallic color. So I opted for a Dark Grey to start with, Metallic Grey to add a bit of shine, a little Yellow-Green on top of this, and finally a little more Dark Grey to knock it back down to something I liked. This is all down with a fine brush, very thinned out and these colors are allowed to blend on the cap somewhat.
 image by brittvallot, on Flickr
And here’s one more of the walkways together. =]
 image by brittvallot, on Flickr
That’s it for tonight. Thursday or Friday I’ll be able to put a clear coat on it and start with some decals.
Nice!
Mike
Very well done BV. Good idea with the masks. Thats some of the best wing root chipping I’ve seen. Whats that paint app on your telly called?
Joe
Thanks Joe. =] It’s still a working progress. I doubt I’ll ever stop trying to improve something like that. The app is called iModelKit. I got the full version. I think it cost about $3. Totally worth it though. It does a lot and it’s loaded with color swabs from damn near anything you could want to reference.
This plane’s starting to come to life for me. I’ll be skipping ahead past some of the boring parts that don’t amount to much visually. I’ve got a clear coat down. Alclad’s Aqua Gloss goes down real well. I doubt I’ll ever use anything else. And it doesn’t change my colors much at all after a coat or two. I used EagleCals AVG Flying Tigers decal set that included Greg Boyington. I did his Corsair about a year ago and I’m in the process of repainting some of the insignia currently. So I had considered getting to his P-40 one day when I decided to do one…and this is it. =] The decal set is great. Plenty of options, crisp in-register decals, and the film is tight around the print. They took a little bit of playing with to get them to set over the raised detail of the Revell kit’s rivets and raised panel lines, but after a nice bath of SolvaSet and they settled down real nice.
Here’s a few close ups of how that went:
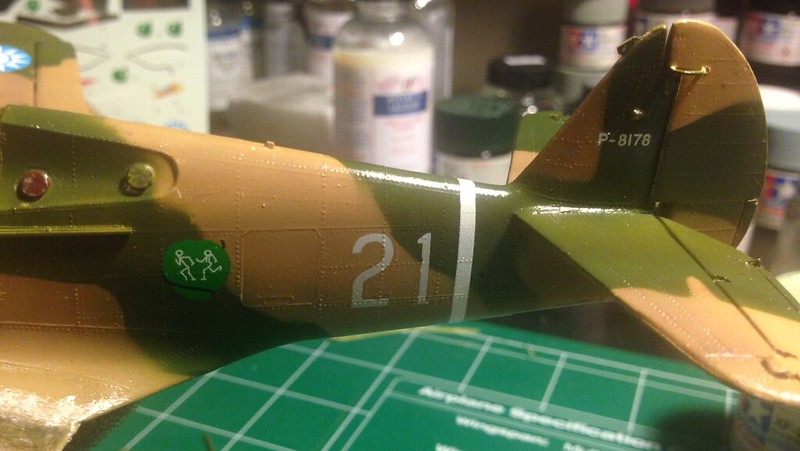 image by brittvallot, on Flickr
I love this smile.
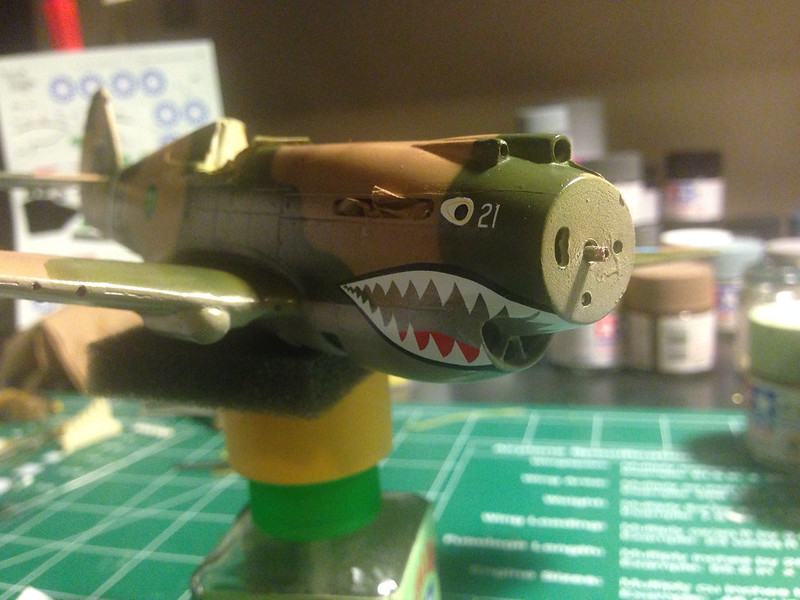 image by brittvallot, on Flickr
With the clear coat down, I wanted to tackle the panel lines next. Now in the past I’ve often gotten carried away with picking out the panel lines. There’s the never ending debate of how much is too much and so on…so here…I wanted to show more discretion and only very lightly define these lines where they were shown to be from photos of the AVG in the Pacific. I picked them out with some Burnt Sienna oil paint I have and thinned it down considerably. When I was happy with the results, I broke out my Alclad Klear Flat to put a coat to seal all this.
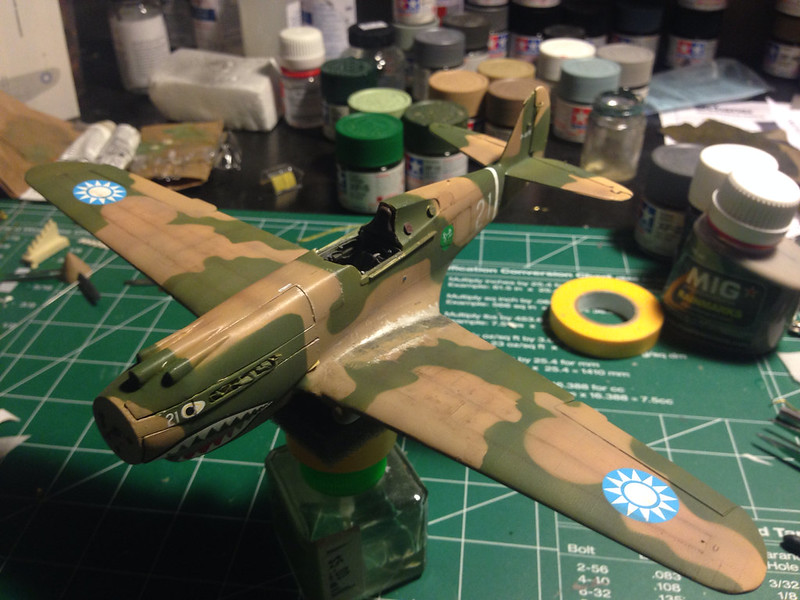 image by brittvallot, on Flickr
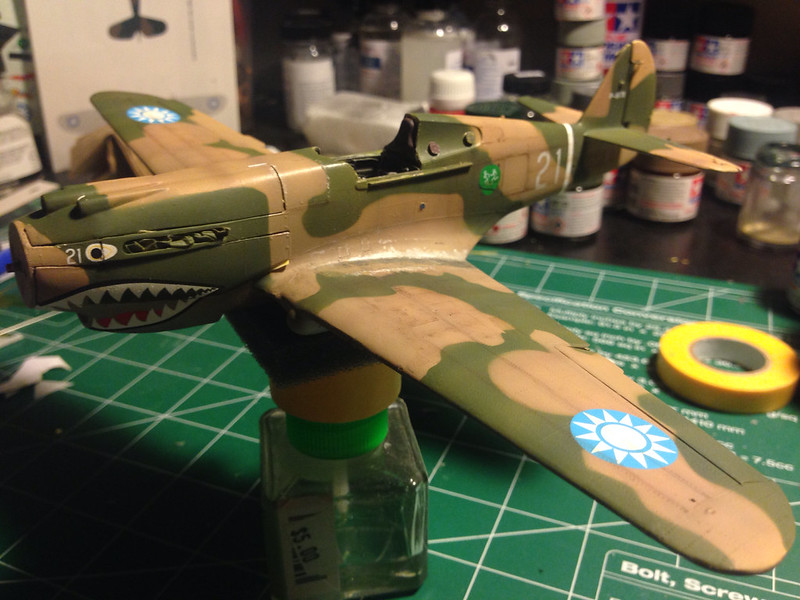 image by brittvallot, on Flickr
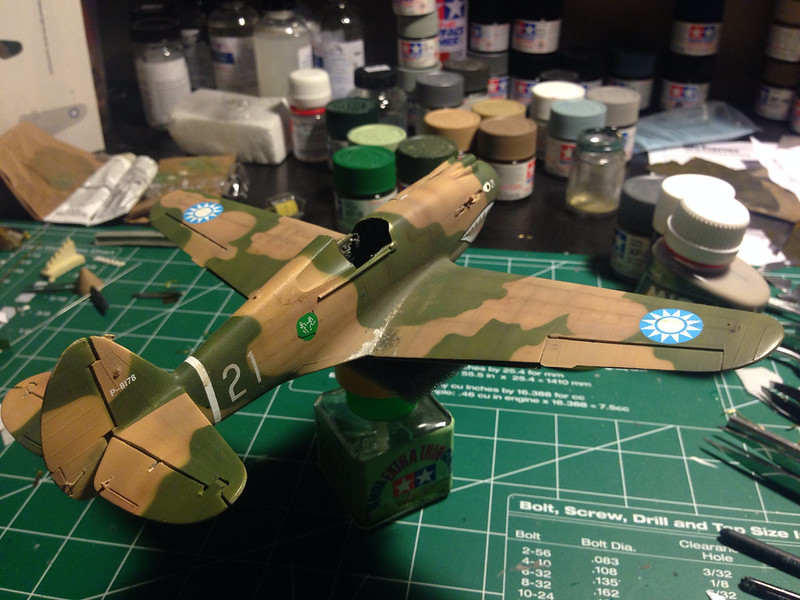 image by brittvallot, on Flickr
Here’s a better top view:
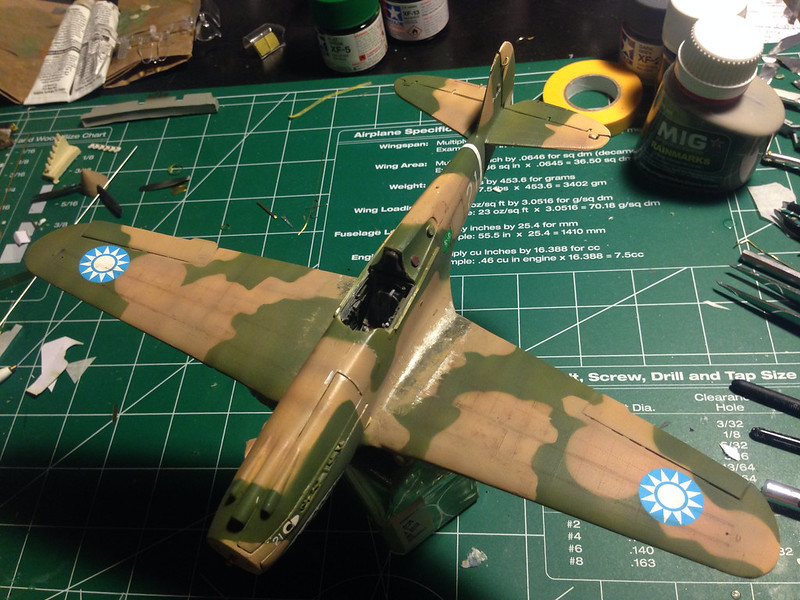 image by brittvallot, on Flickr
Here’s the undersurface. I very lightly picked out some lines with Tamiya’s Dark Grey actually. Never did it like this before. I was too impatient to wait to drop by Hobby Lobby and pick up a little extra variety of oil paint to use for something just like this and opted for an acrylic wash. It actually worked just fine. I will say, be careful not to rub through your clear coat with an alcohol thinner like I started to do. If you put enough of it on there, it will start to eat through your finish.
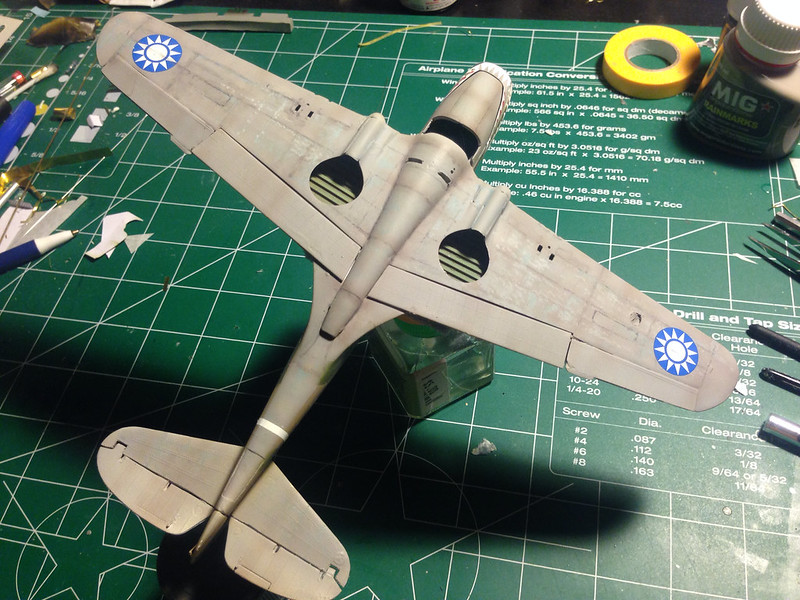 image by brittvallot, on Flickr
One thing I thought was nice was that EagleCals included the “Prestone” decal that went over the coolant expansion tank on the top of the cowling of the fuselage. I was just about to start painting in on when I reviewed the decal sheet once more and caught it! =] It’s the little things, right!? =]
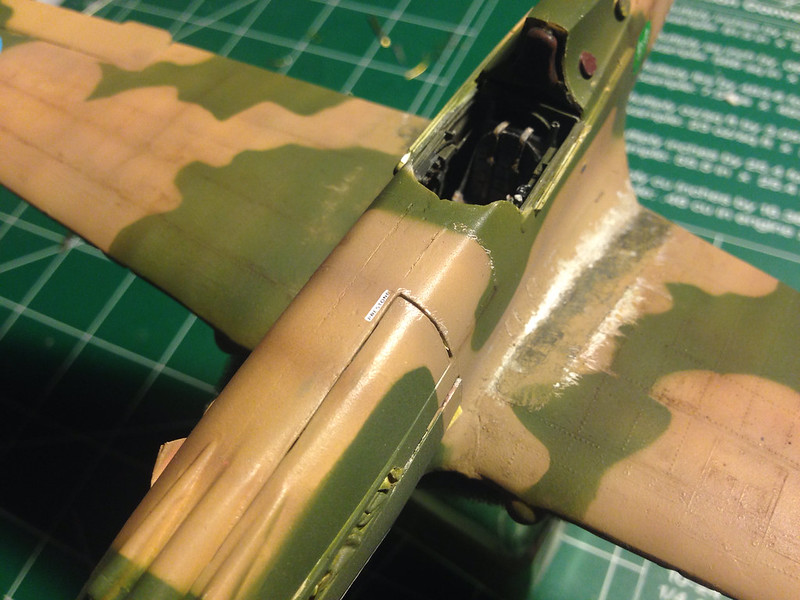 image by brittvallot, on Flickr
Next up, I’ll have a few more quick layers of paint to bring out a more weathered and beaten up look that so many of these Hawks had. I’ll seal that and move on to dotting the i’s and crossing the t’s. =]
Wow Britt! She’s really coming to life. I don’t know… I may have to revisit this in a year or so, once I feel a little more confident and gained a little more experience 
Thanks Ray! She is finally coming around. Certainly was stubborn about it. I still need to fix the prop…if anybody noticed one of the damned blades popped off as I was applying the mask to paint it. Sure didn’t take much either. I’ll definitely revisit this kit again too. I’d like to build it as a Pearl Harbor P-40 and maybe even an XP-40 in NMF as an early pre-war plane. Aside from all the extra stuff I’ve made more complicated in pursuing, it is a relatively quick build.
Have you decided on a type of base for yours? It looked like you were making a little diorama for it.
Bvallot, the plastic on those old birds is a bit fragile. It might be easier just to purchase another kit or two in order to replace that prop. I had two when I started my George Welsh version. After I dry fitted the nose piece, it popped off and I could not find it. Then I noticed my dog was munching on something really good! It took me two kits to build it, but it only costs about $8 each.
Shipwreck, that’s not a bad idea. I was going to try to salvage it. I planned on carving out a little hole for a small brass rod to insert and glueing the rod/prop back onto the spinner. I’m not even sure how it’s going to workout, but at least I don’t feel worried about it. =] That’s a good thing, no? lol Confidence outta get me somewhere.
An extra kit for the prop is not a bad idea. You not only get the prop, but an extra set of decals too! And if you go to Hobby Lobby with a 40 percent off coupon, it’s cheaper than buying a decal set. Guess that’s one good thing about the Revell kits. I needed decals for one of my P-47 builds and the cheapest way to get them was to buy another kit!
She’s a fine looking P-40!
Gary
holy cow! that is awesome dude!
Thanks CB1. It’s been a bit of a love-hate relationship with this Hawk.
A quick update. I’ve addressed a few things that I put on hold for a while and continued to work on the weathering. I had previously assembled the covers to the landing gear since in my test fit it appeared that I would be able to sneak them in underneath. Well, of course that wouldn’t be the case at all. I suppose I should’ve known better. So, I cut the covers off (carefully) and set them aside. I have weathered the tires a bit more to show more mud and dried dirt that it would’ve have sat in at some point briefly.
Here’s that:
 image by brittvallot, on Flickr
You can see in the photo above I had to cut a very small slice off the length of the rod that accepts the tire. After adding the strips of plasitcard, it’s now raised the tire a smidge higher. This allowed the cover to set down a little neater where it belongs. The photo below shows the better fit.
 image by brittvallot, on Flickr
Tires:
 image by brittvallot, on Flickr
Here are the landing gear now assembled.
 image by brittvallot, on Flickr
If you look closely here, you can see where I’ve set the eyelet pin piece (help with that term?) that seems to hold the tire in place. It’s a very tiny brass rod that I’ve bent into a circle. Worked fairly well. =]
 image by brittvallot, on Flickr
Here’s a quick top view of what’s generally going on here with the weathering.
 image by brittvallot, on Flickr
The chalky markings on the paint surface are Tamiya Weathering compounds A. They work rather well, but it did take a little learning of how I wanted to go about it. I didn’t have the kind of luck I wanted with adding some fuel stains. I started with MiG Rain Streaks. It went down a little poorly. I wasn’t patient enough with allowing it to set up, so it became overdone. Then as I tried to fix it, naturally it got away from me a little more. After some more effort I finally got it to come back to where I wanted. This terribly overworked area is a combination of the Tamiya Compounds, light washes of the Tamiya acrylic paints to bring colors back to where I wanted them, and following up again with the weathering compounds. I made this more work for myself than was needed, but it’s coming together. It’s not entirely what I was looking for. I don’t feel I had the kind of control I normally have when it comes to painting and weathering. However, I don’t think it turned out too bad. I’d like to tone this down some next time. =/
 image by brittvallot, on Flickr
 image by brittvallot, on Flickr
Here’s a view again showing some of the Rain Effects applied. I’d recommend it. Just take your time with it.
 image by brittvallot, on Flickr
That’s where I’m at for now. =]
Dang it Britt, I’m sorry I just saw this! Check your messages about the prop! I’ve got an extra!!! Raymond
Ha! That’s nice of you. =] I forgot to mention it during the post as it was late when I got to it. I actually managed to fix it. Since it was a simple clean break, there was a slight tooth to a small part on the most forward aspect of the blade and it happened to fit very neat into the depression it left on the spinner. So I left that alone and with my No. 11 exacto blade I carefully drilled a tiny hole into the widest part of the blade. I matched that up to the corresponding place on the spinner except on the spinner I drilled all the way through. I fit a small brass rod thru it and bent it to about 80 degrees or so in order to lock it down on the inside wall of the spinner…something for the CA to bite on. =] Glued the blade back onto the spinner while noting the pitch and voila! Back to new!!
So no worries. =] Crisis averted. I did however notice that a small triangular, bracket from the engine popped off and that’ll need to be replaced. Always something with this damn Hawk. =] But thanks for thinking of me.
It must be right, cuz it needs a serious run through a car wash!
Aaaaaaaand I’m back. =] Last update. The next post I make will be at the finish line. Just some odds and ends to address.
Completed the cowl flaps and added the rods and gearing to make them “work.”
 image by brittvallot, on Flickr
 image by brittvallot, on Flickr
One thing I noticed happening with the landing gear is that the struts still appear in the loaded position. It didn’t occur to me at first as I was more concerned with making them fit. I suppose it’s a small concession to make.
Master Model .30 gun barrels in place. Ultracast exhausts, and a Squadron wind screen/canopy in the works (not glued down yet). And I finally got one of my magnets back in place for the bottom panel.
 image by brittvallot, on Flickr
 image by brittvallot, on Flickr
A closer look reveals something going awry here with my cowl panel. It seems that this damn thing is bending itself straighter as the fit is somehow different now. Hopefully when I add the magnet at the other end this will resolve itself. My prop is acting funny now too. I think it’s more an issue of the makeshift shaft I have inside the engine. It seems to have shifted while handling.
 image by brittvallot, on Flickr
Other exhaust stack
 image by brittvallot, on Flickr
And here with the Squadron Canopy something else weird is happening. This is the second one I put together. The first one came out great. Fit was perfect. Paint was perfect. Then I tried to dirty the windows up a bit and I started melting through the damn plastic. Made the one you see now and I managed to screw with the fit of the canopy butting up against the windscreen. Everything else about the fit of the slide rails grooving with the canopy is fine. Hopefully, I can beat this into submission before the end of the week. There’s a IMPS event nearby where I live and I was considering throwing this one in it. I’ve never been to one before and don’t really know what to expect, but I do want to make sure I clean up all these little issues before then.
 image by brittvallot, on Flickr
Anyone out there who’s dealt with similar issues with the squadron canopy and has a grip on fixing it, by all means please throw me a bone. =] This is the first one I wholeheartedly attempted. That’s a wrap on that.
If you’ve got any input, I’d love to hear from ya. =]