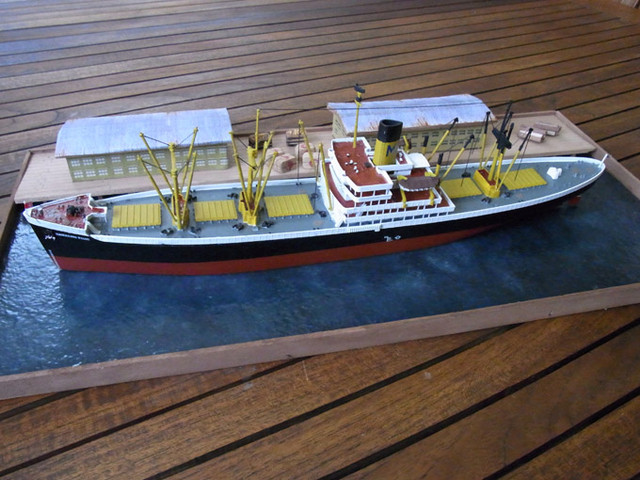
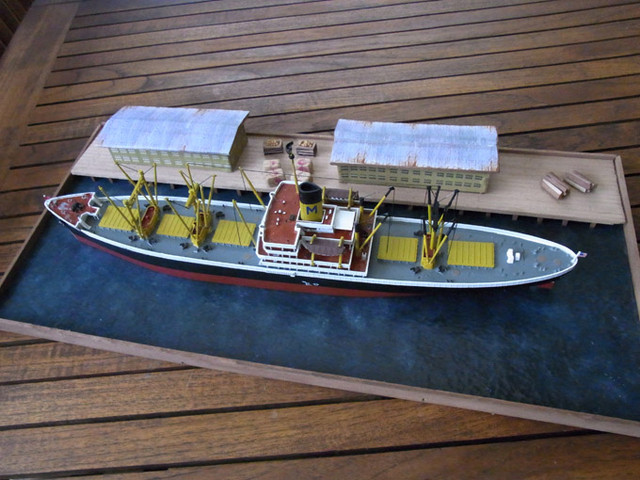
Hi, just joined the forum yesterday, and I have a small backlog of builds completed in my first 15 months in this great hobby. I like doing dioramas as well as building ships and planes, so here’s the Hawaiian Pilot I built from an old Revell kit (1/350 scale), in its dockside diorama setting.
It being an old kit, the decals were in horrible shape, and being a newbie I botched the one at the rear of the ship very badly. It fell apart as soon as it hit the water, and so the ship’s home port is somewhere called "Francisco’. The ‘San’ never made it onto the model.
it’s funny how the little things you do please you more than they should. I am quite proud of my dockside crates of coconuts and ‘bales’ of stuff (not sure what). The ‘coconuts’ are white mustard seeds from my spice cupboard.
Very nice. Welcome to the group. I had heard that Revell was going to repop that kit, but have not seen it on the shelves.
BTW, I always scan decals from old kits before I dip any in water. With inkjet decal paper I may be able to reproduce them. Also, you can buy bottles of decal film at hobby shops that will rescue dried out decals if you know they are likely to disintegrate. If you lose one, stop and apply the film to the rest.
That’s a nice dio. May I make a suggestion though ? If not , well , not to worry .Go to any port or marina and look at the way the larger ships and boats are moored .You have fore and aft mooring lines and spring lines ( the ones in the middle going in both directions. If you choose to leave them off,you will be dinged at a contest .Also the ship Needs to be closer to the pier . Can you move her closer ?
Now , that said .Where did you learn to do such a nice job? Are you a self taught modeler or did someone show you how to do such a thorough job ? I sailed with the company and your colors are dead on for MATSON .Don’t worry about the lettering .Go to Hobbytown and in the train dept. they have Woodland Scenics brand lettering that rubs on . It works great in a situation like this .
P.S I don’t intend to be mean or anything . Anyway you came to a forum that teaches willingly .You build it your way and we will help you out, sometimes like now, without being asked .Sometimes I can’t help my old self . Welcome to the greatest group of like minded folks in the world,well, my world anyway . T.B.
Great start in your quest for the perfect model. I won’t offer any critical observations but rather “what I would have done different” if I built this model…
First the pier. If possible visit a busy seaport that handles cargo vessels or Google some seaport photos. The Revell “Pilot” depicts the old days of cargo lightering, i.e. the ship’s cranes handle the on/off loading of cargo. The “Pilots” cranes wouldn’t be able to lift large cargo containers, most all cargo of that time period were stowed on dunnage and lifted with cargo nets. I would have made the dockside crates a lot smaller, remember in scratchbuilding ship models(assuming you have no plans or drawings to go by) undersize is OK but oversized is really noticeable. I would have made the pier’s wooden planks a lot smaller, considering the scale you are working in. An easy way out is to represent the pier deck in concrete, no wood needed. Another thing to consider is all piers have pilings, bollards and cleats to secure the ship’s mooring lines to. Wood dowel (in this case round tooth picks painted black) make good pilings. I would use the thinnest solder, painted to look like rope as my mooring lines. Solder is great for coiling or faking down rope on a model ship. It’s easy to work with especially on mooring lines, they “droop” just great. And if you’re really into detail, “camels” in the water add a bit of realism. If I didn’t want to have the ship at mooring stations, a couple of scale tugs would look appropriate pushing the ship into the pier or taking the vessel away from it. And since this is a working vessel, a little “weathering” wouldn’t be out of line. This step is a matter of personal preference and requires some planning so to enhance the model in a diorama setting.
You’re off to a good start, I look forward to viewing your next project. Good luck!
Thanks everyone for the constructive comments. I’m afraid that I merely lucked out in getting the colour scheme right (although I did look at other modellers’ builds of the ship online, and I just picked out the colour scheme that appealed to me, aesthetically).
And as for the dockside dio’s lack of authenticity, I’m not surprised it’s badly out of whack. It is merely something I created in my head, as I don’t really know anything about ships, docking or anything like that. I just wanted it to feel a bit small-time, old-style, island-like.
I’m afraid I’m never going to ever score more than 1 or 2 out of 10 for my dioramas’ authenticity, as all I plan to do is create something from my imagination that just pleases me. I wouldn’t dare enter anything in a competition, as I know how shonky I am!
Yes, a nice little tug boat would enhance things very nicely.
And in light of the comments on how “not close to the wharf” the Hawaiian Pilot it, you’re absolutely right! I think I just moved it out so the little wharfy bits like the buildings and the unloaded cargo would come up better in the photos. As it’s a waterline model, I’ve nudged it back closer to the wharf with my finger.
As I contemplated what I had said to you , I want you to understand one very important thing . You had fun building her, Right? And the Diorama ? Well,you see that’s what building models is supposed to be about . I DO love your effort and applaud you for doing a subject not familiar to you .
This shows your adventuresome side .Hope to see more ! T.B.
Very nice job. I have it in my stash, half-finished. I had hacked off all the old plastic rails to replace with PE rails. Taking the rails off was easy, but cleaning up the places they were removed from was not fun, and in the end, I set it aside. Other projects have taken its place, but your work has inspired me to think about getting it out of storage in the coming months to take another crack at it. You have done a great job, and remember that in the end, you are building the model for no one but yourself. If you had fun building it and maybe learned some tricks to use in the future, it was a complete success. That’s a lesson I keep trying to remember every time I work on a model.
Amen, Ships4ever, I am doing this just for fun, and I am definitely having a lot of fun.
My basic story is that I lost my job early last year, I’m almost 61 now and I haven’t even landed a single job interview since then, but I am scraping along just fine on casual part time work, superannuation and savings – but I have stacks of time on my hands. So as a model collector it was a natural (and cheaper) progression to model-building.
I never did model building as a kid, and my hands aren’t exactly rock-steady and my eyes are in worse shape, so I set my sights and expectations nice and low, with the emphasis on having fun and not sweating too much on authenticity, build quality etc.
All that has worked out fine – better than expected in fact – but as well as really enjoying myself and unleashing a level of creativity I didn’t know I had, I have also discovered something else – the joy of solitude. I do all my model building in my tiny, cramped garden shed, and out there I enjoy the relative quiet of the garden for many hours on end, all by myself. I just love being there.
If she’s docked in Hawaii, I keep expecting Wo Fat (Khigh Dhiegh, that is) to appear on deck, escaping McGarrett (Jack Lord, of course) again. Well done!
.I wish I knew how to post photos here .I have that same ship for a client and I replaced all the rails and ladders with P.E. Did that ever make that model come alive !
I am sure there are threads on posting pix here, but I just use one of the free online photo hosting services, such as ImageShack, or Photobucket. Set up a free account there, upload your photos from your desktop, then at the hosting site when you click on your own photo, it will give you a web address as a “link” to your photo.
Back here at the forum, choose “Use rich formatting” in the reply area, up will pop a panel of options for text and photo, including an “insert image” icon (little green square with a plus sign), and all you do is paste your “link” address into the box which pops up, and your photo should appear.
The only thing that might go wrong is if your photo is too big and exceeds the forum’s size limit. I have Photoshop here and so it’s easy for me to resize photos precisely to any requirements. Your alternative would be to simply use whatever photo handling software you have to save your photo as a “small size”, then cross your fingers and hope that works.
I’d love to see your Hawaiian Pilot with the fancy PE additions. Must look terrific!
Welcome to the forum! Very nice dio! I’m in the process of doing a similar one with a Liberty Ship. What did you use for the water? It looks great.
I second previous comments. Somebody mentioned using solder for mooring lines, which is OK, but at that scale you might want to use thin brass wire, painted of course.
I understand exactly where you are coming from. I am 57, and I do almost all my work using a magnifier visor. I realized a year or so ago that I wasn’t seeing my work as well as I would like, so getting the visor really made a huge difference. I love the solitude of building a model, overcoming challenges along the way, and hopefullly learning something on each project. I just bought a Pontos upgrade set for the Perry class guided missle frigate, and I am loving doing the surgery to remove the plastic so I can add the PE. Will it win any prizes? No, and at this point, I don’t really care. I know I will have lots of fun adding all the parts, and it will look good when it is done, good enough for me at least.
Onyxman asked: “What did you use for the water? It looks great.”
I used a craft glue called Mod Podge, lots of coats of it over painted board. I discovered the method via an expert diorama-maker’s YouTube video of how he does water, and so all I did was copy his method, in full, step-by-step. Here’s a link to that video by model maker Dave Frary: