Well, it has been a while since I had good enough inspiration for a good project. I finally landed on this TBD. I built one as a kid. Loved the flapping wings. Of course, as soon as I finished it, I flew it around my room like a bird…flap, flap, SNAP…WAAAAAAAAA!!![:'(]
Anyway, I know after my rescribe on the P-61, I said I probably wouldn’t go through all that trouble again, but, I couldn’t stand them raised squares all over the fuselage[+o(]. So, a rescribe and rivet job it must be.
I haven’t broken into any paint yet. I’m a bit puzzled as to which colors to use on the interior. The book that came with the kit has B/W photos, which appears to be NMF on the inside. I think it’s from a yellow winged bird though. I plan on a later, blue/grey with white belly. Usual, interior green???
Thanks also as I am still building Monograms version,and I had conflicting info on the interior.depending on where I went it said NMF or green,lol… Mine is also midway era so. I guess I guessed right for once.Now just to find the front cowling as it has gone MIA on my bench lol… I really need to build my new one.
Sometimes I look at those Yellow-winged Beasties and wonder if the crews ever had a clue about what was gonna happen to them shortly after they got painted blue…
Always nice to see a build blog featuring this classic! I built it too, as a kid, and I remember how pleased I was with the detail, when I opened the box, compared to the older Monogram USN kits that I built in prior years.
I love your scribing and riveting, too. Though I’m not as much of a fanatic about scribed vs raised panel lines, this kit certainly deserves that extra attention.
Regarding the interior color, I think you’ll need to check your sources for the specific aircraft you’re building. Interior green was applied to some aircraft, at the end of the yellowwings period, and some aircraft still had the aluminum color, I think it depended on when the maintenance crews could schedule the work, against the backdrop of events that overtook us at the time.
I’ve got this same boxing as an eBay find, but along with the booklet, I’ve got the Squadron book and another booklet by a different publisher-Aero-something? can’t recall, the logo is an ace-of-spades-I can see if I can find more pics for you, too. The Life mag photos are excellent, too.
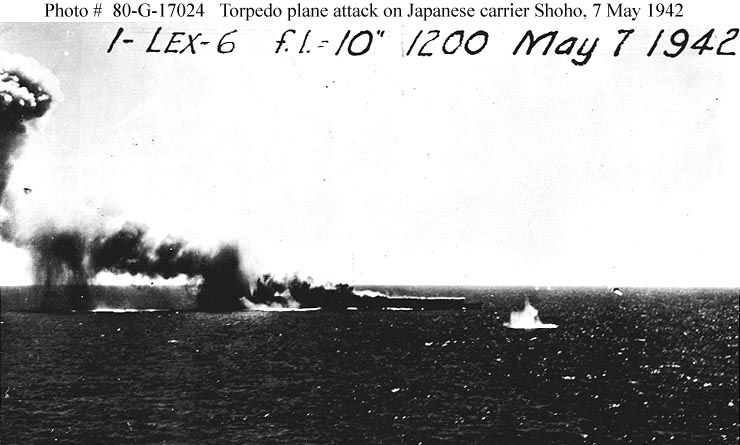
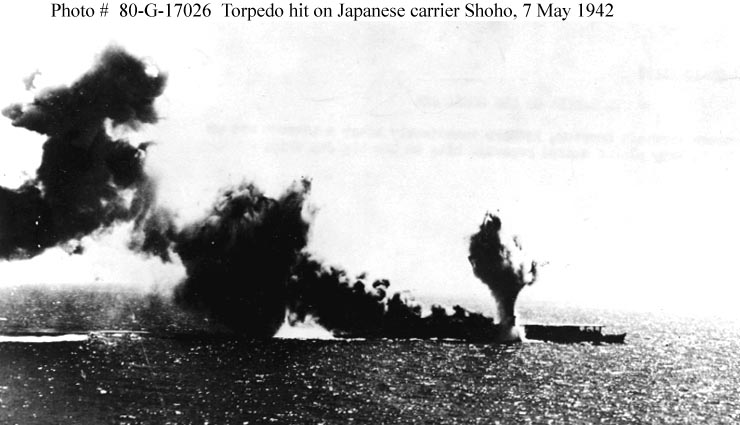
Until the morning of June 4 1942, the TBD actually had a respectable combat record. The early raids on Lae, Tulagi, Wake, Marcus Islands etc. all proved well within its capabilities. On May 7 1942, their hour of glory, 7 torpedo hits in to Shoho
The next day, the faster “Crane sisters” were able to outmaneuver the torpedoes used. At Midway, the main shortcoming when analyzed, was not the TBD itself, but rather the lack of fighter protection for the torpedo squadrons. The TBD’s vulnerability and the torpedoes again were also MAJOR shortcomings that morning. The TBF also had a very bad day that morning during its combat debut (100% losses when the write off of the sole survivor is included- and no hits scored). It is interesting to read Commander Waldron’s words to his squadron how he foresaw that indeed they may be shot down to the last man. Both Commanders Lindsey and Massey, being combat experienced in the TBD by that point I am sure also had little illusion about their chances of success and survival that morning. Brave men all.
Of all the Monogram “classic kits” this has to be an all time favorite of mine as well. A quick look at this photo from the same series as the one I posted above shows that either interior color will work on the Yellow Wing birds will work. The foreground TBD has a green cockpit, while the background one (6-T-16)appears to be aluminum.
Thanks fer the TBD update, Stik… Still… The juevos on the TBD crews… Huge, man… Heck, all Torpecker crews for that matter… Every gun on the target aiming at you, no place to manuver to or space to do it in, can’t do much more than stomp on a rudder pedal to open up your gunner’s line of fire if he needs it… Brrrr…
I know it’s only a sim, but I’ve been flying a TBD in CFS 2 the last week or so, trying to sink the Shoho, and haven’t survived more than a few seconds after torp release, lol… Sometimes I didn’t even make it long enough to drop, lol…
I managed to get in a little bit of time yesterday, didn’t get real far. But, today, I made a bit of progress.
Added a few bits here and there to the fuselage sides, wire, aluminum and sheet styrene. A couple bits of leftover PE fret were bend to shape to replace the forward canopy rails. Also, tabs from PE fret were used for crank handles.
Lots of work to the main part of the pit. Scratched new rudder pedals, along with brakes, aluminum foot …uh…thingys, forward bulkhead, lots of wires and do-dads. Control stick “boot” is alum. foil.
I must say, I’m quite proud of these!!! The kit seats are pretty clunky, so I scratched some new ones, courtesy of an Arizona “Sweet Tea” can.
Still have a lot of work to do on the office, but, I’m calling it an evening.
Thanks, no soldering. I start by cutting a length of alum., then grind the backrest to shape with a dremel. Bend for the seatpan. The sides are cut, then I bend the edges at a 90/ ,so there’s tabs to CA the seatpan to. Let that dry a few minutes and grind the sides to shape. That little curved piece in the bottom corner (pan-back) is a seperate piece, also CA’ed.
I had a full day of the good stuff. I added a few more wires and bits/pieces, and a few donor parts from the boneyard.
I’ll have some color in the next update. Hopefully I’ll get a rain day this week, otherwise, no joy til the weekend.