You could probably do the different colors in paint, and looking at the instructions on the Revell site, it comes with those large stars for the Army version. Just grab some different-colored letter decals from Microscale or dry transfers or something, and I’m sure you could do it yourself! And if the sizes don’t match up perfectly with the kit decals, just use the AM ones. [:D]
It’s great that there is lots of interest in the plane. Hopefully that will encourage some AM development.
Not to much progress to report as it’s been too nice out to stay inside!
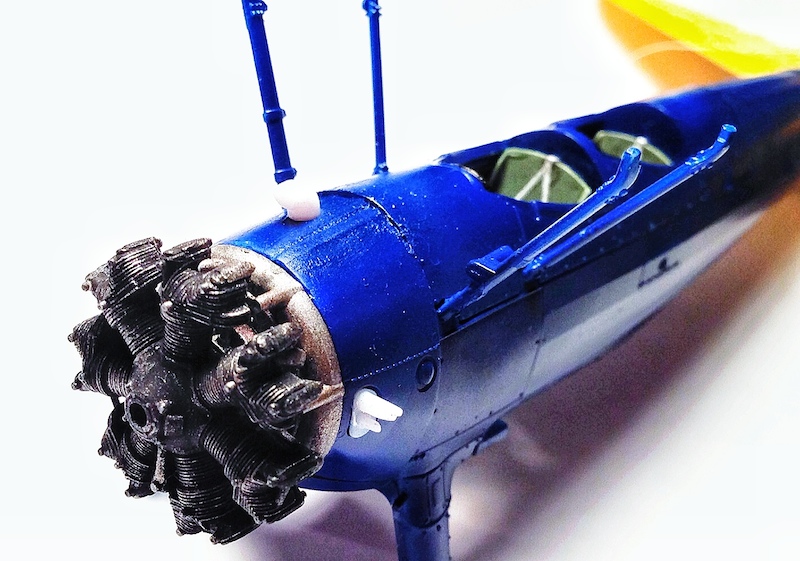
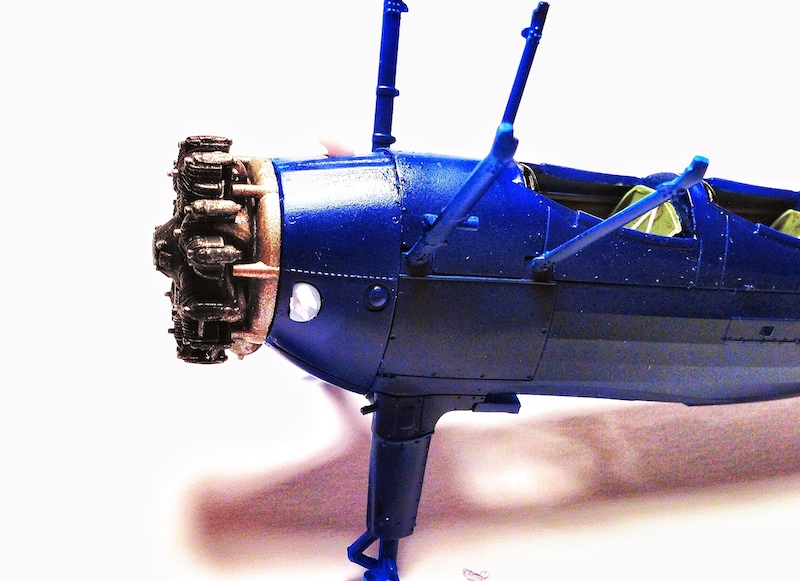
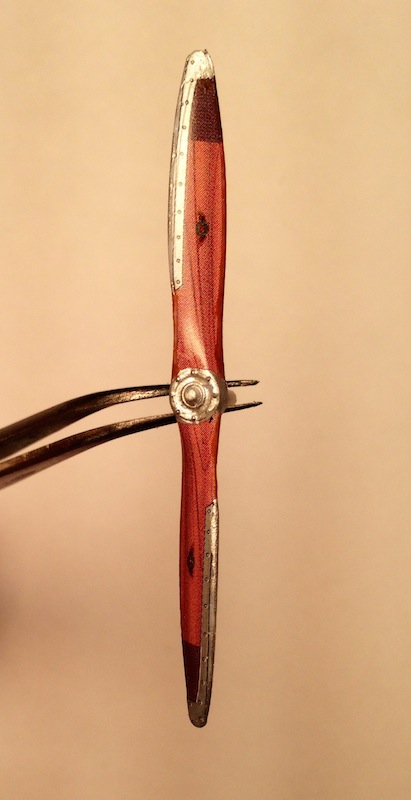
I’ve installed her engine but still need to paint the exhausts. I’m trying to decide what to do with the prop. The instructions give the option of a wood or aluminum one and they actually provide 2 props. For the wooden on they do give you decals but I’m not sure they will look very good and I’m not sure I can paint convincing wood grain on smooth white plastic. The aluminum one is a safer bet but not as classy as a wood one. Any suggestions?
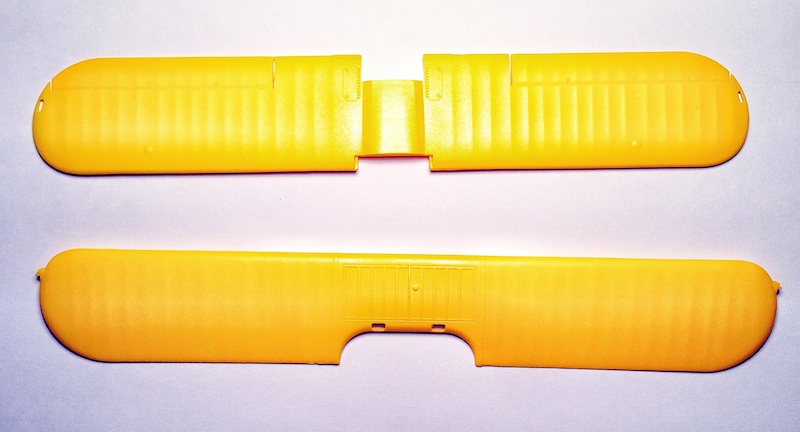
And I managed to assemble and paint the wings. Remind me when I do the yellow paint scheme – I hate Tamiya Flat Yellow! It’s not that the paint is bad but for some reason it is messy, gets all over me (who knows why!) and clogs up my airbrush unless thinned way more than other paints in their line. I had to remove the paint twice before I got a good coat. So I just may use Future to gloss it instead of doing Tamiya Lemon Yellow gloss. But maybe now that I know the thinning ratio, I may risk the gloss. I do know that I’m not going to use the decals for the walking strip on the wings. I’ll paint those on.
I’ve also starting rigging the tail. This part scares me. I’ve only rigged one plane before and I used thin gauge wire - not too good and way out of scale. So I decided to try EZ-Line. The stuff stretches for what seems like forever, but it’s very thin and kind of hard to work with. I keep telling myself, easy… easy… don’t rush. If I do this right, it should look good.
I bet some of the “generic” decals from Yellow Wings could be cobbled together for one of those colorful pre war birds. BTW, I love that in flight shot- I am quite familiar with the area below.
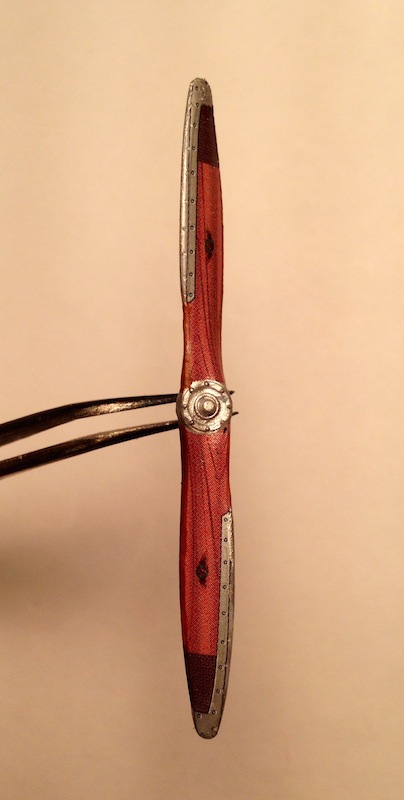
No go there, Rob, one prop is the metal McCauley and the other is a wood prop. I have seen a picture of the model with the wood prop using the decals and I think it looked great.
That’s true. I’m still not sure about the decals. I’m thinking of doing both and then see what you guys think. The only thing I’m toying around with is whether to use the decals or attempt to paint the wood one. If I use the decals, I’m not sure how to get it to look wood-like. The decals are very glossy but I think a flat overcoat wouldn’t give it a wood look and the gloss looks unrealistic. What do you think?
I think (and double check) that wood props were pretty well polyurethaned to protect from the weather. I would do it wood and leave it glossy. If you want to weather it and the aircraft, you might brush some flat coat on the leading edge of the prop blades to show the poly coming wearing off a bit. But I would do so sparingly.
Wood props should always be at least satin, or else glossy. Any moisture getting through the finish leads to imbalance or damage to glue joints, so the finish is usually nice on a wood prop that is airworthy. Fabric covered propellers may be a different matter, but a varnished prop should look good.
They were very helpful and encouraged me to try the wood decals. I’m glad I did. The decals didn’t cover the entire prop, especially on the edges so I needed to paint those in – Tamiya Flat Aluminum for the metal, Tamiya Brown for the brown tips and Model Master Acryl Leather for the wood. They were all pretty good matches right out of the bottle. It still needs a gloss coat for protection and maybe a tiny bit of wear.
I think they came out pretty good.
I also put on the wing decals after deciding to use Tamiya Lemon Yellow for the gloss coat over the yellow flat.
I’m still freaking about the rigging. Sometimes procrastination is good, but most of the times not so much.
Sorry, the prop did not come out looking good…it came out looking GREAT!!! [Y][:D][Y]
Been quietly following this thread up to now. I honestly don’t build a bunch of airplanes, but now I am kind of itching to pick one of these kits up thanks to you. The PT-17 Stearman was a regular at all the airshows I went to as a kid and I always loved the way it looked (as, oddly, with a few other famous trainers like the Trojan and the Texan…of which I have a Texan kit in my stash waiting to be built, and I have been itching for a Trojan kit too!)
Thought you replaced the prop with a wood one until I read that it’s a decal, and wow that looks fantastic. Been trying to see what the difference is between the wood and metal prop. Someone told me one particular engine may have called for using the metal prop. Thru my searching I discovered that those wood props are not cheap!
As far as the wooden prop, I got to wondering. The PT-17 was built with two engines. I wonder if the wooden prop was used on both engines. I forget which engine the kit has- I’ll need to check that out soon as I am about ready to start painting engine- but wonder if the wooden prop is correct for the engine in the kit. All the photos I found with a google image search, of planes with both engines, showed the metal prop.
The instructions show the wooden prop as an option for the Army scheme not the Navy, if that helps. Other than the props, there are no additional options for the engine. There is no indication what engine was used for the model.
What is in the kit is very definitely a Continental W-670.
PT-17 was the designation for the Continental W-670 powered Stearman and it could have either the McCauley metal prop or Sensenich wood prop, in civilian life a Hamilton Standard ground adjustable aluminum prop is also certified to it but I don’t if they were used by the military. THe Lycoming R-680 Stearman was called the PT-13 and although I think they also could use both props I am not so sure as I am on the PT-17.
I did a further google image search and did find several pics of the Continental Stearman with wooden prop. So I guess either prop can be used and be correct.
My Stearman arrived the other day. Looking it over, I haven’t decided whether to rig it with EZ-line or very thin piano wire cut to length and pop the ends into holes drilled with a micro bit. As I believe was previously alluded to, it would’ve been handy if Revell would have provided guide holes or notches for the rigging. Oh well, all part of the “I built it myself” experience I s’pose.
Maybe I have acquired obsessive/compulsive dusease (friends are telling me so), but I have decided to mask the formers and stringers inside the fuselage halves, to paint same color as the other framework. If it were not for Tamiya tape it would not work at all. Even with all care, I cannot keep all lines even thickness (they are about a 32nd inch wide), but since some of this stuff is covered by the main framework, maybe it will not be too noticeable. Sure is going slow. Have on half ready to paint, maybe half done on the other side. But I have held the sides and top together and it is indeed visible, so it is not one of those completely hidden detail things.
Also, it looks to me like the fuselage sides behind the engine are intended to be removable, so I may finish the accessories section on the back of the engine. I had thought it would be completely covered, but it looks like if I make one of those covers removable, it will be visible.