Greg is correct. Using pastels, charcoal, and dry brushing can give you some great, and very similar effects. I shouldn’t have been so careless in failing to mention these, and I’d recommend trying them. When you move to the airbrush you will be able to blend all these techniques and create some really stunning work.
I dont see anyone here talking about washes yet. Washes and drybrushing are two techniques with the brush that are fairly easy to do. And dont requite you to goout and buy more than you lready have- bsicpaints and brushes. And a good old #2 Pencil has its’ place for weathering too. But start simple, get good with the basics of proper building and painting before worrying about the fancy stuff.
Washes and dry brushing are good, but can be tricky for a first-timer.
I’m with guys who recommend pastels/charcoal. I just started using them and like them more and more. A big plus is they can be easily removed if you screw up.
Nice progress, Jeremy, looking forward to seeing your next installments.
Thisay be a stupid question. Do you thin the paint when you are brushing it on? I am using enamel paint.
Thinning is the big X factor when brush painting. Especially large areas. Yes, you will need to thin the paint. You don’t want it going to too thick. As for consistency, I can’t really help you because I don’t use enamel. Experiment on some scrap plastic. You’d rather it go on thin so you can build up layers. If you try and covet with one application you won’t like what you end up with.
I would thin enamel slightly when brushing. The amount depends on the age of the enamels you have, as some of the solvent may have evaporated, etc. When hand brushing, you want the paint to flow a bit, allowing it to level on the surface. Thicker paint will not level as nicely. I would also recommend getting a piece of scrap polystyrene and practicing brush strokes, camo patterns, etc. Watch how the paint reacts with varying degrees of thinner, amount of paint on the brush, etc. Good luck. I’ve seen some amazing work done without an airbrush, just painted by hand. Takes time and lot of practice.
That is actually an excellent question. If the paint goes on where you can see plastic thru the paint (except with light colors such as white, yellow, lt blue, lt gray, etc), no thinning is needed. If the paint is covering with one coat but not leveling out and leaving brush marks that look like a miniature plowed field, it needs some thinning. Most all colors in enamels that are darker than a light gray should cover with one coat. What brand of paint are you using?
A good tip is to clean your brush a few times during longer sessions of painting any color, and leave the bristles moistened just a bit with thinner to aid in paint flow off of the brush. Dipping a clean brush in thinner before you start with each color and then wipe it off until the bristles are barely moistend with thinner is a good technique to use for the same reason. I also prefer natural bristles over synthetic bristles in almost all cases.
Hi Jeremy!
I’'ve been reading this thread with great interest! Your P-39 looks like it’s coming along great. I have to agree with pretty much everything everyone here has said especially when it comes to weathering with pastel chalks. On that topic, I have to say to apply it VERY lightly at first. Step back every now and then to get a good overall look at the progress. Sometimes when it comes to applying the chalks, “less is more”. It’s better to build up to the look you like rather than trying to accomplish the desired look in one single application.
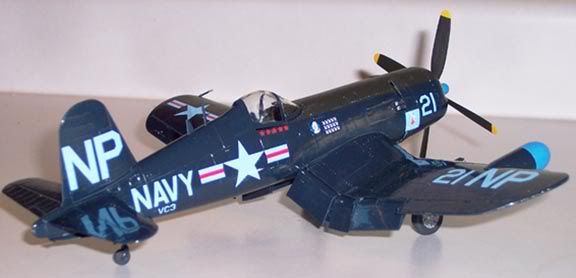
Secondly, I agree about thinning the enamels. Here’s a picture of a Corsair I built a little while ago. It was entirely hand-painted. I thinned a bottle of Model Master Glossy Sea Blue with just a tiny bit of thinner. Bear in mind that the goal was NOT to make it watery, it was to merely make it flow better. At first, when you’re applying the paint, you might see brush marks. Don’t worry about this! As the paint dries, you’ll see that it will level off. (On a side note, the exhaust staining was done with pastel chalks applied with a paint brush.)
Remember, perfection in model building can never be achieved! It can only be pursued!! It’s been my experience that model building and painting is about 50% skill and 50% luck. One model might turn out great, the next will be not so great but the one after that will be stellar. It’s a rollercoaster of a ride. Just hang on and enjoy where it takes you.
The people on this forum are simply the best. I’ve been members of others and it’s been my experience that the group here on FSM are the friendliest and most supportive buch that you’ll find. And there are no stupid questions!!! Ask anything and everything! When one person asks, we all learn.
Best wishes,
Eric
One other thing, Jeremy. The compresser you have on your work bench is the EXACT same type that I have. It’s never given me a lick of problem. I’m hoping it’s working out for you as well. I normally spray at around 18-20 lbs of pressure and it works like a charm for me.
Eric
Here’s another one for ya!!!
On weathering…First, I’d highly recommend spraying with a rattlecan, but this method will also work with a brush painted model. Once your model is painted, lay down some black pastel chalk along the panel lines(charcoal sticks from the arts-n-crafts section work fine too. I use a piece of sandpaper as a palette to grind the chalk down into a powder). I use a farely small, flat/wide brush, dip in chalk, run it along the panel. (doesn’t take much!)

This is what it looks like at this point…

Next, take your base color (same color you originally painted with), and dry(ish)brush over the pastels, getting them mixed in with the paint. Keep it farely localized around the panel lines, with a few random streaks in the direction of airflow.
Here’s a before/after of this step…

…and another after…

It looks like he!!, I know…don’t be scared!
Once you’ve finished this step, all the way around, use your base color again, but lighten it just a touch (with greens, I lighten with a couple drops of light tan…go easy on it!). Now, using the slightly lighter color, drybrush again, randomly, all over (if that makes any sense!!!). I try to keep this drybrushing step more within the center portion of the panels.
Now, it looks like this…

The next step is to spray a gloss coat for your decals, followed by a flat coat to seal the deal.
I dabbed on a little more chalks along heavy traffic areas, as well as making a few streaks, after the final flat coat.
The finished product…

Full build is here if interested…http://cs.finescale.com/fsm/modeling_subjects/f/2/t/124657.aspx?sort=ASC&pi240=1
Here’s another example, done with the above method…


Full Devistator build here…http://cs.finescale.com/fsm/modeling_subjects/f/2/t/128955.aspx?sort=ASC&pi240=1

Fermis, do you have any examples of this method on Multi color camo schemes?
Yes…just one though. It was my first model after a 3+ year break…it was also my first “WIP” on this forum (which gave me the inspiration to get back to plastics, rather than booze!), and it was also the first time I used this method. Funny thing is, I was actually trying to cover up some mistakes, where I got too heavy with the pastels…turned out to look way better than I thought or planned!
Doing a multi-color scheme is a bit of a PITA. I use poster-tack to re-mask along the edges, just so the drybrushing doesn’t overlap onto the other color. (the peiviously posted pics were multi-color, OD over grey, or grey on grey for the A-10)
I did use an airbrush…the old Testors cheapo “Wally” the Walmart wonder (now burried in the back yard!). It was only slightly better than a rattlecan. All the weathering is pastels and drybrushing. (1/32 Trumpy P-40B)

Fermis, as usual that’s some inspiring work. What kit is the A-10 and would there happen to be a WIP for it?
Thank you kindly![t$t]
It is Trumpy’s 1/32 kit. There’s a WIP somewhere in the forum history…but I moved all the pics around in my Photobucket account shortly afterwards, so any pics that would be in the WIP wouldn’t jive at all. Actually, now that I think about it, (not that it really matters anyway) it would have only been a 1/2 WIP. I had started and shelved the project when I went back to flight school and took a couple years away from the bench.
Here’s a link to my P/B album w/ the A-10 for many more completed pics…http://s661.photobucket.com/albums/uu340/fermisb/planes/A-10/
I had posted a question but never mind, I should have looked at the photos first. [H] Thanks for sharing the link.
Fermis, the technique you gave above; is that the only technique you’re using to get the staining/streaking like on the A-10?
Yup, The darker “grime” and streaks were done with pastels after all the drybushing, decals, and flat coat. For the streaks, I lightly dab a little bit of pastel powder along the panel, then run the brush (with slight pressure) across it in the direction of airflow and/or gravity.
Fermis, thanks for the info and pics. I srarted painting the bottom of the wingd. Im not to hsppy with the result. I am going to use a rattle can for the rest.
Eric, thanks for the info on the compressor. So far i am loving the hobby and everyone on this forum is great. I am catching on pretty well with the building aspect of modeling. I can see that painting will be another thing all together.
The local hobby shop didn’t have the color paint I need in a can (sand). So I ordered it online and will have to patiently wait! In the meantime I am going to brush paint the remainder of the small parts while they are on the sprue. I am also looking at airbrushes for the future. Any recommendations? I want something of decent quality without spending to much if at all possible.