I am having my first experience with Indycals where the carrier film is one piece so each decal needs to be carefully trimmed.
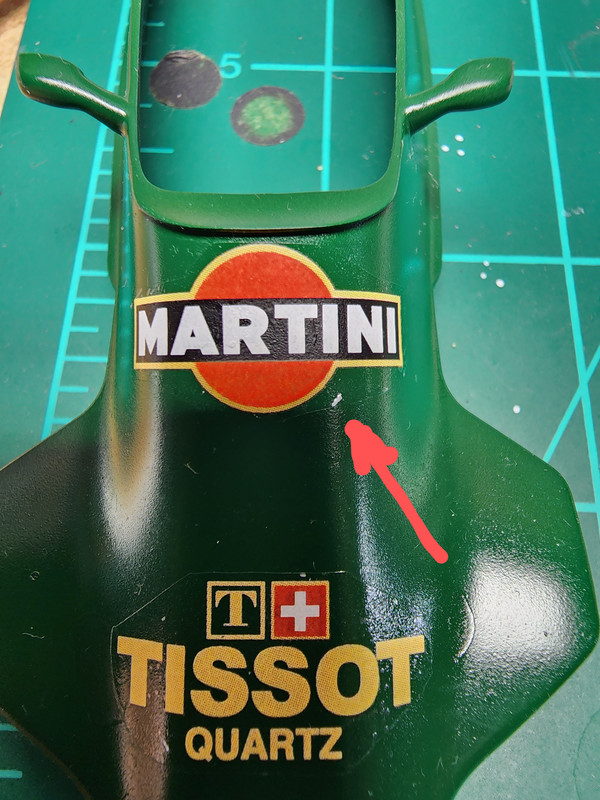
I don’t know where the spot shown came from, but it is either on the carrier film or below it. Unfortunely I already used Solvaset (before I noticed the blemish)
Appreciate any ideas how to get rid of it. I plan to clearcoat with 2k clear afterwards.
This is odd. I see the pic at my end. Let me try again…
Pic should be below here
[Duplicate image removed]
Is it up there?
By the way, John, as I get used to Indycals I like them too. Really thin and very detailed. I wasn’t prepared for the thin nature of them, and had a heck of a time and darned near ruined a couple. Getting the hang better now.
I also cut my first few with scissors, which was a mistake. The edges look awful, even after clearcoat and polish.
Should I cut around it or try to scape it off? If I cut around it, how to get it off then? (I’m sorry, I’ve never tried to manipulate a decal once set)
Would you do it as is (dry) or apply a decal solvent first?
Also, could somebody advise if all 3 pics are showing now so I can remove the following 2?
Greg, I’m thinking the best way to cut that spot away would be just a straight cut across that section of the carrier film, removing just enough to get the offending spot off of there. It might even be advisable to use a fresh curved blade if you have one available (a #15 scalpel blade I think would be ideal), so you can just rock the blade on its curve so the paint underneath incurs the least amount of mechanical stress.
Getting the section of decal you want removed to separate from the surface can be done with a tiny blob of BluTack. Just hold the little blob of BluTack with tweezers and lightly dab at the edge of the area you want to pull away, and it should lift off pretty cleanly, even after Solvaset has been used. Had to use the BluTack technique a lot on the bottom of my F-4B to remove decals here and there that didn’t belong on an older F-4B.
I can see all three of your photos, so you should be good to remove the other 2.
I would paint over it. I assume you still have some of the green. For small spots like that, I shake the bottle, take the cap of and turn it over on the bench. Then dip the toothpick into the cap. That usually produces the right thickness of paint to put the right amount on the end of the toothpick.
I sure like your idea of repairing the decal cut edge, or underlying paint with a tiny bit of clear or Future. I wouldn’t have though of that and waited to ‘hope’ that the final clear coat fixed any damage.
Excellent, thank you, John.
Pretty much all stuff I’d never have thought of here, too. Rocking the curved blade to minimize damage to the underlying paint is a really neat idea, and so is dabbing up the unwanted decal part with blutac.
And thanks for letting me know about the 3 pics having been visible, too. Appreciate your ideas, Eagle.
Can always count on you for simple and often-overlooked solutions. (Didn’t anyone ever tell you that as an engineer, it was your job to come up with the most complicated and expensive solutions possible? [;)])
I really like your idea a lot, only hiccup is the green is Airbrush-ready Gravity colors, not sure it would cover. I’m planning on doing a test spot on a spoon later, though.
No problem Greg. From the photo you posted, when I blow it up on the screen, it looks like the spot is maybe a little piece of lint or other debris trapped under the film, so physically cutting it away may be the only way to get rid of it. If you use paint to touch it up, you may see it as a pretty prominent blemish in the paint. If that’s not what has happened though and its just a flat, smooth discoloration, you could still touch it up with your airbrush if you want to. I have found that toothpaste makes a great barrier between a decal and masking tape to keep the decal from getting damaged. You just brush some on with a paintbrush of your choosing and let it dry overnight. Then you can put masking tape over that part of the decal and use your airbrush to gradually feather in some more green paint to cover the spot and blend with the surrounding area. When the masking tape comes off, its just a matter of a little gentle wiping with a damp sponge to remove the toothpaste. I have left the stuff on for days and was still able to wipe it off with no issues. The decal underneath always escapes completely unharmed.
Actually the first place I worked, Mcdonnell Douglas, had posters up warning us of Gold Plated solutions. I think it was a government required poster [:)]
No problem. Just came up with that one recently because I had a beautifully-decaled F-4B fuselage (with probably 100 or so tiny placard decals) and realized I had to mask it off to shoot corrogard onto the leading edges of the wings. Heh…and I thought I was being smart by not decaling the wings yet. [bnghead]
On the subject of engineering, our engineering department has a plaque on the wall that says “Engineering: Using methods you don’t understand to solve problems you didn’t know you had.”
That’s pretty funny. Glad you knew I was tongue-in-cheek. I was one, more by decree than degree, and I get a kick out of poking fun. Truth is it is I who overthinks everything, not real engineers like you!
Sorry Greg just saw your post right now. If it’s a piece of trash trapped under the clear film then use a new 11 blade to carefully and surgically remove the culprit, lightly sand and reseal the wound. If it’s trapped air again a new 11 blade tip is used to puncture the film and re apply Solvaset to pull the film tight.
Hopefully you solved the issue by now since this is a Nov. post.
Thanks for the ideas, much appreciated! Your response is not too late, I haven’t been able to proceed with the Lotus for now. When I do, I’ll be armed with your and everyones input here to help me through.
I’m mad at myself becuase I rushed the decal applications shown, and it was a good lesson for me because my modified “Morrison’s law” bench free spot was down to about one square foot and not clean. I guess this is what happens.