I’m in the process of building the Ebbro Lotus 49, I’ve painted the body of the car but there is much more work to do. Is there a way to cover the paintwork during construction so it isn’t damaged with glue spots, scratches, etc. What would be used?
The paint came out nice and smooth, I would really like to keep it that way. Any suggestions would be appreciated!
3 Likes
Unfortunately no. I’m assuming you’ve already put a clear coat on it. This will provide some protection. When handling the body, I always wear gloves. You just have to be as careful as you can be.
2 Likes
Ahoy Johnr. I would also like an answer to this question. This is the main reason I shy away from building model cars. As for me, the danger lies in mating the body to the chassis and in adding the glass and fiddly bits. I try to do as much building as I can before I reach this stage.
1 Like
Thanks for the replies, I was hoping for an easy solution. What I am doing though is using Weldbond glue for some of the body parts. I can place the part without damaging the paint, once the Weldbond dries, I can go back with a drop of Tamiya Extra Thin placed with a fine brush. It seems like it’s working pretty well so far. Fingers crossed!
BTW, for those not familiar with Weldbond, it’s some kind of white pva glue, except stronger, it’s used to bond wood, glass, ceramics. I use it for building wooden ship models. It dries clear and provides a very strong joint.
1 Like
I second the advice from @Cbowling: Always wear gloves. I buy the 1000 count Nitrile gloves (way better price per glove than just buying boxes of 100). I actually wear these throughout the entire build process, not only just for handling bodies post-painting: Bare hands & fingers are good at leaving oils and transferring all kinds of dust, dirt & debris onto every part you handle.
As for minimizing damage to paint during construction, for me it has always been a battle with using adhesives and having then end up where you didn’t want them. Over the many years and many gluing mishaps I’ve experienced, I have adopted a philosophy of minimalism when it comes to attaching parts. Here’s how I approach this now:
Does this part (such as a car body) really need to be permanently bonded?
Over time I’ve realized that my models just sit on shelves 99.9% of the time and don’t need to withstand constant handling. If the body, hood, etc. can stay in position without using glue, then I avoid gluing. The mindset is “attachments only as strong as they need to be”, not “this thing must survive a nuclear blast” (which I actually used to think).
If the part really does need to be permanently bonded, what is the “least adhesive” means by which that can be done?
When it comes to attaching parts directly to a painted body, using traditional glue on mating surfaces is not my first choice. Where possible I will drill tiny holes in the mating surfaces and use bits of wire to pin these parts to the body, only using the tiniest amount of glue on the wire ends. If the part is either too small for pinning (like an emblem or a wiper blade), or you need the ability to adjust the position a little before it dries, I will use clear acrylic paint with a fine brush to attach the part. PVA can work but often its thicker than I want for small parts and can leave a visible “shoreline” edge when it dries.
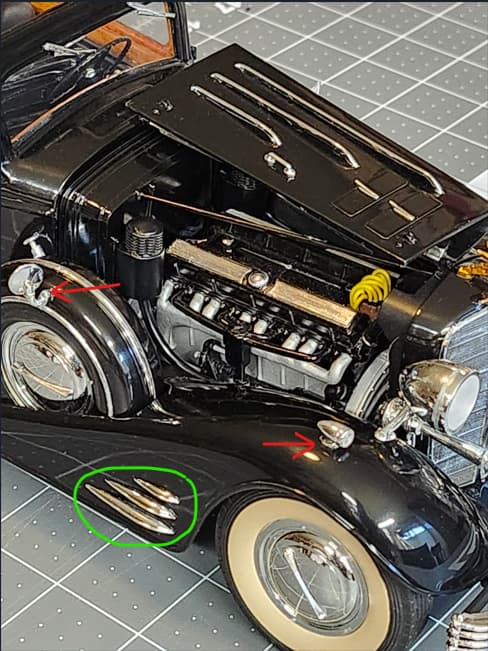
For example, here is a picture of a car I built last year (the old Entex V-16 Cadillac kit). The red arrows point to parts I attached with wire pins. The green circled parts were attached to the painted surface with clear acrylic paint:
When installing clear parts I avoid adding adhesive around the entire perimeter. Just adding glue dots at the corners is often sufficient if the part fit is good.
When planning to mate sub-assemblies (like interior tub to body/chassis, body to chassis, etc.), don’t be limited by the attachment points that have been provided by the kit. Add new attachment points to get the results you want.
I have built several kits with 60s era mold design that leave attachment of the body entirely to the builders imagination, with only the vaguest of attachment points indicated in the directions. Before I even prime the body I will test fit repeatedly to see where internal (non visible after assembly) attachment points might be added between the body and chassis, and I’ll add these using little styrene blocks, often trimming/shimming these custom attachment points to get the exact body stance I want.
4 Likes
Thanks for your reply Rob, those are all great suggestions!
I will certainly be keeping these in mind as I continue work on my model.
1 Like