I’m getting VERY close to throwing paint at my Zvezda La-5 WIP - spraying the gear bays tonight and probably starting with the actual surfaces tomorrow - but as I get closer I’m having a tough time figuring out my masking strategy.
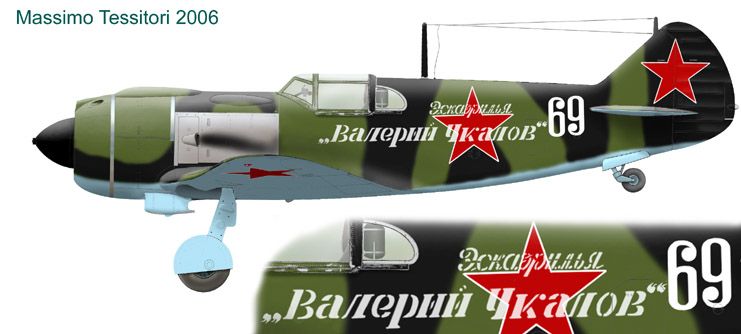
Here’s the scheme in question:
I’d been planning to do the standard underside → topside light → topside dark using play-doh to mask for soft-edge lines, but the more I think about it, the more I think I might run into huge problems masking such a narrow sliver along the bottom of the fuselage, especially when I start masking for the black.
So now I’m starting to think about painting the upper surfaces first, and then doing the underside blue last. Or at least going back to it to get a good line along the fuselage.
Has anybody else run into this kind of issue with the underside on a camo scheme? How have you tackled it?
For some reason I always start with the underside then mask it when it is dry. I use tape most of the time but on complex curves I use silly putty or blue tack., either one of these would work a champ on your aplication here.
Personally, I would do the top half first, masking approximately for the underside. After that I would mask the top of the bird, do any primer touch-ups as required & then top coat the bottom (? you know what I mean).
I generally always, no matter what the scheme, paint the upper surfaces first. Not exactly sure why, but I prefer being able to mask the larger surface area of the fuselage. There is more to cover, but the tape has more to stick to. Just my preference.
I also like to get the more difficult painting, ie camouflage, out of the way first.
Not at all. The only thing I would watch out for, 'cause it gets me almost every time, is over spray when you’re painting the underside. I tend to always make the mistake of not using enough masking tape. For example, when spraying the undersides of the horizontal stabilizers I always seem to get over spray on the tail section. Same goes for spraying under the wings. Paint invariably ends up on the fuselage. So just make sure you mask enough of the upper surfaces…unless of course, I’m the only one with this problem
That is my usual method as well. Once the lower surfaces are painted I tackle the topside colors. In cases like your yours where the upper camo runs beneath the horizontal stabilizers I will mask off the lower surface with masking tape. After all the basic colors are applied over the uppers and lowers I will go back and touch up any overspray as needed. The last part I usually hit is the upper/lower demarcation line with the lower surface color.
I agree with light color 1st. I paint the bottom color also up the sides of the fuse so the colors overlap.If the demarcation line is hard, I use Tamiya tape to mask the line and cover the entire bottom with wide painters tape and paint the top color(s). If the d`marc is soft, I back down on the air pressure and free-hand it.
Jon- I know all bout overspray around the tail section...happens everytime I free hand..lol..I got smart and now use post-its to mask off those spots.
I myself generally paint the underside first then the upper surfaces… Besides, the underside colour is almost always one colour…
By painting the underside first then the top, it makes it easier to touch up the underside then it would be the top. Meaning if the topside had a camo scheme whether it be soft or hard edge, masking/touch ups would be a bit more tricky…
On a side note… As to light to dark colours… I threw that theroy out the window along time ago…(It enhances the effect of weathering and colour variations)
Eh, I tend to view light to dark as a rule of thumb, but one that can and should be broken as necessary.
But one thing I’d point out is that I’m not necessarily going for a great finish. The La-5 is a mid-war Soviet fighter that first appeared over Stalingrad, not some pristine museum queen.
At this point I think I’m going to paint the underside first, if only to get things like the leading edge of the wings where I want them, then the topsides, then come back and play-doh mask and paint the fuselage demarkation if necessary. Seems a happy compromise.
Do appologize Boss for going on a tangent but… For me, I like mixing it up with light and dark colours… IMHO, it helps add natural shading as well as shadowing to the build…
At the end of it all, it is up to you the modeler… You have to be comfortable in your building zone and most importantly, being happy with the final result…!!
Looking forward to seeing WIPs of your La-5 Matt…!!