I’m working on my second A/C kit. The Tamiya 1/72 P-51D Korean War. What I need to know is how do you paint or decal those anti-glare panels in front of and behind the canopy?
Any link to web sites with a good techniques or suggestions for books would be greatly appreciated.
On my recent NF-104 build (and all others I’ve done with anti-glare panels for that matter) I spray the anti-glare panel first. Let it dry. Then mask it using Scotch brand 2080 painters tape for delicate surfaces. On NMF birds the only difference is that I mask off the area that needs to be OD. Spray the OD. Let dry and then mask off on top of the OD to shoot the NMF. That mask stays in place pretty much through the rest of the painting until the end. If you don’t mask the area to get the color on an NMF bird any overspray of the color into the area that will eventyally be NMF is going to show up under the NMF finish as a reflection difference. YOu can beat that if you spray the entire bird with clear gloss before proceeding but it’s usually easier for me just to mask the areas that will get color to stop any overspray from getting into the NMF areas.
Depending on the type of paint used on the fuselage, I would simply mask off he area to be painted anti-glare and spray. Airbrushing usually looks better than a decal in my opinion.
Beats me its the one with the shark mouth. But now that you mention it I think I’ll do the one with just the front anti-glare. I can always do a shark mouth bird later.
Glessner’s Pony has the Sharkmouth and the front & rear anti-glare panels, and the canopy rails were black as well, with a single red star on a white square to denote his Yak-9 kill…
The other markings were just the normal USAF markings, stencils, and numbers… If you are doing Glessner’s, the Buzz-number is “FF-736” and the S/N is “511736”. As Korean War Mustangs went, Glessner’s and the rest of the 12th FBS Ponies were the most “colorful” ones…
I did a 1/72 F-51 sharksmouth about fifteen years ago. I think it was the Academy kit. I baremetaled the thing as an experiment and masking the anti glare panels was a PITA because the mask wanted to pull off the BMF. I still have that freak of a kit. Wierdest looking plane in my 72nd collection.
The thing about anti-glare panels on otherwise NMF aircraft is that, with the noteable exception of Alclad II, most types of NMF don’t take masking tape well. Also, remember that the natural metal parts of your aircraft need to have a smooth, even glossy, base-coat for anything like a realistic NMF to be achieved.
This, therefore, is what I do. Having primed and filled the model, I polish it to achieve a glossy base. I then mask off the anti-dazzle panel area, and spray it Olive Drab, matt black or whatever. When this has dried and fully cured (so give it at least a day, even with acrylics) I then mask the AD panel, and then remove the masking which was previously there, defining its area. I then spray the NMF in the usual way, and only remove the masking on the AD panel after the rest of the model has been decalled and varnished (if you varnish NMF aircraft, which not everyone does).
Here’s a Hobbyboss 1/72 T-6G painted as described above:
The NMF is mostly Humbrol Metalcote Polished Aluminium, with Matt Aluminium for the fabric control surfaces, and the occasinoal panel of Bare Metal Foil for variety and contrast.
Last time I did it, I did it exactly the wrong way. I painted Alclad, decaled and applied four heavy coats of Future, letting it dry a day in between each coat. I thought this would be anough to prevent Tamiya tape from pulling up the decals. No so much.
Long story short, I got a beautiful flat antiglare panel on a shiny NMF skin, but huge chunks of decal came off with the masking. To fix it, I made it worse. Trying to pull off the rest of the damaged decals with painters tape, I damaged the NMF finish pulling up small chunks here and there. I had to completely repaint the nose, redecal and re-Future. Luckily the huge mid-60s AF decals covered most of the damage, but overall it came out like crap. Oh well, lesson learned…
Every masking projec is unique, depending on the shape of the plastic and the shape of the area you are masking. Luckily for you, the easiest masking project is a P-51 Anti Glare panel as they only have one on the forward fuselage. This can be masked easily with straight strips of tape. I aways use Alclad II paint for my natural metal so that I can mask things such as anti glare panels after I have painted the aluminum finish. For the P-51, the only thing you really need to do is find a point of refrence on each side of the fuselage so that you know that when you put your tape down you will me masking the same are on both sizes of the fuselage. Find panel line or rivet on boths sides of the nose as your point of reference. you will need one near the nose and one near the canopy on either side of the fuselage.
Other than that, follow these general masking guidelines:
use a good tape such as 3M blue painters tape or Tamiya Tape.
Always cut a new ‘edge’ to your tape by laying your tape on a clean piece of work glass and then cutting away about an 1/8 inch of tape using a metal ruler and a sharp hobby knife.
Always use an airbrush to paint over a mask. Paint brushed on tends to seep under the mask which causes a sloppy looking paint job.
Never aim the airbrush into the mask, always spray straight down or at a slight agle towards the area you are painting.
Lastly, an indespensible tool for masking is an Olfa Circle Cutter. This will allow you to mask items where your masking tape needs to be curved. Simply put your masking tape on a clean glass working surface and use the circle cutter to cut the desired curve.
Don’t worry, as you get experience you will get better and better at your masking techniques.
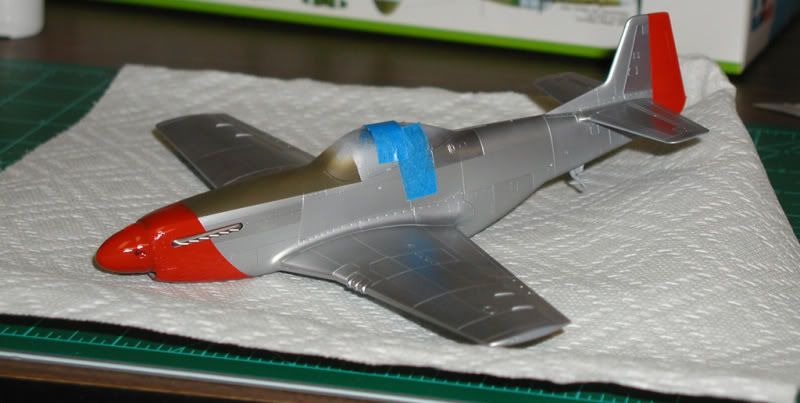
Masked this P-51 using straight tape for the anit glare panel and the Olfa Circle Cutter to cut a curved mask for the red group markings on the nose.