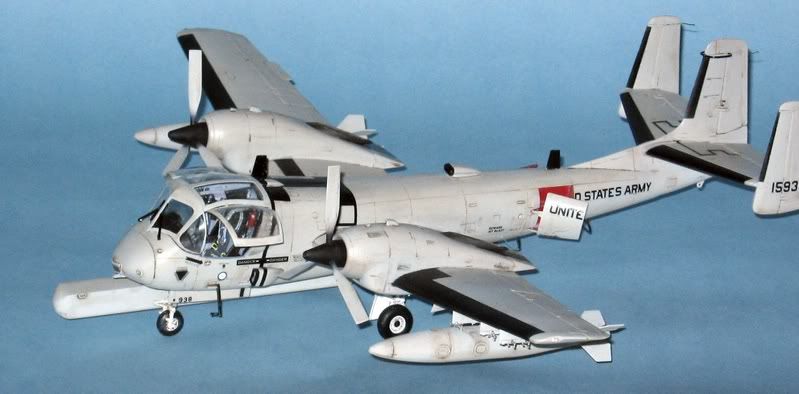
Haven’t been on the forum for about a month, with work and travel getting in the way, but managed to finally finish my Roden OV-1D Mohawk. I originally saw this plan at an air show in Pittsburgh. Thought it would be an interesting build if I could find a kit. As far as I can tell Roden is the all manufacturer with a 1/48 scale kit. I added the Eduard photoetched interior for some extra detail.
Hey John thats pretty good. I like what youve done with the interior. Ive always wanted to do the Roden Mohawk, well I believe its the Roden Kit. How is it, was it a pain to build or did for the most part was it a nice kit. Good build by the way.
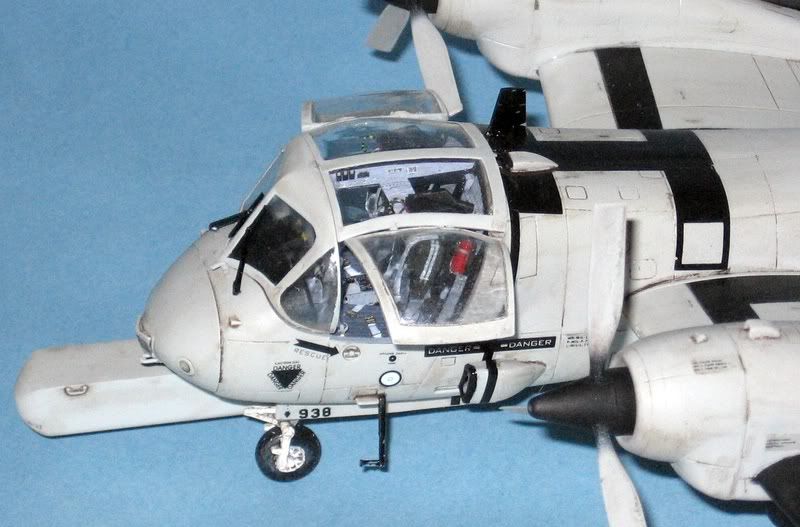
The decals can be a bit fragile. The main issue is that the seats are too tall so the top canopy doesn’t fit. You need to take about an 1/8 th of an inch off the bottom of the seats to make everything fit. The Eduard interior adds a lot to the cockpit but also will extend the build considerable.
Very nice job. The weathering is right on the money. Not overdone. Less is always more. Either you have the knack for it or you don,t. Looks to me like you have it mastered.
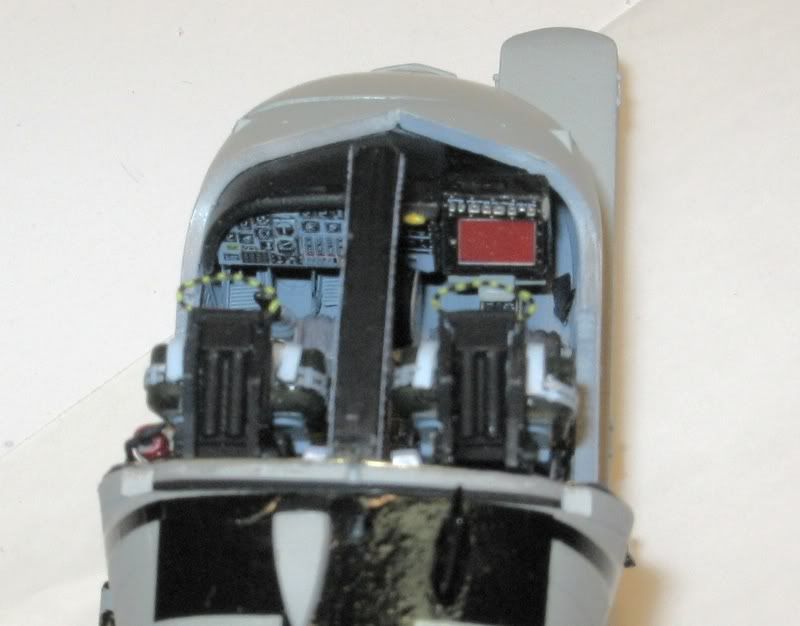
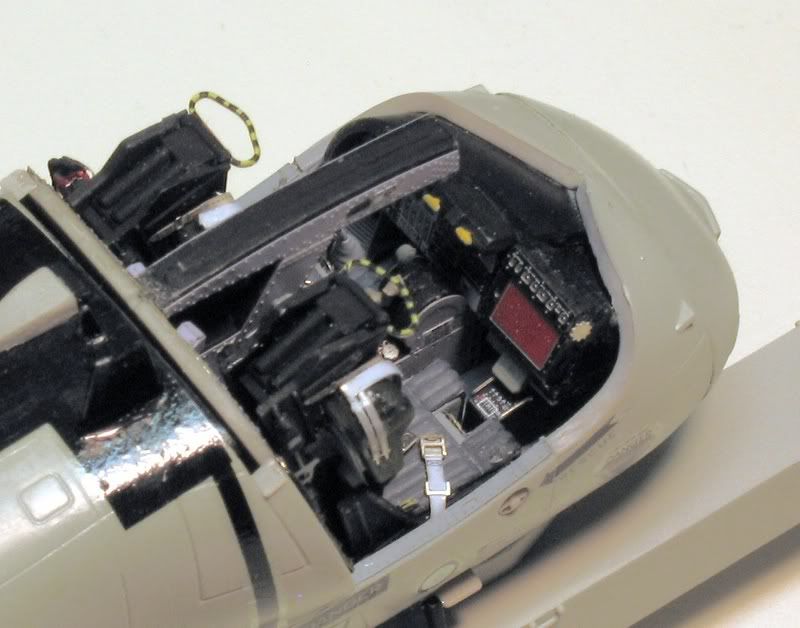
The Eduard detail kit is worth the time if you have the patience. Like all their photoetched kits I seldom use all the pieces and it often takes a while to decipher their instructions. The cockpit kit really gives the instrument panel a finished look put you really need to pre-plan because some of the extras make fitting the tub into the fuselage tricky.
Great job on the Mohawk. What is the time frame of the paint scheme? I’ve only seen the OD paint schemes, other than the few aircraft operated by NASA. How much weight did it take to get the kit to sit on the nose gear? I have one of these kits sitting in the “to do” shelf, but it will be well into next year before I can get to it. Did you use any other after market materials on the kit? Again, a super job.
The paint scheme is for the 73rd Combat Intelligence Company based in Germany circa, 1988.
Actually the model is significantly tail heavy. The instructions suggest 15 grams in the nose but I was using lead fishing weights and there was no way they would fit in the nose. I put them right behind the cockpit bulkhead but that wasn’t sufficiently far forward. I ended up cutting some additional weights up and putting them in the front portion of the of the undercarriage radar pod that sits underneath and along side the right of the fuselage. That worked once glued in place.
Just used the Eduard cockpit photoetch set. The only other detail was that I wired the engine with thin gauge electrical wire and added some along the landing gear to simulate the hydraullics.
That unit was known as the 73rd Aviation Company, then the 73rd Military Intelligence Company while they were based at Fliegerhorst Kasserne, Hanau Army Airfield in Germany. The Unit moved to Echtergingen Army Airfield in Stuttgart in August of 1975. It was the only Aviation company in Europe equipped with OV-1s.
Though I never saw an OV-1 in anything but the flat brown or olive drab paint schemes, all of them had ejection seats equipped with the double looped upper firing handle found on other contempary military aircraft. References that show only one loop on the upper firing handle are incorrect.
For those that find the SLAR antennea a distraction, it was removable, and OV-1Ds that were used for Infra Red photography and other missions were flown without them. Radar and Infra red equipment were interchangable, and the same aircraft could be flown with or with out the SLAR antennea. The instruments in the right seat were also swapped out, with a double screen IR display replacing the single SLAR display. What looks like a radar scope in the right seat is actually a lighted platform designed to view the roll of film on which the SLAR imagary was developed and displayed.
The side windows were not hinged at the top. There was enough space to put your hand through between the side window and the top canopy when it was opened. About six inches or so of the side window was inside the aircraft when it was opened. The kit instructions don’t make this clear, and positioning the windows correctly is pretty much guess work.
For those that are interested, this page from the OV-1 Mohawk Association lists the current status of every OV-1 ever made, with clickable links to the eventual fate of several individual aircraft.