my first build in progress

This is my very first project, so please have patience.

I do not see how to post a picture, so cannot post picture of the box. It is a Monogram AD-6 Skyraider.

I don’t have paint yet, so just starting fitting a couple of pieces together, and I am a little surprised/dismayed that there is not a positive feel when joining the parts. All I have done is fit an arm to pilot, the pilot to seat, and control stick to cockpit. None of them feel solid at all, like they can float around a lot. Putting the control stick in, and then the pilot around that, seems like it will be a bit touchy.

Does this sound like normal fitting?

I will post pictures as soon as I can figure out how to. All I can see is “enter URL for media”.

Thanks!

MGH, welcome to the Forums! Not sure I can assist with the fit problem as I’m not sure I understand…what kind of glue are you using?

Any how, to post pics you’ll need to register to a web based image hosting site like Flickr or Photobucket. They are free, all you have to do is register. You upload the photos to that site, then copy the image url or IMG code to your post and voila! Hope that helps!

http://s700.photobucket.com/albums/ww7/mgh24/AD6/?action=view¤t=AD-6_box.jpg&newest=

All I have is a photo of the box, no photos of parts yet.

Sorry for not explaining well, I will try again.

I expected that there would be a spot where the parts would feel secure. When I put the pilot in the seat, I can move it around quite a bit, and it never feels like it fits, it does not want to stay in one place. I expected to feel a place where it would naturally fit.

Most kits have that sort of fit. It’s up to the cement/glue to keep the parts in tight. Pretty normal.

For posting the pic right in your post, have 2 internet windows open, start your post, go to your photobucket, right click on the pic you want to post, it will enlarge…left click…“copy”…come back to your post…left click…“paste”. The pic will be there, where ever the curser is when you paste. Sometimes the pic will look HUGE in your post, but once you click the final post button, it will be resized automatically.

Sounds like normal fit (or lack of) for a Monogram kit. No big deal, sand down the pilot’s butt until it’s flat and fits the seat. This is why you dry fit everything before you apply glue; you can sand away lumps and bumps so the parts fit tightly and there are no gaps to fill. Also bear in mind the plastic has to be bare for the glue to work. Typical “model glue” works by melting the plastic and forming a chemical weld. Painted or chromed surfaces have to be scraped to expose bare plastic so the glue can do its thing. Where certain surfaces aren’t going to be visible anyway (like a seat and the pilot’s butt) there’s no point in even painting them. I had replied to your other post about being intimidated, and made some suggestions. Have you found an IPMS chapter yet?

Thanks for the suggestions.

I put down the Monogram, and picked up a Revell P-40. I guess I don’t know what is to be expected, but this fit seems quite poor. There is less detail in this Revell also. My camera batteries are dead, so can’t post a picture yet. I will try tomorrow, see if I can get enough detail in the picture.

It is certainly going to take some putty!

Most Revell / Monogram kits are very old reissues lacking state of the art technology in the tooling that produced them, and are difficult to build because of that. Things just don’t fit right and need fiddling, which requires experience.

Next time, try a Tamiya or Hasegawa kit- you will notice a world of difference in quality.

Kind of funny, but the Revell is simpler, fewer pieces and less detail, which almost makes me a little sloppier (which is saying something considering how new I am anyway). The Monogram seems nicer, but I have not done much in the way of fitting yet, so maybe I will revise my view on that, but I wanted to be more careful, as it seemed there was more at stake.

One thing about it with a less expensive model to practice on, I won’t feel as bad when I screw up the paint job [:$]

mgh - yes, awesome to see that you’ve got a WIP thread going!

I wrote a blog post on how to post pictures here awhile back, should be of assistance: How to Post Your Photos

As for kits…in my opinion the older Monogram and Revell kits offer great bang for the buck, but they take a bit more know-how to build into truly stunning finished products. It can certainly be done, but the fit’s not always as “snick-snick” as newer-mold kits, and I don’t know if using sheet styrene shims is something I’d recommend on a first ever build.

I know a lot of people recommend them as first builds, but you may want to look slightly higher upmarket. Apart from their newest kits, most 1:48 Tamiya WWII aircraft are rather affordable. You can get a decent chunk of their kits for right around $20-25 if you look around, and some cheaper than that.

When I came back to the hobby, my first build was Tamiya’s P-51B, and it went together like a dream. You might also want to look at Tamiya’s Fw 190, Bf 109, and Spitfire kits in addition to the Mustangs. All are rather affordable, and the parts count is entirely manageable.

Well I put this down while I ruined a Revell P-40 and a Testors P-47.

With a tremendous amount of help, I have been making progress on the Skyraider. Pretty happy with many of the glue joints, though far from perfect. I was congratulating myself about how well I got the bottom fuselage to look with a little putty work…until I primed it. That’s a wake up call.

I have sanded the primer off here, but damn, that line down the center is smooth, and it still came through plain as day with primer on it. The joint where wings meet lower fuselage feels wonderful. We’ll see what it looks like after primer.

T

This was my first attempt to fill before gluing. I can see how effective it can be, even if it was not very effective this time[:$]

The black that is showing to the front (left in this picture) is not shadow, but the color of the filler. This one came together OK, you can see the spot right in the middle where there is a gap.

I can’t imagine trying to use putty in this wing root. The P-47 had some room between wing root and fuselage, so I could at least try to get in with some putty. No way that is happening with this, that fit is right up against the fuselage.

I’ve certainly made some big mistakes with this one, but it is coming along much better (thanks Disco!!).

If the fits are giving you the, um, fits, might I suggest trying out a “shake and bake” kit. It’s amazing what a kit that fits together perfectly can do for your confidence, especially when you’re just getting going.

My recommendation would be any of Tamiya’s 1/48 P-51s (the wings of the P-51B I built as my first build back fit so perfectly that I didn’t even have to glue the upper wing root)…look around online and you can have them for about $20. It’s been awhile since I’ve built either, but I believe their Bf 109 and Spitfire kits go together exceptionally well, too.

I`m just waiting for the “Hammer” to fall on this thread…[;)]

i agree with Doogs. with all the tam kits i have, i build one monogram/revell kit and it drives me crazy.

i always find monogram kits to be really sloppy and needs a lot of clean up.

Mph I have been watching your build, well the P-47 anyway, the pictures here seem to be gone. I cant say anything bad about the Tamiya kits really but for cutting your teeth building models the Revell/Monogram and even the Testers kits are great to learn on. I think your biggest hurtle to get over now is to complete a build, doesn’t matter if its perfect or not, in fact more than likely it will be far from perfect as there is a lot to learn. You should see my first one LOL. Anyway the Revell kits make you work at learning to fix problems with a build. You have to learn how to fix seams with putty or glue or paint, what glues work best for you and where they work best. In essence you are learning basic modeling skills. One of your best tools will be the guys here so don’t be afraid to post pictures, lots of them at first. You will be surprised how much good advise you get and once you get 3 or 4 builds under your belt go for a Tamiya kit. They do fit quite well but you will be having to pay much more attention to detail, lots fiddly parts to most Tamiya kits.

I would like to know what happened to the P-47 it looked like you had a great start going, much better than my first one coming back to the hobby. The gear looked good, the wing has a bunch of dihedral in it so with the wings off the fuse the gear will look funny and not right. The seams looked good too so I would say you have the idea.

So don’t get frustrated we, all of us had to learn this art and like I said once you get 3 or 4 done your skills will be building up and you will really start having a blast building then there is scratch building details and dios and the list is endless.

Hope this helps you out.

I agree 100%. Youll never learn anything if evrytime you hit a rough spot with a kit, you toss it back in its box and move on to the next one. And dont think for a minute that a Tamiya kit will give you 0 trouble...you still have to fill seams on those kits. The fit for the most part is better than most Revell kits but theyre not perfect. Hang in there…remember you have yo learn to walk before you can run! [:D]

I agree 100% than Revellogram kits are great to learn on. No argument from me there whatsoever.

BUT…

If seams are proving a difficulty, learning how to knock them out on a kit that’s known for about as perfect a fit as you an get in this hobby isn’t a bad idea. Once you knock out the spine seam on a Tamiya P-51B, you know you can knock out seams. The Revellograms just require a bit more work, care around the raised panel lines, and sometimes shimming with strip styrene.

Fiddly? If we’re talking the P-47 or the Mossie, sure. But the P-51 kit is two sprues. I picked up the Mustang III kit a few weeks ago, and had a good laugh when I saw those two lonely sprues sitting in the box. After a string of rather more parts-heavy kits, it looked so minimalist!

Everyone’s different, and I know “start with a Revellgram” is as common in aircraft as “start with Tamiya” is in armor, but I found Tamiya’s P-51B to be the perfect way to ease back into the hobby, and the relative lack of seam work was a big part of that.

Here are the pictures again. My bad on that one.

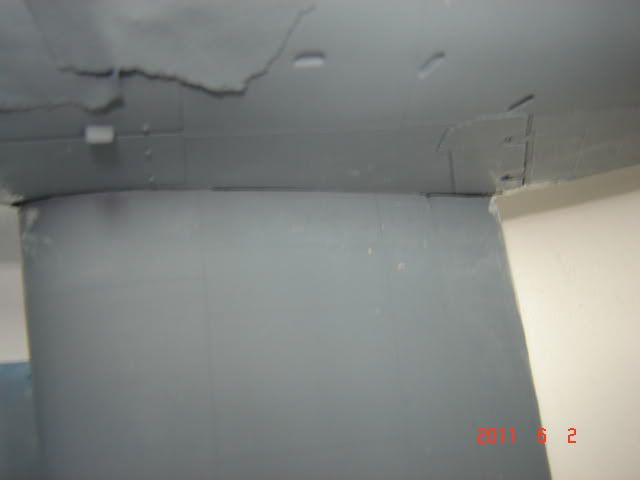
I just now put another coat of primer over this spot, and it looks better already. I must get into the habit of taping before laying down putty!

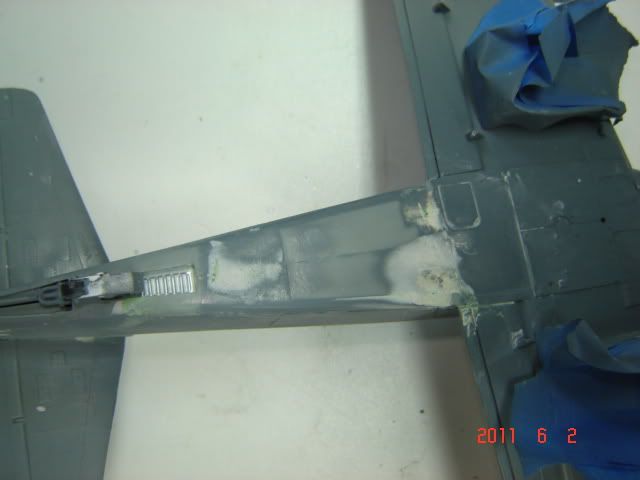
A little more care and I could have made this fill work.

This one not so good.

This is not the final primer coat, so the tape is there to protect the cockpit.

I was frustrated with the Revell, but that was a matter of expectation, what I thought, or remembered, it took to build a decent model.

The P-47 was a learning experience, one more step in the learning curve, and much better result. This Skyraider is one more step, and thankfully it is still a step up from the other 2 as far as results.

I am waiting to get some paint on the P-47 before putting the final touches on it. It will be a great one for me to practice painting and decaling on.

I am still pretty happy with the fit on this Monogram, and I am learning some good lessons on filling. This point on the bottom, where the wing assembly fits to the fuselage is the worst, or biggest gap I have had to work with.

I did pick up a Tamiya P-51D with a 40% off coupon, and have been doing a little work with it when waiting on glue/putty/paint to dry on the Skyraider. Yes the fit is nice, and I laughed when I read Doogs comment on the 2 bare parts trees; that was exactly my impression when I first opened it. However, I am quickly learning that even with the relatively low parts count, there are some small intricate parts to work with.

Another comment, or first impression on the Tamiya, with the extra detail comes extra pressure to prepare and paint all that detail. I mean there is zero chance I can paint the pilot up right! I’m not going to get hung up on it, this is still a learning experience, and I am enjoying it.

Thanks for the feedback, it is much appreciated.

I picked up an airbrush, so that has slowed me down some as I am trying to learn the basics of it.

I finally got brave enough to take a shot at the canopy on the Skyraider. I came out pretty rough, but I figure acceptable for my first try. One problem though, I got paint on the inside of the canopy. I had it on a piece of silly putty, and brushed the paint on, and some leaked behind the silly putty. So the problem is not that the paint got under the masking, it got underneath the putty, so is on the inside of the canopy.

A few weeks ago my LHS sold me what he called sanding films, and they are very fine, but not fine enough to leave the clear parts clear. The finest sheet still leaves the clear looking a little cloudy. What would you all recommend to remove the paint from the canopy?

Thanks.

You could use a little bit of thinner on a Q-tip to remove it. You could also use a wooden toothpick and gently scrape off the paint. For the cloudy canopy, you need to work on it with progressively finer grit sandpaper and keep going til youre satisfied with the clarity. After I get it decent looking, I use Novus plastic polish/ scratch remover to finish up. I get wet/dry sandpaper at Home Despot and can usually find 6000-12000 grit paper and thats usually good enough to get it clear. Patience is your friend, you`ll need alot of it to get the canopy looking good again!