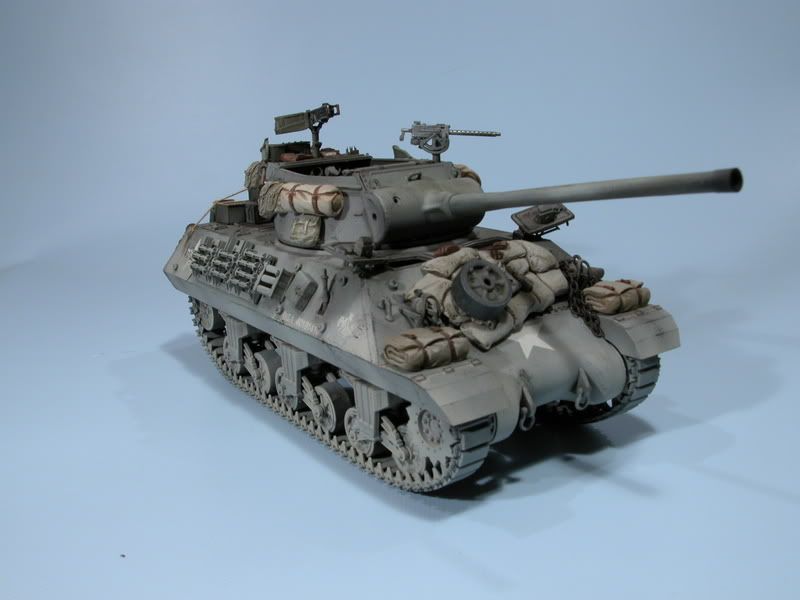
This is the Academy 1/35 M-36 Jackson. Construction was relatively easy and had no problems except for the ammo tubes that I had to remove after shermanfreak told me it was not that way in M-36s. Also, I first painted the interior floor white as per the instructions and it was supposed to be Olive Drab so I had to repaint the whole thing. I didn’t made any research on that tank prior to build it so shame on me. The only reference I had is the Squadron/signal book on US Tank Destroyers.
I wanted to do this M-36 really dusty and tired. I first painted the whole tank Olive Drab and then faded the paint with a mix of RLM grey and Buff. Then the dust effect has been made with some Deck Tan lightly spread everywhere and heavier on the undercarriage and tracks. A light wash of a mix of Hull Red and Black to add depth to the details has been applied.
The stowage is a Verlinden kit originally made for M-24 Chaffee. I had to hide the spare track on the sand bags with a spare wheel.
Despite the few problems with the interior, I enjoyed that build alot. I just love open turret armors, it has so much details.
Hooo weee! That looks great! I can taste the dust in my mouth! I really like your weathering and busy but not crazy storage. Great job! One thing you might want to attend to is the angle of the drivers’ hatches. When opened, they splayed almost facing forward.
Awesome. Along with the hatches, the crew seats on the turret ring should both be in the up position as they were spring loaded. Something you might want to remember for future builds. Great weathering and attention to detail, a superior build, congratulations…
Ok but how the hell am I supposed to make them open like that if the hinges provided in the kit are not made to do this? I’ll have to look at it again but I followed the “natural working principles”. The hinges in the kit are probably wrong.
Holy Toledo Yann !! - Looks like someone could get in that M36, drive off, and light up the enemy with some fireworks. I don’t know what I like better, your build or your amazing photography. That weathering is tremendously tasteful. The M36 is probably my next build - either that or the M10. I have the M36 AFV Club kit, and I’ll probably build that since I’ve not built any AFV Club kits yet and would like to see how it compares to some of the others. All I have to do first is finish the Hetzer (Italeri Group Build) and the Academy M18, both of which are close to being finished.
Thanks a lot for sharing your work. It is truly inspiring.
Yann,
Nice build by the way.
I was also building an American tank (Sheridan) although not the same tank, but I never knew how they would look after dusting and stowage attached.
One suggestion thou, I recomend washing and dusting everything from below the fender down; tracks, rollers, wheels, etc. They just look to clean and un-natural. Even when the tank is new, those area will always be dusty and slightly oil somewhere here and there.
Thanks for the comments Carves, BTW, it is very dusty from below the fenders, it is supposed to be Olive drab when new and it is almost grey right now. Like the tracks they are supposed to be black but they are almost all greyish because I wanted that tank like if it was traveling on typical norhtern France dusty road back from the front. The dust is really fine and greyish. Like if it was running during very dry temperature. Anyhow, I will make some drybrushing to the tracks to show some scratches from rocks on the road and also some scratches on the side fenders.
I really like the detail of the tools on the rear.I’v just about got my Academy Achilies to the painting stage and I hope it ends up looking as good as this.[:)]
Nice build overall, well constructed, nice paint application and dusting. Nicely tied down stuff on the rear deck.
But the stuff on the front…How’s it supposed to stay there? The glacis is at a 55 degree angle. The road wheel looks like it’s gong to fall without any movement of the tank. The first turn, bump, stop or recoil is going to drop all that off the front of the tank. While the canteen may be molded on, ask yourself why a trooper would leave his canteen on the front of the tank, completely out of reach unless the tank was standing still. The .45 would make a bit more sense if it looked like the drivers and were out of its case. If the driver had to use it, he’d have to reach out, exposing himself to enemy fire, retrieve it, open the holster and draw it. How much safer to have it on your hip and simply pull it out. That position=ing is about as logical as a police officer storing his service pistol under the windshield wiper of his cruiser.
I suspect Verlinden molded all those goodies on, but the sculptors just can’t be thinking straight.
I agree, some of the stuff on the front are not properly placed. For the road wheel, I have two options, tie it down with ropes or installing a square plate with a bolt going thru it as if it was bolted on the hull. I saw both method on reference pictures. I also heard that the sand bags were most of the time attach to the hull with ropes underneath.
But overall, I agree with you that the front stowage is wrong. That stowage kit was originaly designed for an M-24 Chaffee which is less sloped on the front. My mistake.
I can still lay down a tarp over the gun and canteen to hide them![;)]
I would like to say Outstanding Job on the Jackson. I have only been a member of the forum for a short time and have posted some of my work and have received a lot of good commits, along with some not so good! I’ve notice a lot of nitpicking from other member on how things should look on how to place something (i.e.) mud, rust, guns, dust and the list goes on forever. But if you look back in the Cliff Clavin’s of this forum past post, you won’t find much of Cliff’s work if any. I feel if your going to pick the Sh-- out of someone’s work, then post some work Cliff ! I’m glad Cliff pointed out the info on the hatches, I would have never been able to get any sleep tonight. GREAT JOB YANN
PS. If I have misspelled anything or used the wrong grammar, I sure someone will point it out.
Thanks rtodd! I don’t know who your referring to but I agree that comments about scratches, more or less dust and something not rusty enough or too much can be a pain and purely subjective but I like to have clarifications about errors in a kit. Like wrongfully placed doors lets say cause I know most kits have errors and it is sometimes difficult to spot them and help form others is appreciated.
I don’t take these comments personally and I will correct only the one that I decide to correct. After all, the only one who will see my models other than me are my family and friends who don’t know nothing about armor or modelism at all.
ajlafleche, the net is a great idea and it happens that I have cheeseclothes on my workbench! I might try this to see how it looks. Now I have three options.
Thank you all for your comments.
Edited: rtodd, are you the one who made that diorama with us soldier making good jobs on Hitler’s pictures? That one was so good! If not, never mind.
The first thing I want to say is that this is a magnificent job!!! I absolutely love the fading effect you’ve achieved with the use of the different colors. It really is outstanding, and considerably better than I can do. In fact, I would be interested in learning more about how it’s done.
I agree that items on the front slope should be tied down if they’re not there temporarily, like they are on the back - but the roadwheel might just have been thrown there, right? I do, however, believe that the pistol and canteen are just fine where they are. The soldier, while taking a break in a rear area, with enemy action unlikely, may at times ground his gear in a nontactical way. At least, I frequently did. And you can tell they’re taking a break because none of them is inside the vehicle. So I like the pistol and the canteen on the front of the vehicle.
I like stowage, though. I like a lot of stuff on an armored vehicle. I like an Sd.Kfz. 251 that looks like it couldn’t carry one more ammo can, or the Horch staff car in which you can’t see the back seat (or the judges can’t see my glue splotches on the back seat). Camo nets and tarps are gifts from the modelling gods, IMHO.
If I had to find something to suggest, I would - and this is a stretch - suggest using light pastels on some of the bedrolls and bags that are tied on, in order to further dull them. Probably just one of those photo things, but they seem to have a little bit of glare.
hi yann[:D] i dont know to much about the m-36, but i feel i do have a good eye for what looks like a beautifully detailed and painted model–the dust and dirt lightly fading up to the drab looks really really good to me as does the colors you used for the stowage-- every thing blends really well yet remains very crisp looking![wow]!— this is a real beauty man–super job[tup]— treadwell


