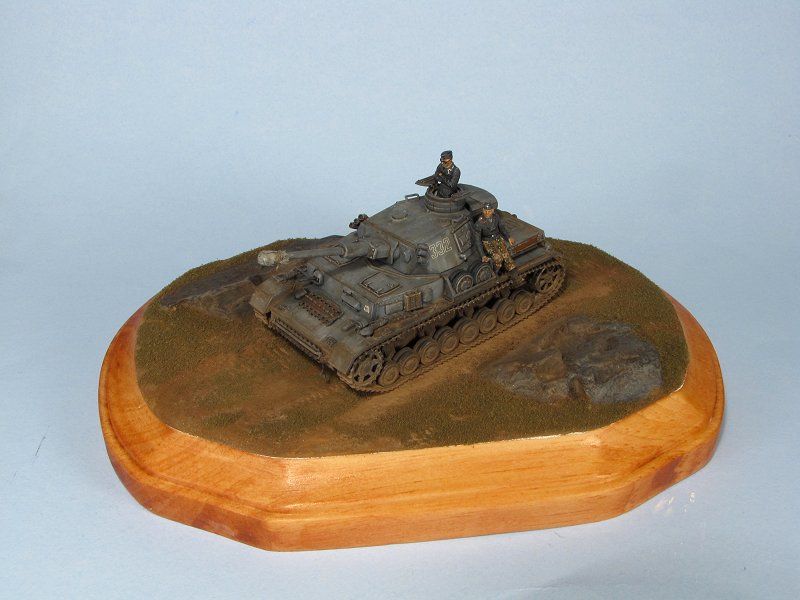
This is my first attempt at a base for any model. I thought I’d start small with the braille scale PzIV, it keeps it from being lost on the shelf. [proplr] I took a small pine placque, stained it, lacquered it, then used spackle for the terrain. I mixed the spackle with white glue and craft paint, then airbrushed the grassy colors.
Well, it’s not bad for a first, rudimentary base. But it could definitely use improvement.
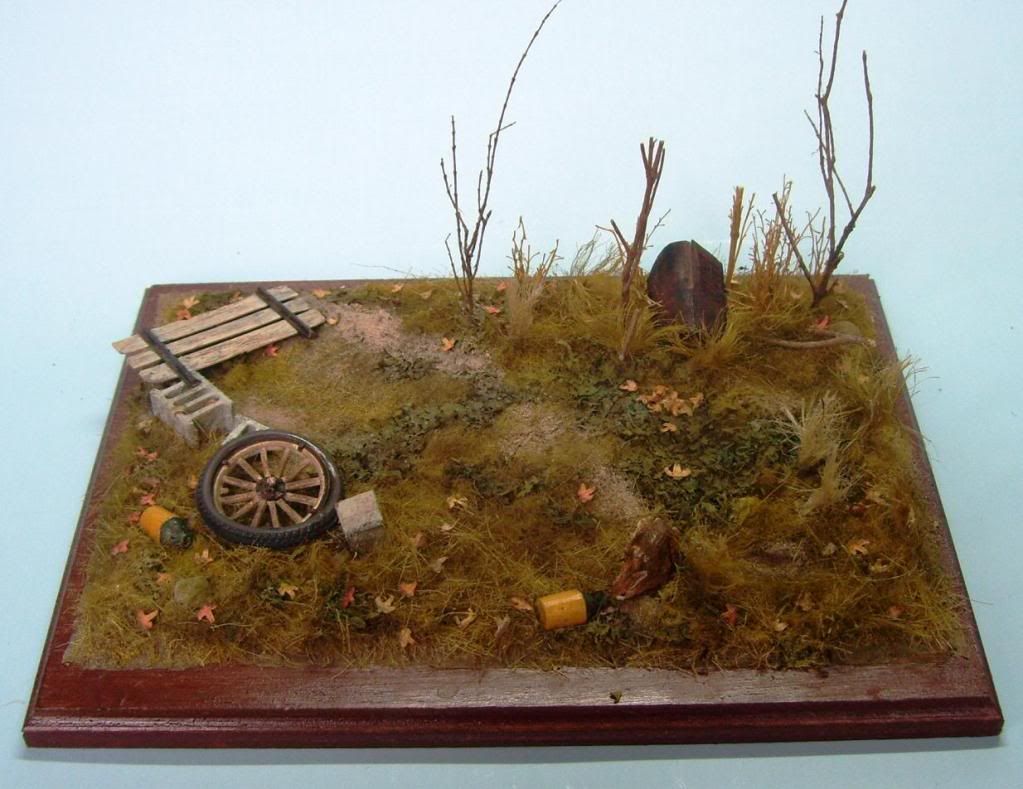
Take a look at my base here that I just made for my Model T-----
Now go and look at the real ground outside. Real ground has variation in spades, if nothing else. All sorts of subtle colors, textures and shapes.
What you have will pass for a well-manicured lawn or parade ground, but I’m nor sure that that was what you were going for? I would recommend that you get some various colors of static grass, and also some longer grass for model railroads. Cut the longer grass into 3-6mm lengths, and mix in with the regular-length static grass, and spray our base with dullcoat and then coat the base liberally with our grass mix. Let sit for a minute, then blow on it to raise it a little, or even use a sharp implement to raise the “blades” a little.
Then you can add another coat of dullcoat, and sprinkle on some other material for more varied material, like some small leafy spices or ground, real leaves. Like I said-go for variety.Add twigs and some sticks, maybe, and small stones.Use your airbrush to spray some added color and tonal variations in various greens, yellows and browns. VARIETY is the key!!!
Like I said–not bad, but definitely you could do better with some more effort.
As Doog says, a few bits of tiny gravel, leaves etc from a railway scene set would look great. It’s very ‘flat’ at the minute but the track marks are good-it does the basic job well. A few shrubs, a brick wall, rubble etc-anything to liven it up will help no end. I’ve never made a base but I’m sure you could let your imagination run wild!
I’ve got a 1/48 Tamiya Tiger I upstairs plus a 1/48 German Tank Field Maintenance Crew-I’m planning on building the tank but leaving the decals off and having the tracks ‘unrolled’ in front of the tank on one side.
There will be a guy on the stepladder in the kit painting the markings on and the other chaps doing their jobs like fixing the tracks. I’m planning a long oval shaped wooden base that looks like your yours but with shrubs etc-I’d like it to look like Doogs but I’m not that good yet!
My Dad does a lot of deer shooting and he mounts the antlers on bases to hang on the wall so he has a lot of wooden bases so the base is sorted already.
I reckon you could really bring that to life-best of luck.
What Doog said. In addition, it’s a good idea to bring the groundwork to the edge of the base. Some really dramatic effects can be achieved by bringing the base work beyond the edge. I prefer Celluclay mixed with textured material, brown acrylic paint, white glue and just enough water to get a thick, moist slurry. I drill holes in the base where the Celluclay will be laid down to give more bite. Then come pebbles imbedded in the mixture, tree stumps from Bayardi and other sources, grasses, static grass or Silfor clumps, leaves and any other debris. You have churned up soil, but i can’t tell if that’'s carried up to the tracks. That pretty important to visually tie the tank to the base.
WOW G, you and I are on the same wave length at the moment. I just finished a base for mine too. We even used the same plaque
All the advise given already is great. The few bases I have done have gotten all of the same comments. What I got out of it all is that whether is a complex base like doog’s or a very simple base, there needs to be some other elements in there to give it some life. Rocks, trees, buushhes… something. In the pic below I went with just a couple of surface rocks. These are cast in rubber mold. As far as materials for the ground work…the suggestions you will get can be like if you asked what is the correct color XYZ is supposed to be.
Me personally, I never got results i was pleased with from celluclay. But that’s a me thing since many use it and love it. I like Durham’s Rock Hard Water Putty. Mix with water to a paste, spread on the base and contour as you like. While it is wet, pour some of the dry powder on top and leave it alone 'til it dries. Brush off the excess and instant texture. For this scale I use Scenic express Turf. It is almost like a powder. I random dabbed some of the same color paint as the dirt and sprinkle it on, let it sit for a while and shook off the excess to get an patchy look.
Now as far as you and i doing the same thing… if you tell me you are about to start a T-34… that will be just too freaky.
Your diorama looks really good. Great advise that has been posted. This is how we can exchange ideas and techniques. I also use Durhams mixed with crushed kitty litter and wht. glue. You can use cheap craft paints to color the groundwork. It really adds texture and variation. You can use dried items from the craft store for vegetation. Here’s a shot of my DAK MK.II parked on kitty litter and Durhams.
I wasn’t quite sure just how “busy” I should make it. That and the scale left me pondering techniques and materials. It’s hard to tell in the photos but the grass has various shades of green and I did carry the mud onto the tracks.
I’ll work on this after tonight’s meeting, Christmas party for IPMS/Kit Kruisers doncha know? My little friend will be part of Show and Tell.
T34 eh? Well looks like a trip to the LHS is in order. [:D]
Kudos for even trying the braille scale TANK, let alone a base. It took me months to decide I could pull off a prefab cobblestone base in 1/35, you went with grass and mud, in micro scale.
It looks great, conveys the “out in the field” look to me.
Wayne, for the first base it is a good start. Guys like Karl and others are true dio people and I have tremendous respect for the “groundwork”. Some of us (like me) like to have a base and do “some” groundwork to set the scene of the model but if what I have is busy, it directly connects to the model (like ammunition, dunnage, crates, etc.). I prefer to spend my time on model details then the base…it is a matter of chice and artistic license.
There is no right or wrong…just what you like. If you want to “get a bit more busy” then the advice give is top notch.
I think your base looks great, I agree you could add a few more groundwork elements but I wouldn’t overdo it and detract from the tank itself. One thing I always liked was a small nameplate of some type. Most malls have a place that can engrave a small plate that you could mount on your base. Remember not everyone looking at your model will know what type of vehicle it is, by adding a small plate you let people not familiar with WWII armor know what they are looking at. I think with just a couple of additions your build will really stand out.
I have had mixed results with Celluclay BUT Doog did mention making sure the paste was much thicker than the slurry type mixture I made.
Bases take time to do well and convincingly though, so do not stress to much at your first attempt at it. The problem with braille scale is that dio accessories are hard to find at times, never as much that is available for 1:35 modellers.
I have yet to find decent cobblestone except for vacc I had to import in from Jadar.
I used an MDF drink coaster from a craft shop as a base. Love these items as they are perfect for a simple base and in no way very bulky.
Some fine railway ballast and some small rocks were added with thinned PVA, direct to the wood base which was roughed up to give the glue something to “bite” to.
I then painted the roughwork with various shades of browns mixed to emulate the reddish brown Tunisian soil. This was followed by a selective application of earth tone flock with earthtone/green flock mix for the greener patches. I then added some Woodland Scenics vegetation. Once all was added I then blended the placed Crusader and ground with the same Mig Pigments. Mainly muds and european dust.
It took several hours to get the base right and plenty of research to see what the terrain and vegetation in Western Tunisia looked like.