My USS Constitution will be unique compared to most of those that you find on the forum. It is out of the box and the builder does not know what he is doing!
My wife got it for me 25 years ago and I have come to the point in my life that if I do not build it now, it will not be built (along with most of my stash).
Shortly after gluing the hull halves together I managed to wack the bow against a cabinet and split the kneel where it joins the front of the hull up through the stem. The next mistake wast to apply glue to the seam to secure it and keeping it from braking off. I should have attempted to force the seam closer together. Now the stem is about 3/64s off center.
I have 9 months into my little project and I really need to tap into your wisdom. I am at the point of installing the rails on top of the bulwarks. They are very flimsy. How do you rig to the deck without destroying the rails? It seems that it would be difficult to install them after the shrolds.
Wow! I wish I could help specifically - but that model is on my list! It looks WAY better than when I built it when I was 13 years old. It got me hooked for life.
But I hope someone helps out! Your pictures are amazing.
Put the hammock nettings on last. They aren’t really scale to begin with, and they would have been set up with netting, not several lines like a railing. I’ve seen them made out of bent wire, which takes a little enginuity to attach to the builward but is a lot stronger.
I have a diagram somewhere of what they look like. I’ll look for it this week.
The U shaped iron frame was called a “hammock crane”. Someone no doubt makes these in photo etched metall, maybe the nets as well. The photo is of the Constitution, which in her current state has open waists.
It has been 6 months since I have posted to this thread; and that is because I cannot seem to make any progress. I am currently adding all the blocks that I can on the ship, masts, and yards! This is my question that you may be able to help me with. The kit instructions show the top gallant and royal yard halyards going through sheaves in the mast. The royal halyard goes to a pin on the deck (no block and tackle). The top galllant halyard goes to the mast top where a jeer attaches to something, and then attaches to a pin on the deck.
I cannot figure out how that jeer/block and tackle of the topgallant halyard attaches to the mast top. The configuration is the same for both the fore and main masts! Any input on this question would be very much appreciated.
Great to see you back at it… Wonderful work so far.
I would think your immediate solution would be to loop a small length of wire thru the bottom tackle eyebolt then down thru a hole drilled thru the mast top. Twist it underneath around a very small snippet of rod to firmly secure since there could be tension pulling on this rig.
This is an interesting setup in the Revell plan. It matches the AOTS approach and also what Len Petersen shows in his rigging book based on the model of HMS Melampus. The Hull model and the Charles Ware sailplan in the National Archives suggest it was different. More likely the “tye” that lifts the yard and passes thru the sheave in the mast would lead down to a block/tackle that is secured to the channel. After reeving thru the blocks, the end of the halyard would lead down and secure to a cleat on the bulwark. (in practice, halyards did not lead to pins, but the Revell kit fudges that).
If that stem interferes with any rigging you might be able to warm it with a hair dryer (heat gun would be too hot) and bend ita little closer to specs.
I do it similarly, except with black thread. I leave a pigtail of about half an inch, rub the end with CA glue. After it hardens, I put another drop of slow dry CA on tip and insert it through mast, clipping end when it hardens.
I remember trying to build that model (or was it the Cutty Sark) about 55 years ago. I never got past the standing rigging. Trying to do the running rigging seemed to be an impossible task.
Actually, I just finished building the fore top gallant yard. I have eight more to build before I can start the standing rigging. They seem to be like every other part of the ship; they are taking forever! If I can finish the standing rigging; I would be happy! Not that I do not want to do The running rigging. The fact is that I do no want this to be the last model I build. Then Mr. Coronavirus might get the last word anyway!
Just finished the gun port covers and placed the messenger pulley in the manger area. Making eyebolts out of cat 5 wires for rigging the guns. It does seem to take awhile.
Thanks for asking, Rick. At this very moment I have actually to come a critical point in my build. I have installed every block that I can, masts are complete, bow sprint is set aside so that I can’t break it, top mast futtock shrouds are in place, and yards are set aside.
Every thing that I have read says to rig the shrouds in a vice. That would be near impossible on my build. I have used the kit bullseye assemblies and I am using scaled rope. Scale shrouds should be about .035 for the lower shrouds. It is not going to be easy to reeve the shrouds between the plastic lanyards (I might have to go down to .025). It would be easier, I think, to work this out on the hull rather than build up all the shrouds around the tops only to find out that they will not fit the lanyards. The real problem is to manipulate the .035 rope between adjacent lanyards, get it through and than up to lash it; all within a tight working area.
I laid the shrouds out on soft pine, then pressed pins into the pine and stretched the shrouds pin to pin but not too tight. I used .035 for the shrouds. That gave me a good scale pattern, then I used a fine needle and pulled .018 through the shrouds. (Syrene thread) After threading through the shrouds with the needle remember to pull the shrouds to tighten up where the needle went through them. Don’t let the better half catch you going through the sewing kit. The gals can be terrirtorial with their sewing stuff. (you can use .012 too)
Tying them off was tedious and I used white glue on the knots. I would do about ten lines then do something else to break the tedium.
There is a space between the kit deadeyes to secure the shrouds to and you should be able to work the .035 through them. This would enable you to work the shrouds off ship.
I hate backstays, shrouds and ratlines. Revell put them in there to punish us.
How is your build coming along?
I have had problems with the hull on mine. The gun deck went in fine, and I laid a Scale Deck on the gun deck, then scratch built a Brodie stove and galley and made some water casks. Added anchor rope, with messenger and put a capstan on the gun deck. I was going to light her up with leds and my grandaughter saw the wires below the hull and pulled them out. (She’s 5 now) So much for that, and yes, she’s still alive!
Then to the spar deck…ouch. The hull was bowed out from amiships to the transom and the transom was out of whack. The glue wouldn’t hold the hull to the spar deck properly because of the tension… I finally took some household wiring and tied it around the caronade ports and twisted it tight to bring the hull into it’s proper place. Then I glued square tubing to the gun deck line,where the deck meets the hull and glued that to the deck after wiring the hull up with makeshift clamps. Twisting the wire pulled the hull in just so.That worked.
So now the spar deck is in, with a Scale Deck atop it, and all the work on the gun deck went for naught. When the spar deck went in, it hid all the work on the gun deck!
I used the lower masts but am trying to make the rest of the spars and masts on my lathe. Must be heavy handed, they keep breaking, and I keep downing another Guiness.
The lower fore went in just fine, the lower main needs some tweaking, and the mizzen mast is leaning sternward. Trying to fix that with some cautious filing.
I believe this kit was designed to get you to cuss.
Time for another Guiness. Would like an update on your Connie. Have you finished it yet?
Rick, thanks for asking about my build. You asked"Have you finished it yet?". My question is will I ever finish it.
It seems most things I do about twice, and then correct! But I am determined to finish this project; in-spite of failing eye sight and left hand. I am not sure what finished will look like; perhaps up to standing rigging.
I do enjoy the journey, even if it comes down to working through the problems. At one point I ran out of rope and Syren was on a pandemic sabbatical for a month I built a 1/350 Gato class sub. While rigging I am preparing my next build which is the USS Hornet CV-8 on 18 April 1942.
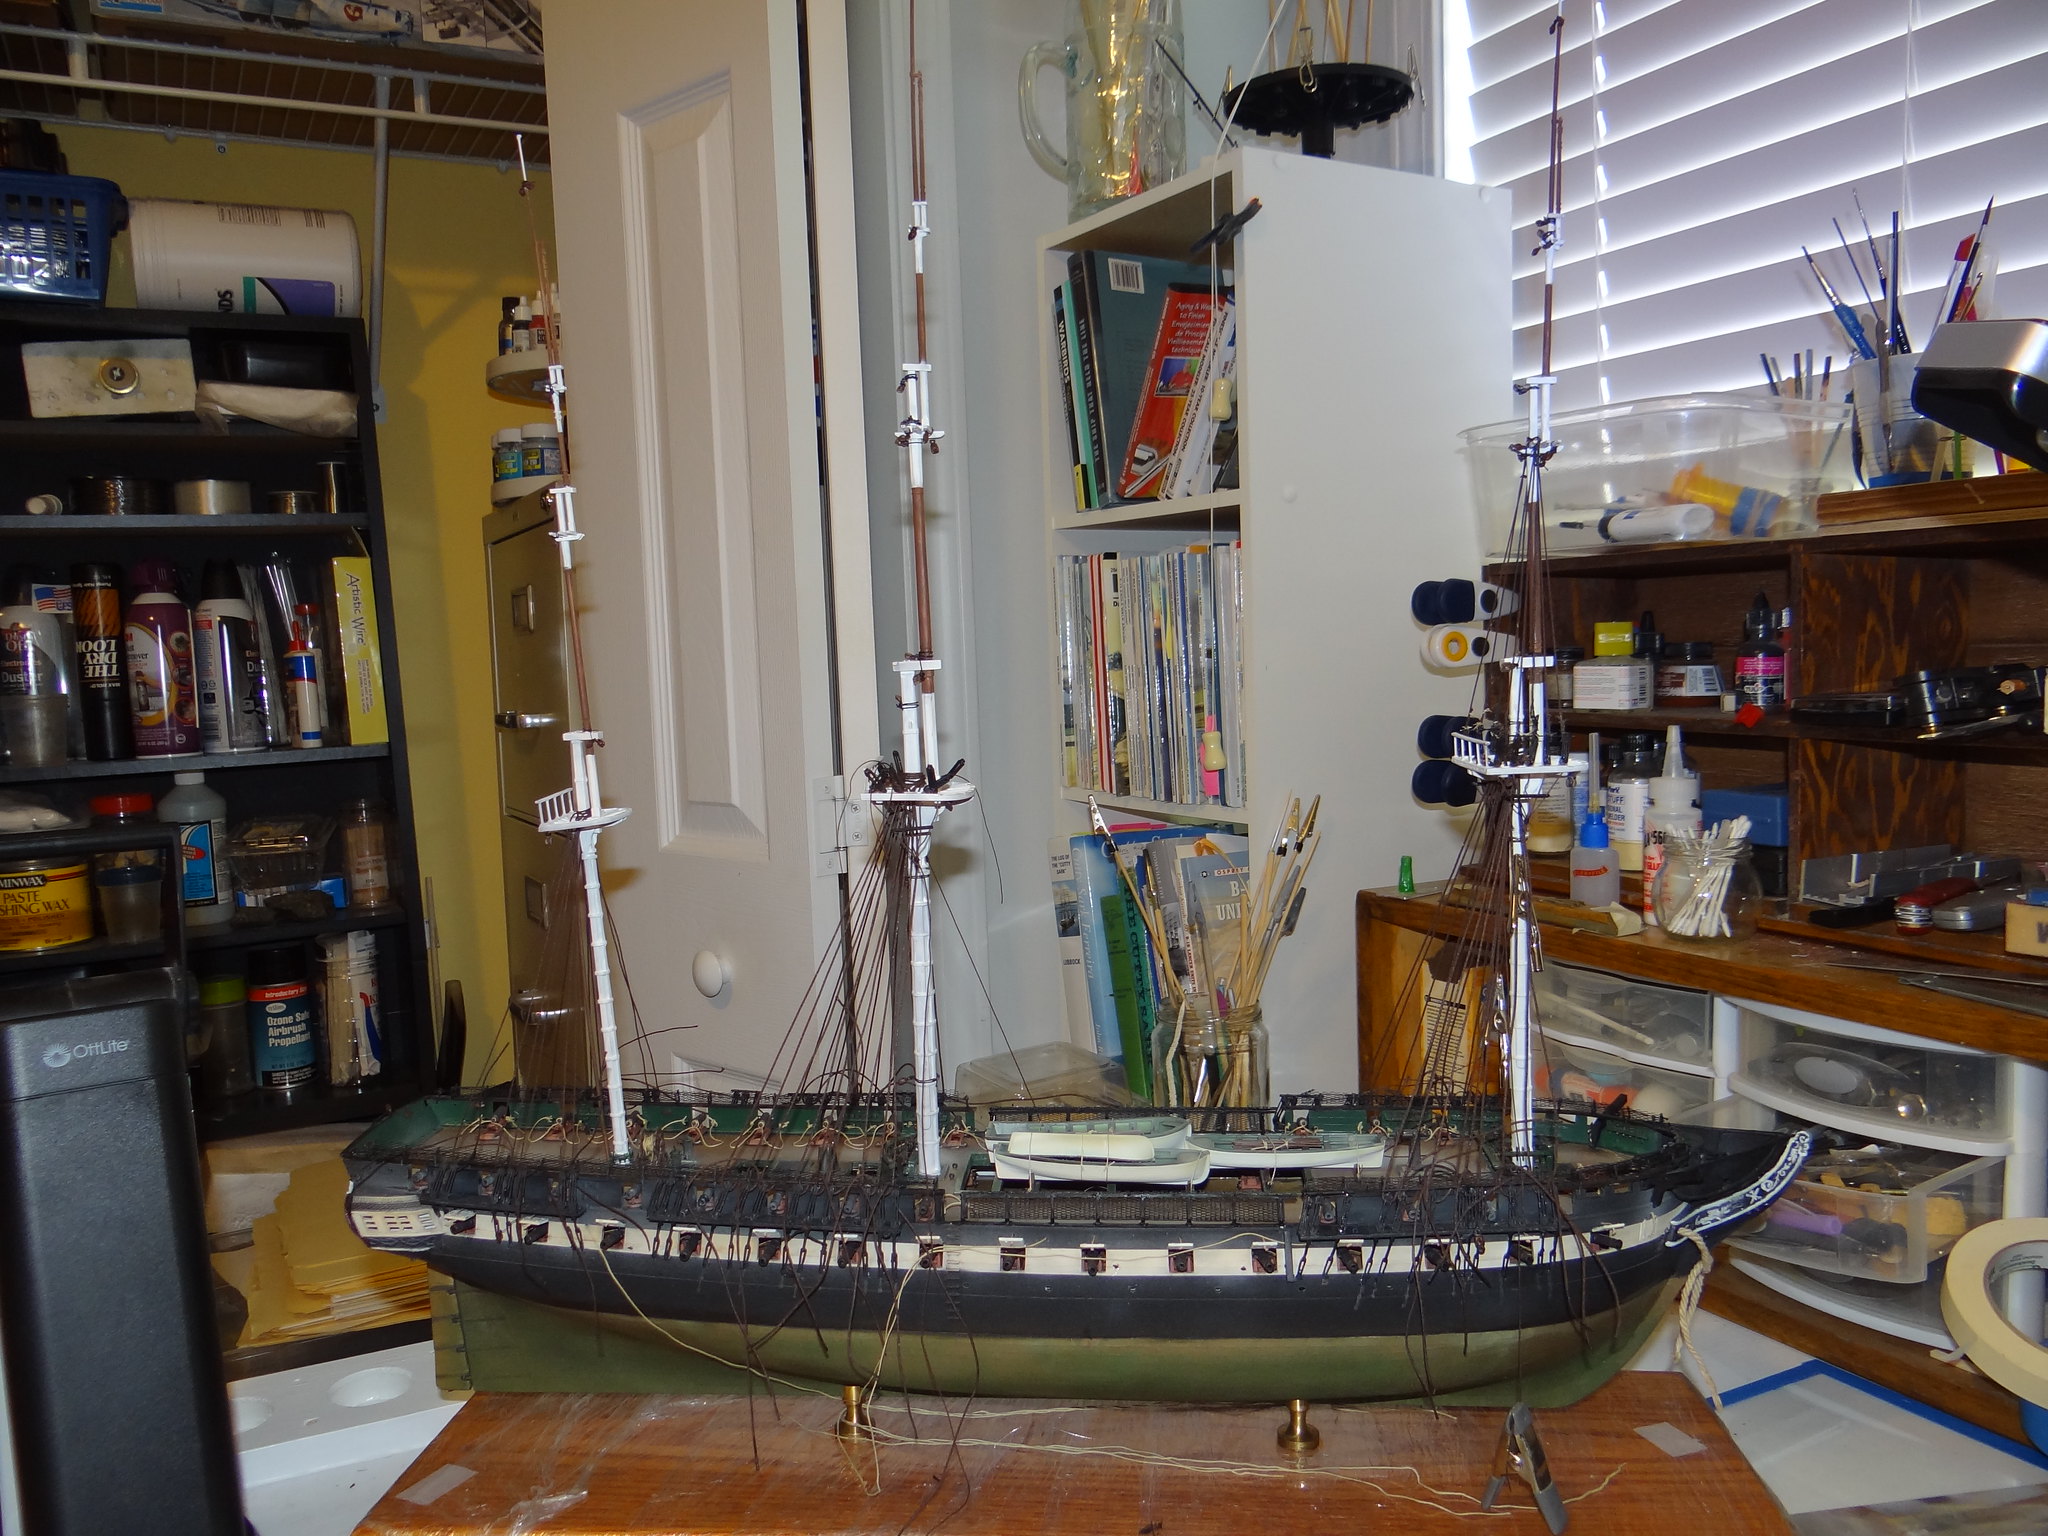
The photo is where I am at right now. None of the lower shrouds are tied down and will not be until I finish the upper masts. I just noticed in the photo that the mizzen mast is listing aft. I am hopping that I can correct that with the stay! Next: top main shrouds.
For what it’s worth, or 2¢, I never fiddle with the ratlines until near the very end of things. That way I can focus of the shrouds.
My preferred technique it only assmble one mast at a time as much as possible. That way the shrouds can have their eye put in so they can then go over the mast in their stacks. That just leave fetching up the ends of the shrouds to their deadeyes.
Leaving the space between the shrouds open let’s you pass other rigging through them without interference.
When you get to a good time for ratlines, a bit of paper card the width of the spacing can be threaded through the shrouds to align the ratlines. Whihc will let them stay relatively parallel and even to the waterline.
The mizzen mast leans aft on mine too. I have been filing the opening very carefully and have it to where the standing rigging should pull it straight.
I am going over Bob’s awesome build to refresh myself on how he reworked the pin rails on his build.
 DSC07548 by Benjamin Zabriskie, on Flickr
 DSC08559 by Benjamin Zabriskie, on Flickr
 DSC08616 by Benjamin Zabriskie, on Flickr