Kenjitak- I have never been a car model guy, but I have to say that is some beautiful work there.
Blkhwkmatt-Your alclad looks really nice on both aircraft!
Ken-I am also not a car guy, but yours looks fantastic, particularly the paint job!
Groot
Kenjitak,
Sorry I didn’t get to you sooner. My internet at the house is down, probably until tomorrow the 16th, but I did take a look on my phone,
Man, you car guys really do some detail work! I’m just fascinated at the level the car forum goes to in the scratchbuilding area. Nice job!!! I love funny cars and dragsters. I wish the model companys would come out with more of them. Don’t forget to grab a badge, by the way.
You guys are doing great in here. Keep up the outstanding work!
Steve
I talked to my Uncle a bit ago who also builds cars and we both agree that if you are already into cars you are going to want to scratchbuild. For instance I know what the engine compartment of a muscle car tends to look like so I see everything the kit is missing and say to myself "that wont do, needs more detail to be like the real thing). My Uncle built a 69 Camaro in 1/12 and just had to go out to his garage for reference! LOL
I bet its the same with people who know planes (which I do not, apart from identification). I see a 2 parts for an aircraft engine and go… “yup looks good to me”. [:$]
Great looking work everybody! Still plugging away over here. I’ve got the paint stripped (from the yellow mishap), invasion stripes back on, underside and 1st color of the topside camo done! Hopefully I’ll get time this weekend to put the 2nd color on and post some pics!
-Andy
That will be great Andy. I really need to get back to my Big Beautiful Doll, I just HATE sanding. I would just about do anything else.
Okay, I should have my 1/32 P-51B in my hands by Monday or Tuesday and I’ll get her started. Its taken me awhile, since I was waiting for the new Revell P-51B to come out, I think it is just a rebox of the old kit with some new decals.
Looking forward to seeing you get started on that B JELLIOTT! As promised here are a couple quick pics of where I am with the mkiii…


Still not perfect but much happier with the way it came out this time. Worked on trying to let the preshade show through a little. Next up is getting the legs on it and sealing with a gloss coat for decals! Thanks for looking, comments and critiques welcome[:D]
-Andy
Looks great rooster. I think the pre-shade is just right [Y]
Looks great Andy! The lines are so sharp! Beautiful work!
Nicely done so far Andy. =]
With the Meteor on hold untill my next Hobbytown run for paint, my A-20 set aside because I started filling and sanding in my sleep,.and the Hurricane sitting while some Micro-sol does its thing, that left me with nothing happening on the bench. I can fix that, perfect time to start my Mustang build. Presenting the Accurate Miniatures P-51.  We all know that the best way to buld an AM kit is to follow the directions, to a tee. So I find it somewhat ironic that the VERY first thing I did was break from the instructions. They would have you put the put the cowling on the fuselage as a singular unit. I instead cut off the locator pins of the cowling pieces, and glues each one onto the correct fuselage piece. I’m such a rebel!
  In the cockpit, the sidewall detail comes as seperate pieces. So in order to give depth and some shadowing, I sludged up the inside of the fuselage halves so to get a darker tone from the interior green in contrast to the sidewall detail pieces, which I am not sludging up. My way of doing this is simple. Using Tamiya XF-1 flat black, I get some on a brush, let it dry alittle on the brush for about 20-30 seconds, then brush it on in no partucular direction or pattern. The end result is a light, irregular, uneven coat. Exactly what I want in this case.
  I have already airbrushed the interior green,.and it is drying now. So more to come very soon.
The model being molded in OD kind of negated some of the effect I was going for, but a difference can still be seen. 
adj,
I wish I had that kit. I was watching an old episode of “Great Planes” on youtube on the P-51 the other day, and they showed quite a bit of footage on the A. It was used quite a bit in Burma and the pilots really enjoyed it’s stability and low level performance, although they had to be careful of ground fire due the the inline engine and the coolant lines. The most vulnerable part of the aircraft was exposed. It was a very interesting show, I recommend it. Anyway, there was one P-51A landing on a mud runway and the mud and spray was just soaking this poor plane. I thought that would make a great diorama. Most 51’s are all pretty and polished.
Speaking of pretty and polished, I picked up my Big Beautiful Doll again, bit the bullet and grabbed some sandpaper and started in. I’m at the priming stage now, but with it 107 deg F today, I’m going to have to hold off. The paint will be dry before it hits the surface, and probably just bounce off like sand blasting beads.
A Korean(?) company named ACE is now in possession of the molds for this particular AM Mustang, and they can be found on ebay at a pretty decent price. Now just to make sure everyone knows, this is a plane jane P-51, no bloody A, B, C, or D (the Star Trek fans will get it.) This was one was armed with 4 Hispano 20mm, while the A had 4 .50 BMGs. From the little that I have read from pilots of the era, when under 10,000 feet, (other than range) the Allison Mustangs outperformed the Merlin Mustangs, or about anything else in the skies in 1944 in just about every way. They were lighter than the B, C, and D.
Let me tell you, the sidewall detail coming as seperate pieces makes for a much easier time doing the detail for the interior. Everything is looking so nice, I just might have to steal the canopy out of my Tamiya P-51B just so I can pose it open for this. 


The dive bomber version of the Mustang was the A-36 Apache, although they were all all called Mustangs anyway. Machine guns and dive breaks.
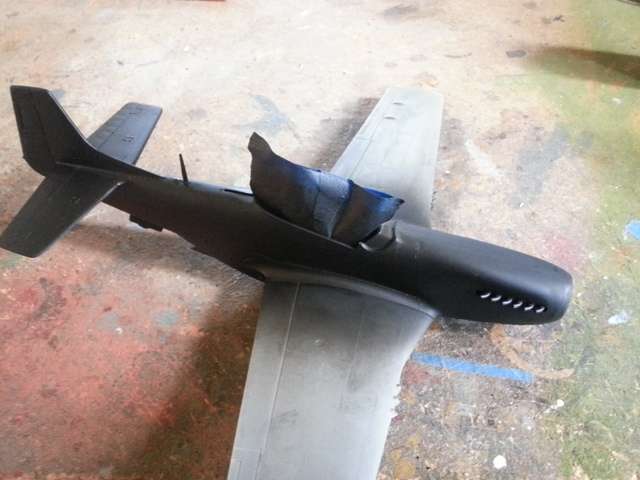
Here is the “Doll”. I primed the fuse with black prior to the Alclad. I will spray the wings and tail a silver to simulate the Lacquer silver that was used and the Alclad for the polished aluminum.
I was actually wanting to do the A-36 for this build, but I am going to wait till i get the Italeri boxing, because it has a super nice decal sheet with two very interesting schemes. Alittle history lesson now… We all know the Mustang was originally developed for the English. The US got a hold of 50 or 60 of the Mustang Mk. Ia (20mm) and assigned the designation P-51. Many of the USAAF test pilots liked them, and the word made it to the brass. There was one problem though; the USSAF had already used its allocated fighter budget (why you would have a allocated military budget and not just write the Army a blank check during the largest military conflict in world history is beyond me) for 1942 on P-38s, P-39s, and P-40s. Some quick thinking between some of the cooler heads in the USAAF and North American Aviation figured out there was still money in the budget allocated for attack aircraft, and that gave birth to the idea of using the Mustang airframe, with a few modifications, as a dive bomber/attack aircraft, thus keeping the NAA Mustang assembly lines going until 1943 when the Army could order more P-51s. So in a round about way, the A-36 “saved” the P-51. After 1942, there was no reason to keep making them, so only 500 were made. The first American Mustang ace actually flew an A-36.
Just some odds and ends here before bedtime. Its gertting awfully late here in the eastern time zone. Or is it awfully early…? Here is the seat, with some nice paper belts  Now the roll bar part that goes behind the seat doesn’t have any armor for the pilot. No big. Just got some .015 plasticard (which scales out to roughly 3/4 inch. Does that sound right for cockpit armor?) and glued the roll cage on. Let it cure, and with a sharp blade, cut off the excess. Paint, and then I was done. Simply stuff really.

 And here are a few pics of the completed cockpit. 1st without the seat to show detail, 2nd with the seat and armor installed.
 Now off to bed. Tomorrow, I deal with the radiator exhaust situation.
While watching that episode, one thing I didn’t know was that when the Merlin was installed, the plane became very squirrely and unstable. The pilots prefered the Allison version more.