Just wondering, I’m putting the finishing touches on a CA - 38 USS San Francisco and I am contemplating one of the most frustrating parts of the construction. I have built a fair number of 1/350 warships and ALWAYS, ALWAYS, ALWAYS have trouble painting the name plates and making them come out right. The pictures of the model kits built by members of this forum and at Fine Scale always have really nice name plates on them and I just can’t seem to get it right. After all the work of getting the paint jobs just right, the aftermarket PE glued and painted, the model in display cases I build myself only to have a &((&^!!! looking name plate. Any tips of hints on how to paint these things would be appreciated.
Go to thing’s remembered and purchase an engraved one. I’m actually serious, it saves the headache and often looks very nice. If you go this route, drill some holes and buy some brass screws at a hardware store because the self-adhesive backing wears off after time. It’s zero stress, and fairly affordable.
I assume you are using a two-tone paint job on these. If so, paint your recessed color from an airbrush or rattle can, then drybrush the highlight color repeatedly until it gets to the depth of color you want. Fairly safe to do it that way.
If you want a two-tone, paint the recessed color and use foil to mask the recessed part to spray your raised color.
Paint the whole thing the recessed color and use foil as your finish over the raised part.
I would recommend trying to stay away from brush painting the whole thing. Keep in mind you can also paint foil before and after it is applied, so lots of options there, and for the type of surface a nameplate presents, I find it works better for me than any kind of tape. Your mileage may vary. Good luck!
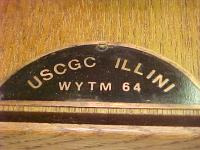
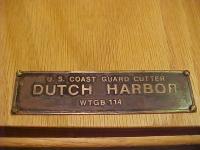
Engraved brass or steel nameplates always look nice and professional. Just about every community of any size has at least one “trophy shop.” (If the teeming metropolis of Greenville, NC has one, everybody does.) The people there can make you a nameplate in just about any size, with any text you want, in your choice of fonts. The engraved letters will be filled with black paint, and the whole thing will be clear lacquered. It’s been some years since I’ve had one made; my recollection is that it cost about $12.00, and was ready to pick up in a day.
Another approach: make your own nameplate with your computer. Print it on some sort of fancy paper, and use some ingenuity in mounting it. (I made one that way and mounted it behind a sheet of clear plastic in a little pewter-finished “card frame” from Lee Valley.)
If you really want to use the kit part, you could try an old-fashioned trick for pairing raised letters. Paint the background and let it really dry. Then fold up a paper towel and brush some paint in the color you’ve picked for the lettering onto it. While the paint’s still wet, press the nameplate into it. That method is not guaranteed, but it may give better results than brush painting - and it’s a lot quicker than masking.
Here’s a method that duplicates the cast builders plate - use a PCB etching kit from Radio Shack. Other materials needed are brass sheet, dry transfer letters (Woodland Scenics), paint, and clear coat.
Anneal the brass sheet.
Paint the back of the brass sheet and the edges.
Scuff the face of the brass sheet with a green 3M pad or fine sandpaper.
Layout the plate using the dry transfer lettering and striping as appropriate.
About an inch from one end of the plat, bend the brass strip up as a handle. Cut the upward handle about an inch long,
Follow the instructions for using the PCB etching solution (ferric chloride).
After etching to the depth you want, clean off any etching solution. Trim the plate to the proper size.
Polish the raised lettering and attach to your base. I’ve painted the etched area black or used A-West Blacken-It with good results
It is easy to make faux anodized metal nameplates. Make an inkjet decal, rectangular shape, with ship info, and maybe a frame. Make it all in black on clear inkjet paper. I sometimes “invert” the design before printing, so all clear areas become black and text becomes clear, but sometimes don’t invert- try it each way.
Then, cut a piece of brass or aluminum just slightly bigger than decal, polish it up, and apply decal. Put it on base with double sided tape.
Thanks for the replies. I knew somebody could help me. The etching kit from Radio Shack is intriguing. I may try it on my next project. I may try each suggestion on a different older project to see which I like best. I may end up with Mr Tilley’s idea. Being a college town and the home of several state high school sports champions we have a number of trophy shops in Bloomsburg, PA. Just have to see what they cost. Again thanks for the suggestions.
I make my brass plate the shape I want .Then a duplicate a teensy bit smaller .I do this four times . This gives me the edge I want .Then I paint the whole thing Gloss black , I then strip the black from the edges by using a " Q " tip and lacquer thinner .
I found a company that makes brass letters in P.E. I cut out what I need and put them on top of the plaque then spray clear gloss over the whole thing . Then I screw it to the base using brass screws made for model railroad stuff . T.B. P.S. Been doing this for over fifty years now !
I can get etched brass plates from the local trophy shop for $7.50. Well worth it in my opinion. I make my own wood bases for my models, so between that and the name plate it turns out real nice for not much money.