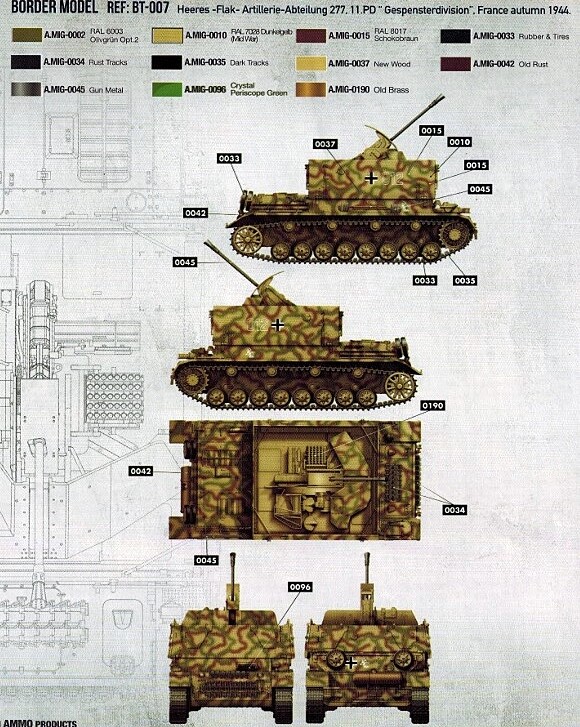
Camouflage:
For RAL 7028, I used A.MIG-0010 Dunkelgelb (airbrush);
For RAL 8017, I used A.MIG-0015 SCHOKOBRAUN (FS 30059) (airbrush/brush);
For RAL 6003, I used the RCM015 from AK (pen).
Markings
For the white, I used A.MIG-0050 Matt White;
For the black, I used A.MIG-0046 Flat Black (FS 30059).
I used A.MIG-1000 Brown Wash for German Dark Yellow. I changed the technique this time and I confess that I liked it more. I used a 20/0 micro brush from Keramik instead of the pen-type applicator from Dspiae.
For the rain streaks, I used the color Dust (A.MIG-3516). I was stippling on the top part and, after about 10 minutes, I started “pulling” with a flat brush dampened with Odorless thinner.
Exhaust
Here I first painted it all with Old Wood (A.MIG-0036), then after it dried (5 min.), I applied the sponge technique with Dunkelgelb Aus '44 DG I (A.MIG-0011) and then Chipping (A.MIG-0044). Still using the sponge, I applied Rust oil paint (A.MIG-3510). Finally, with Dark Brown (A.MIG-3512), I used the splatter technique with a flat brush and an old airbrush needle.
Tools
For the wood, I used Old Wood (A.MIG-0036) as the base, streaks with Chipping (A.MIG-0044), and a glaze with the two previous colors plus Medium Rust (A.MIG-0040) in a 1:1:1 ratio.
For the metal parts, I used Gun Metal (A.MIG-0045) as the base, then polished with the Polished Metal pigment (A.MIG-3031), and finally a wash with Rust oil paint (A.MIG-3510).
I used Dry Earth (A.MIG-1750) and then Heavy Earth (A.MIG-1704).
Dry Earth spraying with an airbrush; Dry Earth spraying with an airbrush;
Heavy Earth with small brush strokes on the corners where material would accumulate; Heavy Earth with small brush strokes on the corners where material would accumulate;
Dry Earth and then Heavy Earth with a brush and a toothpick; Dry Earth and then Heavy Earth with a brush and a toothpick;
I cleaned the excesses with a brush moistened with thinner. I cleaned the excess with a brush moistened in thinner.
Dust Accumulation
Accumulation of dirt and dust on the top
I used Rubble (A.MIG-3013) + Europe Earth (A.MIG-3004) + Dark Brown (A.MIG-3007)
Applied weathering on the wheels and tracks.
I used Heavy Earth (a.mig-1704) combined with Dry Earth (a.mig-1750) to create the initial texture and then sprayed the mixture of pigments Rubble (A.MIG-3013) + Europe Earth (A.MIG-3004) + Dark Brown (A.MIG-3007). Finally, I applied matte varnish (a.mig-2051).
For the nets, I used a gauze soaked in water + PVA glue + paint (a.mig-0018). I didn’t like the color, so I airbrushed RAL 6003 Olivgrun (a.mig-001).
For the bucket, I used Field Gray (atom-20080). For the fuel cans, I used RAL 7008 Dunkelgeb (a.mig-0012), with a wash of Brown for German Dark Yellow (a.mig-1000) and chipping with a.mig-0044.
Detail of the front part, here gun metal pigment had already been applied to the exposed parts of the track and the teeth of the drive wheel.
Almost at the finish line! Absolutely stellar work with this one Ricardo - I sense I’ll be coming back to examine your finishing touches in more detail as I close in on my current project…
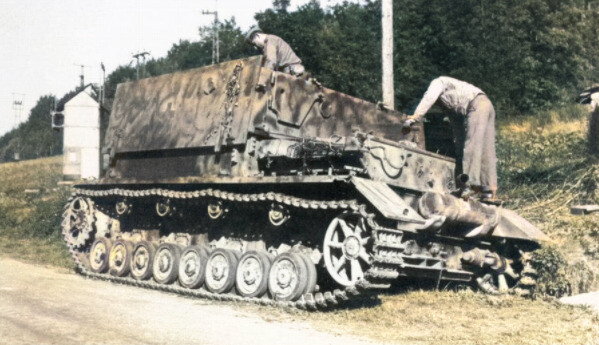
I see you’ve got a scheme that’s deviated from the box art, and in a way that makes the model much more interesting - Was there some inspiration or historical reference behind it?
Ah yes, the old trope of “the casual observer won’t notice, but I’ll notice”. I still think it turned out brilliantly, and for so many reasons…
We beat ourselves up about getting it right, but the more I learn, the more I understand how chaotically the three-colour German camouflage was applied with shortages experienced at both factory and frontline. This is particularly the case once we’re getting into Late-1944 as your inspiration sheet suggests
The most striking thing for me is that it actually looks like it’s been applied in-field with a well-intentioned interpretation of vague regulations, and your efforts with the chipping and edges look like whoever painted it was trying to match regulation colours with whatever they could find - Say, barn paint from a French farmhouse, which wouldn’t have been as durable as a factory-issue paint