Mitchell Madness - 1/32 B-25 WIP in 3 weeks

Hi all,

So around 1am Sunday morning while assembling a crib for our upcoming 2nd child (our first boy), I had an epiphany that I need to hang some sort of plane in his room.

When my wife got up, she completely agreed and thought it would be a brilliant idea. She asked me what I was going to build. I knew it had to be fairly large, so I thought of a Tamiya 1/32 Corsair. I had just finished one for my father and thought it would be cool for my son to have the same plane that his “Lolo” has. My wife made the mistake of telling me that it might not be large enough……haha.

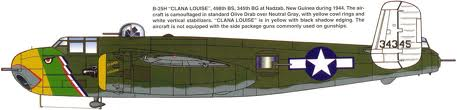
So off to a new LHS to see what they had in stock and just as I walked in, sitting on the counter was this!

It was a sign from the storks.

Brought it home with great fan fair to my wife. She loves the look of the kit and other than the scary clown face (this will have to be resolved with a new set of decals), thought I was perfect for the nursery .

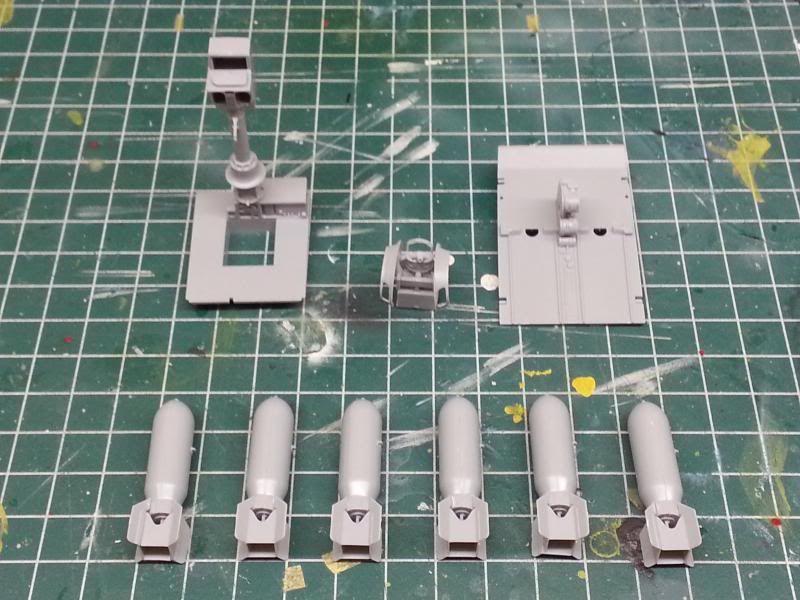
This thing is massive. I placed the fusealage of my previous project, a 1/48 F-18A and you can see the size of this thing. It has a 25” wingspan.

So the catch is, and it’s a big catch, after spending $200 on a model and some paint, it needs to be done in time for the shower, which is 3 weeks away. Gonna model it with the wheels up to help speed up the build.

Could anyone help me with two questions:

1 – What is the best way to hang a model, especially one of this size?

2 – Where can I find a 1/32 scale bomber pilot figure. Doesn’t seem right to hang a pilotless plane.

So let the madness begin!

Post Script – Anyone in Southern California or the Los Angeles/OC areas owes it to themselves to visit Military Hobbies in Orange, CA. The sales man (I didn’t catch his name) was amazing. He was very helpful, even opened the box for me to let me check out the kit. They have a great selection of kits, many of which I usually only find online with competitive prices. Most importantly, he was very patient with my 2 year old daughter who loves airplanes. He let her look at all the cases of models and gave her a back issue of a modeling magazine because she wanted an “airplane book” so badley. Please support our LHS when you can, they are great!

Thanks!

John

2 Likes

25 lb Trilene Big Game. You’ll pull the anchor out of the ceiling before this stuff breaks.

www.walmart.com/…/16880447

and a screw in J hook that’s long enough to hit a stud in the ceiling. Never trust drywall.

www.liftingrigging.com/…/37706001.jpg

Congrats btw!

1 Like

Agree with what CN said.

I look forward to see this build progress…any idea what markings you’re going to do instead?

CN,

Thanks for the tips. Any thoughts on how to attach the line to the model itself?

Josiah, I picked up a decal set from Eagle Editions. I am going to model Clana Louie. I like the bird face for the nose art. Great for a kids room.

[URL=http://s141.photobucket.com/user/john0087/media/B25/goal.png.html]

I am resisting the urge add any after market sets, but I did pick up the Edgaurd PE set for the bomb bay as the doors will be open.

I also picked up a USAAF pilot figure from Ultracast. I am a little concerned that the figure will not arrive in time. I may have to work out a way to attach the figure after I seal up the fuselage so I can keep going.

So 2 days into this project and 4hrs or work, here is where I am at. Not much progress, but I am still finishing up the baby’s room at the same time.

[URL=http://s141.photobucket.com/user/john0087/media/B25/Days1and2.jpg.html]

Only 18 days to go!

Thanks

John

Well. This will be interesting. I really want a go at this kit myself, but size…

I’m glad that your “we need it for the baby’s room” strategy paid off…lol…I tried that myself…didn’t fly :slight_smile:

As for attaching the line to the model…really the only way I can think to do that would be to install small eye-bolts into the model…which is why I’ve never hung anything because for me it would be ruing the model.

Three weeks would be a lofty goal for me to do this kit justice. Good luck. :smiley:

Yeah, it is a lofty goal. I briefly thought about not assembling a lot of the interior bits that wont be seen, but I just can’t bring myself to do that. I am going to compromise and build the interior but not spend a lot of time detailing it so I can concentrate on the exterior, which is all that you will really be able to see when it is hung.

I am at a little bit of a standstill on the interior construction while I wait for some more interior green paint to arrive so I will be starting on the engines tonight.

Back in the old days I would just loop some thread around the wings and fuselage like a sling to hang models from the ceiling.

Looking good…as to how to attach it…like buckeye said you can just loop it around…I’d do one around the fuselage right ahead of the tail and then it’s up to you whether to do one loop on each wing or just one around the fuselage. 25lb test will hold it no problem, I still like stability though so I personally would do one loop on each wing between the engine and the fuselage.

EDIT: Here’s a zero I did not too long ago. I don’t have any display cases so I’m starting to hang all my models on the ceiling. Granted this is a 1/48 Zero and you have a 1/32 Mitchell…but here’s sort of the loop idea if you can see it. I put my first loop on the fuselage right in front of the tail. and the other around the fuselage and wing to get it in a bank left/dive position (I’m putting a corsair behind it eventually). Also…I just used push pins to put it in the ceiling…I would not reccommend doing this for you B-25…my zero is very very light so I could get away with this.

I always just made 1 large loop, as mentioned above, just before the wings and before or just behind the tail. It all depends on the angle the plane will be displayed and the weight distribution within the model. The single loop will allow for multi-axis adjustments as it’s hanging.

The best knot for joining the ends of a monofilament loop is a blood knot.

www.flyfisherman.com/…/blood-knot-FFMP-090019-KNOTS-01.jpg

Wow, this is going to be epic! Kudos to you sir for thinking BIG!!!

Ok, so I sucked it up and just purchased a set of Master 1/32 .50cal turned barrels. These things look great online. Funny, it was cheaper to buy the B17 set of 13 then buy them in pairs, so I will have some extra barrels…haha

Hey all,

Got some good work in the past two nights. Painted all the components for the engines. I still need to add a little weathering to the parts but they look pretty great considering the time frame. I test fitted them and the assembly looks real good. Not sure if I want to use the kit supplied plastic ignition plugs or wire them myself. I will do which ever is fastest but I painted them up just in case.

The push rods were a PITA to clean up. Very delicate parts. It would have been easier if they were attached to the sprue at ends instead of along the rod itself.

I am a little worried that my turned .50cal barrels wont arrive in time. I have not received a shipping notice from the store I ordered them from. I sent an email and I got an auto reply that they are doing inventory and updating their website so there may be a delay in shipping. Soon, probably this weekend I will have to decide if I am going to drill the guns to accept the new barrels or do with stock. At least the kit is designed to be able to install the barrels at the end of the build so there is still hope.

Enjoy the pics.

John

Looking good.

I wouldnt sweat the barrels too much. I can’t imagine even the slowest place taking three weeks.

It’d really be a shame for you to rush yourself into settling for a finish you’d be less than satisfied with just to have it done by your sons birth. Maybe he wouldn’t mind if it took a little time after coming home to get his plane :wink:

dflu78,

Thanks for the compliments.

My strategy is to really concentrate on the parts that are going to be seen and do just what is required on the parts that are not seen. I really feel like I am not settling on the quality of the work, just having to make decisions on what is important to me. For example, I usually spend a lot of time on the pit, but since I am hanging the plane and adding a pilot figure, I don’t see the need to do stuff like weather the floorboard etc. On the other hand, the bomb bays will be open and clearly open to viewing, so some time will be spent there detailing this part.

Engines again were a small compromise. I didn’t prime the parts like I normally would, but I made sure that I added the details that were important to me like painted the bolts on the gearbox aluminum. Also, I could have left the ignition coils gray or painted the ignition wires black per the instructions but I really like to look of the copper ignition coil and brass wires, so I stuck with that instead of taking the easy was and just painting black when my air brush was loaded up.

With regards to the time line, the 3 week goal is to have the model completed by the baby shower. My wife’s due date is actually in Aug but my wife is pretty adamant that the nursery is complete by the party…and there is a little personal pride involved to show off as well…HAHA

I am sure that there are a lot of modelers that probably disagree with my plan or think I am wasting a perfectly good kit (FYI I don’t think you are suggesting this, just making a completely unfounded comment), but I wouldn’t display something that I am not 100% satisfied with, and if I can concentrate on a good exterior paint job, well weathered, just the pure size of the model and finish should be good enough to impress and make me proud.

Besides, I am having a great time with the challenge of this and I am super excited to see this project finished.

HAHA with my luck, my son will probably be into something other than planes, like rockets or shiney 18 wheeler big rigs…but just another excuse to model a different subject.

Thanks!

John

edit Sorry for the quality of the pics. I have been using my cell phone camera since I am building late at night. This weekend I will try to take some better shots with our good camera.

Haha. Well what the wife says goes so I guess you’re on a strict deadline. Please don’t think I meant anything negative. You could manage a full out build and detail of the OOB kit in three weeks provided you have enough bench time to do so. You would just need to be really efficient and plan the build out. It the wife says “hey honey you’re spending all your free time at the bench” just point out that she’s the one that put you on the deadline

But if you’re going to hang it and don’t have the need to bring it down and ogle or take to a show or whatnot then there is no need to spend a lot of energy on things that wouldn’t be see. You are right about that. I’ll be following along closely either way :smiley:

No worries, no slight taken, I just felt the need to explain myself. Probably the modeling gods taking to me in my sleep…

Efficiency is most certainly key. I am a production manager and well trained in lean and I am using a lot of my skills from work on this build. When something is drying, I am usually working or prepping something else…haha its an interesting exercise.

I am expecting a delivery tomorrow of paint and some aftermarket parts. The pilot figure has shipped from our neighbors to the north, so hopefully customs doesn’t hold that up too long.

I am working on convincing my wife to spend the morning on Sat at her parents house with our daughter. Told her to go swimming so I don’t feel guilty about spending a few hours on the bench.

I hope to make a lot of process over the weekend/

Thanks!

John

I’m really like’n this build, it might motivate me to get one these monsters to put in the stash

Congrats on the baby.

Great build, looking forward to seeing it complete. One comment about the “not seen parts”. Somewhere down the road, you, your wife or child may decide to display it differently and no longer hang it. I would think you may have some regret then for going easy on those areas.

HAHA maybe but I am building it wheels up, so it will be hung somewhere, but good call, I may have to re-think my strategy.

Thanks for checking in.

John

Congrats to you & the wife on the new addition, that B-25 is one ambitious project for the deadline! I did the same thing 10 years ago when my daughter was born, except on a much smaller scale. Built a 1/48 P-51D and marked it as “Daddy’sGirl”. She still has it hanging in her room, and has been building her own snap kits since she was about 5yo.