I just received my Micro Mark catalog and there on the front cover is a micro punch and die set. Looks good in the description and it’s only $40. 1mm to 5mm in 0.5mm increments. Maybe a good option if you can’t find a Waldron set anymore.
Making your own isnt too much worry, either. And it beats $40
You can still find the Waldron Punch
http://www.brookhursthobbies.com/waldron_model_products.htm
I’ve had mine for years and love it.
Here’s a link to a IPMShow how to using the punch set.
http://www.ipms-phx.org/articles06.htm
Roy
OK guys, stop talking about the Waldron punch set or I am going to get in trouble for buying one. [(-D]
[#ditto] [swg]
Waldron Punch set is one of the coolest tools I have for modeling[:D] Now just go and get one[:-,]
Roy
What difference, if any, exists between the Micro and Waldron punch die sets? Besides price…
I have no clue on that since I have not seen the Micro set. If it’s the same size as the Waldron and fits the IP dials that you can get from Waldron it should work. When I got my Waldron back in the early 90s I did not know of Micro.
Roy
Must resist… Must obey the New Years resolution…it’s only Jan 3 [V]
Dont fight it the Waldron punch is on of my favorite tools
Thad
Marc,
Waldron makes a micro set, just right for you, 1/144 scale builds[;)]
Roy
Roll Models now owns and manufactures the Waldron Punch. I bought mine from John a while back, used it a couple of times…I like it!
Making a punch and die set is really quite easy - and it’s really inexpensive - you just have to have access to a few tools to make one.
Below is a drawing of one I made a while ago…very simple…
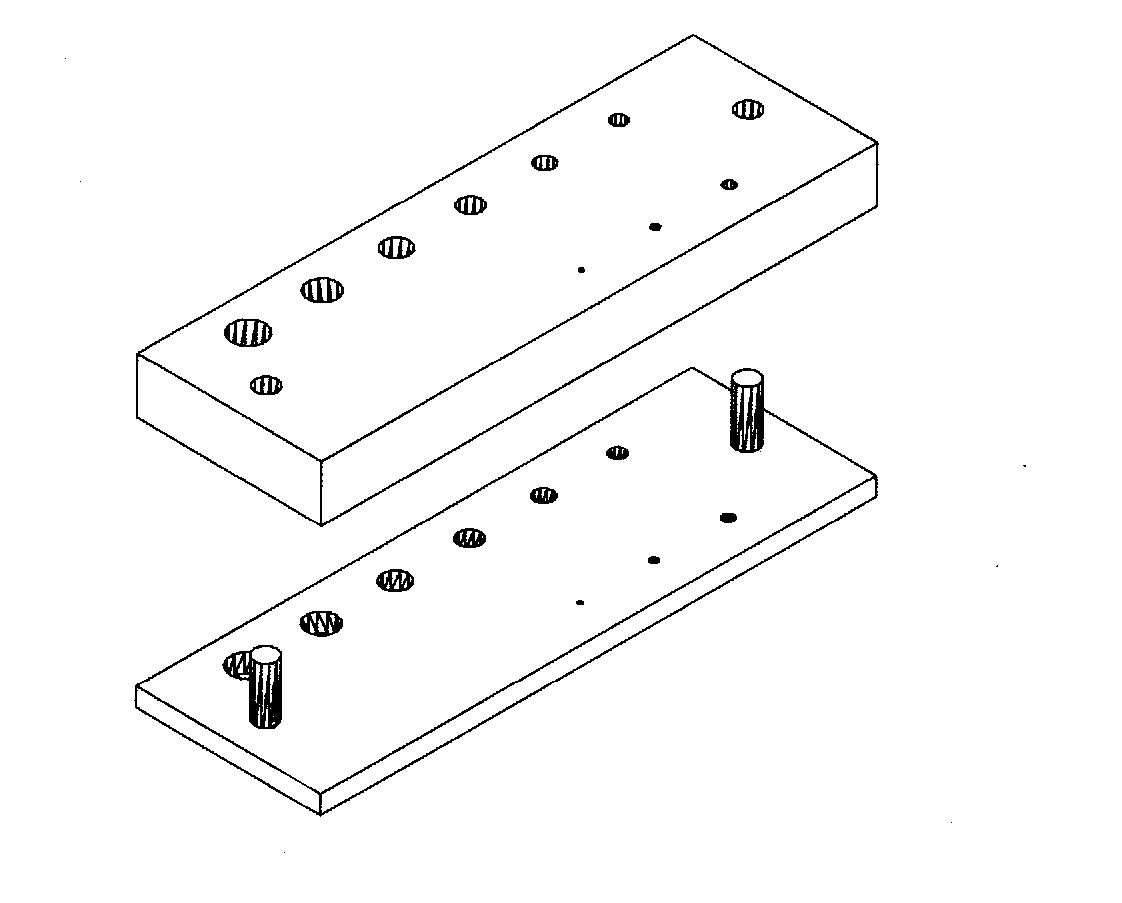
Now - imagine the top piece is acrylic about an inch thick…the bottom piece is steel or aluminum about a quarter of an inch thick.
Cut both pieces so that they’re the same overall size, clamp them together, and using a drill press, drill two holes in either extreme end right through both pieces. These holes are for steel locating dowels that you should glue or solder into the metal base plate, allowing the acrylic top piece to slide up and down. Make sure the dowels you use are a snug fit in the holes that you drill - just match the drill size with the dowel size.
Once these dowels are stuck fast to the base (making sure the top acrylic block slides on and off easily), and using the drill press to keep all the holes perfectly square to the base, drill a number of holes along the sides…from larger to smaller - in whatever sizes you need.
Make sure that the drill press is set on its slowest rpm setting and work slowly - use lots of 3-in-1 oil or a suitable coolant to help keep the drill tip and flutes cool so you don’t overheat and melt the acrylic.
Once you have the holes drilled, hit the back end of the drills you just used (to make all those different sized holes) with a fine grinding wheel on a bench grinder to make the ends as perfectly flat as you can get them - with nice sharp edges - these drills will now become the punches. These edges, along with the sharp edges on the metal base plate you just drilled, are the effective “cutting edges” - cuz what you’re doing is “shearing” the plastic or paper or whatever…by placing the original between the metal and the acrylic, placing the back of the drill into the right hole, then hitting the drill point with a weight…I use either a plastic hammer or a brass hammer…neither one will damage the drill tip.
The extra thick acrylic top gives more support for the drill and acts as a “guide” to ensure that the drill doesn’t move offline or at a slight angle, which will nick the lower metal plate, effectively damaging the lower “shearing plate”, making your cuts tear and rip - the more carefully you make this tool, the longer it’ll last and the sharper the cuts you’ll get.
I’ve used a metric drill set to make my punch and die set - they come in 1/2 mm steps from 0.5mm to 13mm…lots of variety there and a size for any application I might find.
If you have any questions, just email me at the link below - I’d be happy to give you any help you might need.
Yeah…(sniff)…I know 
Thanks, lee, for that excellent reference. I have a machinist friend whom I will ask to help with this, so as to get it donw up whisker fashion.