So im working on this 1/35 model and the directions say to cut out this piece of sprue then i guess trim off the bolt pieces??? Anyhow, it seems to me very unlikely ill be able to get these small nubs off - i havent tried yet - but looking for alternative ideas please. Ive included a shot of the directions and the front and back of the sprue. Im only guessing here - that im suppose to trim (shave) off the bolt pieces and not cut them out of the sprue.


That’s a really neat idea I’ve never seen before. Kudos to the manufacturer for providing that detail…although it seems it might have been easier just to mold them right onto the respective parts. [:D]
Anyway, if you choose to use them, those bolts should ‘shave off’ quite easily (and cleanly) with a single-edge razor blade. It might almost be worth putting a piece of clear (see-through) cello tape on top first, then using the razor blade beneath that. It might reduce the likelihood of the tiny pieces pinging off into space.
Cheers
Hello!
Should any of them babies get lost or something like that you could take some hex rod (or stretched sprue in a pinch), cut some slices off of it with a sharp blade and glue those slices on with liquid glue. When the glue is completely dry you can file the ends of your “bolts” a little for neatness - the glue will hold if you do it gently.
I used this method for truck frame:
What an interesting idea. Never seen a kit offer something like that before. I would try to remove them with the razor idea. Maybe use tape on the model as a guide so they will be straight and spaced properly.
Shaving off those little bolts will take a sharp razor and a steady hand. Go slow and try to get all of the bolt (unlike my usual results of curly half-bolts).
I stink at doing this, so I have some round and hex punches which I use in lieu of actual skill.
But Pawel’s idea works well too, as I have successfully used it.
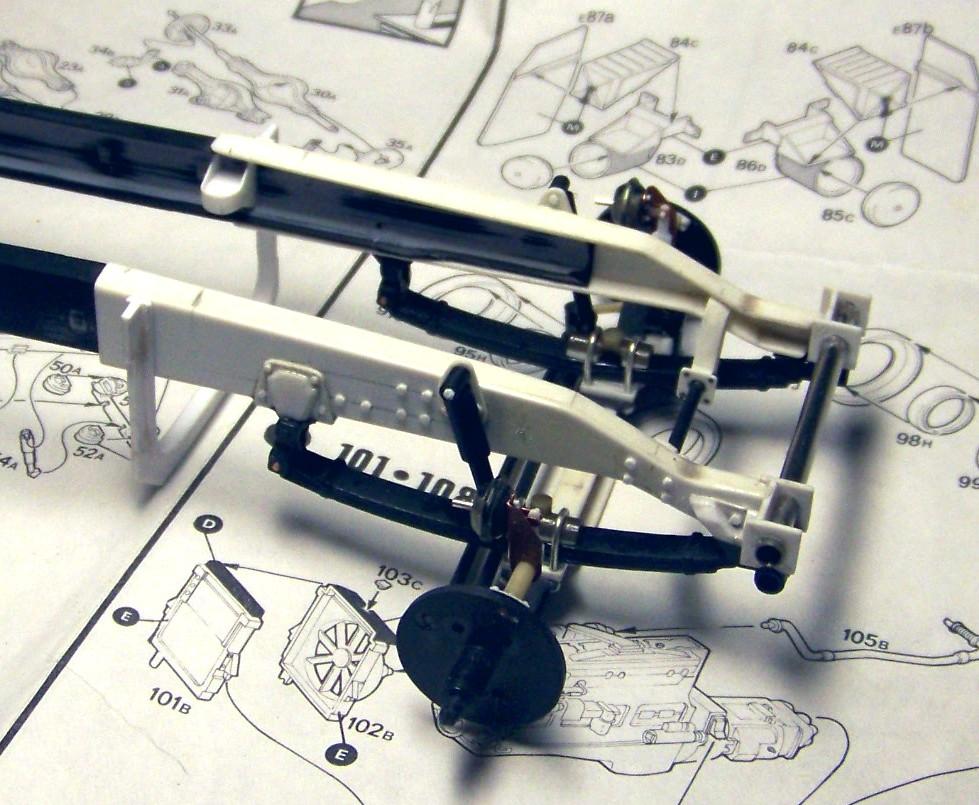
So it looks like i get to practice multiple methods… haha. i was able to shave them off and only lost 1. Hoping that the manufacturer priovided some that would not be needed, i took off an extra. I got them all on, see picture.

THEN i discovered i glued them on the wrong darn side. So, into the kits parts bin to find a tiny length of leftover and shaved a few pieces off and glued to the other side. These will have to be sanded when dried. We’ll see.
Tks for the tips!!! I really didnt think these would shave off so easily - while only loosing 1.
There are afternarket vendors who sell dummy bold heads in a varity of sizes. The heads are mounted on tiny cylinders, so you can easily cut them off the sprue. If you can find the size you need, that is an easy way to handle bolts. Also, if you are handy in cutting that cylinder a sixteenth or so, you can drill a tiny hole to make positioning more accurate when you glue it in place.
So you one-upped the kit! Bolts have two ends, after all.
Side note- when you stretch sprue, the section of the stretched part keeps the same section as the original. So if you shape a piece of sprue to be a hexagon, and the then stretch it; the thinned part will also be a hexagon unless you really melt it.
Bill
I had a kit that had me shave off small rivits and apply them. It was not fun working with such small bits, but it did work and looked the part when done. It was a piece of armor too, I forget which one. I’m thinking is was the Trumpeter Dickermax.
BK
well, here is where we are for now. Here is the correct side with some new “bolts” cut…
Tks all - good tip too bill on the sprue shape and stretching - i dint know that either…

Yeah, there are Maschinen Krieger kits that include a flat section of sprue with bolt heads molded on. I use deep box or plastic container to work in, and slice the bolt heads off with a razor blade. I did invest in an RP Toolz hex punch and die set, though, too.
The bolts I mentioned above include a stem so you can easily cut them free with an Xacto blade. They are sold by a vendor that caters to model railroad folks- found in the RR area of hobby shops. They are tiny bolts (no thread), rather than just a head. You can drill holes and mount the bolts in a hole, or cut the heads of at top of stem and glue them on flush.
I took mine out of the package so I don’t know the brand. I found them by googling dummy bolts for scale modelers.
OOOh Yes;
The Bolt and Rivet conundrum! I finally went out and bought a set from a Model Rail Detail Parts firm that has them( Rivets, Nuts and Bolts )in five sizes. I cut them off with a GEM Single Edged Blade inside a Quart ZipLoc bag! That way you don’t lose none of the pesky little things.
My first run in with this kind of things WAS on the Trumpeter DickerMax. On Armor, which I only build occassionally, (just for me) I don’t get that serious. For instance, if a ship has them I make them go away. After all, even in 1/350 or 1/200 how are you gonna see them anyway?
Yes, i think these too maught get “lost”… But, i wanted to try and see how’d theyd come out. Anyway, this little gun is kicking my rear. Maybe because i took off so much time away from the bench. Its tiny parts are getting to me a little. But i know too that the eyes are getting tired and the fingers shaky, etc., etc. And i hope im not making a mistake assemblying componets then priming then painting. We’ll see. haha