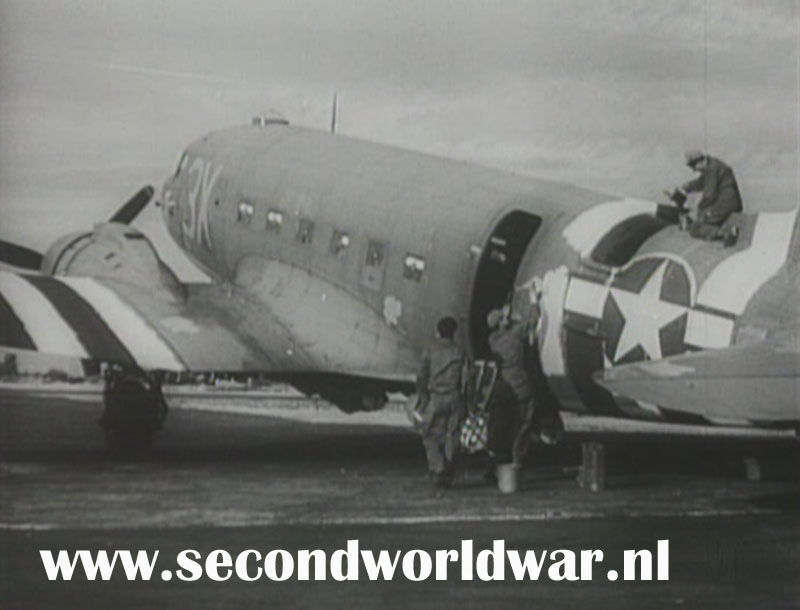
During prep right before D-Day the ground crew painted around the insignia and numbers, so you’d want to put the stripes on first and then decals. Didn’t think of mentioning it, but one way to show that the stripes are out of place is to weather the plane before putting them on and leave them totally clean minus panel shading. If you’re going with Polyscale, I’d think “engine black” would do nicely - that paint is as black as Stalin’s soul.
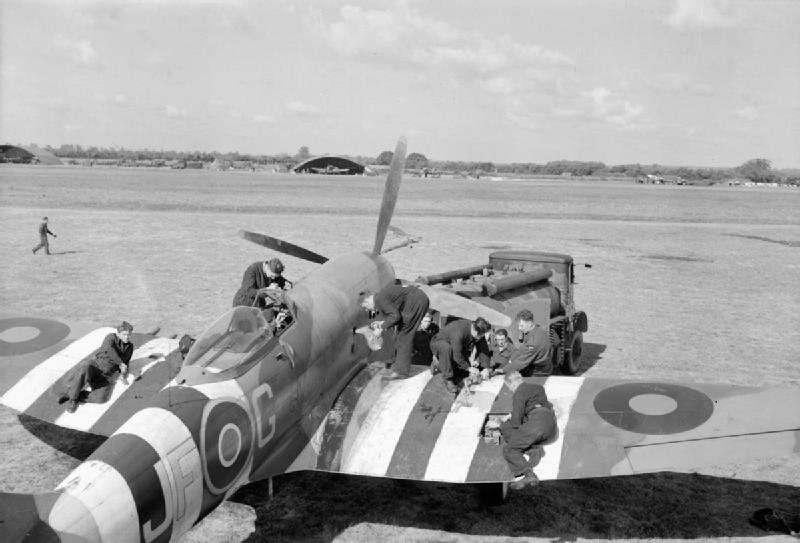
I’ve only searched for British orders for the invasion stripes, and the only item I’ve found regarding their application was that they must not obscure the national insignia. No mention made s to how to approach the fuselage codes. It depends at squadron level, or even the individuals, as to how neat the execution was.
Have seen some examples that have already been posted before, where they have gone to the trouble of actually leaving a thin outline, so the code letters stand out from the white stripes - this can look fairly pristine at a distance (such as Bonnie ‘B’ that Stik has posted above), as well as this one:
Hey everyone, sorry for the long absence. Lots of “life” things happened (and still are) in a very short time period. But I’m back, alive, and well!
Wow! Great work everyone! This being my first armor, I’m having a blast! Having to consult Prof. Bish for ALL of my questions (thank you my friend for all the help!).
Here are some pics of the Puma. I hope to have more tonight! As you can see, the expert painting and weathering job I did on the body… [whstl] O.K., actually what happened was me trying out a new paint and what I initially thought was a big mess, turned out to be pretty cool…so I ran with it! Here’s what happened…I bought some Vallejo paint to try out (never used it before) with the AB. Got everything ready, mixed the way it said to and sprayed…and you see what happened. I was bummed! Thought I Was going to have to stripe it and redo it. Then, the next day I come in to check it out and it actually looked “weathered”! Of course Prof Bish told me not to worry too much about it, that the interior can hardly be seen. So, see, even mistakes can turn out cool! So here are a few pics of what I’ve done so far. Man, there are a tone of little bits for the suspension! Are tracked vehicles harder?!
I’ve got the tires glued also, but will paint and install them last so I can do some really nice weathering on the body.
Stik and Jack: Thanks for those great invasion stripes photos. It looks like unless you are doing a specific plane, you have a lot of latitude there to still make them look authentic.
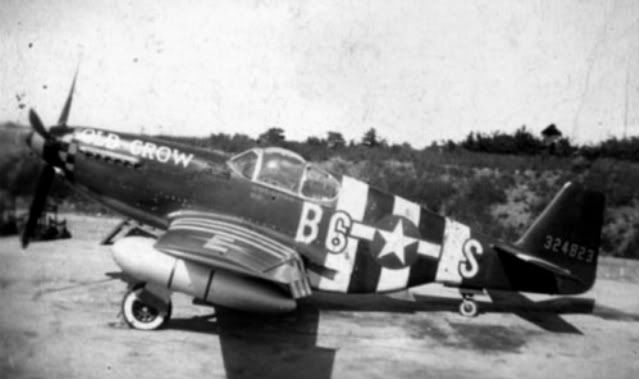
Jack, since I am doing the Old Crow, I really appreciate the first photo you posted. I’ll see if I can replicate that! [:|]
looks like the paint was too thin. i have had that happen to me especially when going between brands; tamiya has to be thinned a lot more than MMA.
i too have been absent for about 6 weeks with some issue. doesn’t appear to be serious, doesn’t keep me from doing what has to be done, but sure makes me feel like doing nothing else. also in a model slump but that should change after going on holiday so i can finish up a number of GBs and get ready for regionals.
Well I had a nice long reply typed out this midday to all the previous posts to add my 2cents to after my last one, and of course my stinking ASUS tablet had to dump it… If I did not have so much stuff saved on there I would take it down the street to the ocean and toss it into the surf for a saltwater and sand electronics death… one day[:@]
Silentbob, I cant recommend any specific pressure offhand, but I do suggest this: take a piece of paper or an index card and use it for testing. Dial down your air source another 2 PSI and do some test lines, if they are still too wide, dial down 2 more PSI and try again. You may need to thin the paint down a bit more as your pressure decreases. it is very much trial and error, but it works.
BlackSheep and Sparten, thank you. I am in the zone here and having a blast.
Eagle, youre off to a nice start on your 234. Those have an imposing air about them to me. the forerunners of todays BTRs and LAVs.
Schmidty, youre very welcome. AS you can see you have a lot of leeway in how you paint the stripes. If you look at the Tempest in the photo I posted, even on a single aircraft there can be variety. Extremely neat fuselage striping, coupled with less neatly done wing striping. Unless your doing a well photographed aircraft like Gabby’s Jug or Old Crow, you are very much hard to be called inaccurate.
Wayne, I hope the problems pass quickly and successfully for you.
Today’s update was minimal. I added the flex ammo chutes for the tail guns. I had some PE ones from a Verlinden US Aircraft MG set doing nothing but sittng in a drawer for years so…
Clemans, thanks. This is similar to the scheme I am doing for the Marder in the Hunters GB. But ever since I got the kit, I knew I wanted to do that scheme, but was worried I couldn’t pull it off. With the Panther, I had originally intended doing a different one, but at the last minute changed my mind and went for this. And was really surprised with the results, so hopefully the marder will be a breeze.
Eagle, you know we were chatting about Vallejo air. I had the same problem but with the green, the yellow went down ok. As wayne said, it just seems to thin. You are doing the /2 with the turret ain’t you?
Stik, nice work with those ammo belts, and chutes, some really nice scratch work on this.
wayne, hope its not to bad and things get sorted soon.
Eagle: Your first armour kit!?! Wow, that looks good, you wouldn’t want to have seen my first! As Wayne said the paint looks a little thin, you might add another coat or two. And most German vehicles the interior was a light cream buff colour but if you’re going to close the hatches I wouldn’t worry about painting the inside at all.
SP: Very nice look with those ammo belts there!
Btw: I know what you mean about losing posts- though I think it’s the FSM website so don’t blame your poor tablet!
Nope, it’s my tablet. It does this every so often to me and the main culprit is the backspace key. The set up of the key board has no delete key and if I make an error typing the backspace key is what I have to use to eliminate the error. But if I hit the backspace key too many times or hold it down for too long-poof I just rolled snake eyes and the whole web browser shuts down.
I’m glad you guys like the ammo chutes, they busy it up just right back there with everything else.
I’ve really become fond of water based acrylic modelling and have a boatload of Vallejo paints - 80% Model Color. MC need thinning and I’ve learned how to do it - or at least one of the ways. But I’ve had perfectly good luck with Model Air and their AK Interactive twin brothers. One thing’s for sure - water based acrylics really want a good primer. The biggest problem adapting acrylics to plastic was the difficulty in getting the stuff to hold evenly - that’s why it took so long for acrylics to catch on. And give Tamiya credit for figuring out how to make a solvent agent that wouldn’t break down the structure of the paint itself - haven’t a clue what it is, but it’s a country mile from the polymer base found in Vallejo. (AFV gurus like Adam Wilder and Mig Jimenez consider Tamiya and Gunze to be lacquer paints: definitions get pretty cloudy in that area.)
The best primer is Vallejo’s own - it looks like their paint but it’s a tougher and coarser material. It needs a little longer to cure (overnight is probably best, but I’ve used it after two hours) than lacquer based primers but you won’t choke to death using it. Model Air in theory uses the same pigments as Model Color (I’d sure take issue with that claim, although a color like Olive Drab might get a “make-over” every so often) but is thinned with flow retarder, self-leveling fluid and some kind of very thin resin (or at least I think so). It’s not as forgiving as Tamiya when airbrushing. If you thin Model Air more than just a little, use Vallejo “Airbrush Thinner” - water alone will break down the paint. Vallejo rewards the low PSI, light coat style of painting, but when you get used to it you can give a good blast. I know some folk claim that Model Color can be cut with the same stuff - I’d use MC thinner which is white - sure sign of some kind of polymer or resin. (That’s why the new Pledge/Klear in some markets is white.) When you get used to it the stuff is splendid. Terrific colors, quite sturdy and easy on the room atmosphere. I followed a Mike Rinaldi technique (details later) which called for Vallejo lighter shades sprayed over a Tamiya base. Rinaldi is also keen on Vallejo’s “new” (actually been in their art section for years) collection of acrylic washes and I’ll certainly second that. So Vallejo has a different drummer which explains why so many people find it hard to use and wonder “what the heck?” But it’s great stuff when you learn to sing along.
I am really getting into mixing my paint types. Enamels for priming,acrylics for base coats, and enamels for detail work. Any mess ups are then easily cleaned up with a thinner moisted brush with a few hours of detail paint work.
I got around to painting the LCVP tonight, and I’m a little disappointed in my photography skills as I just can’t get a good picture tonight that really shows the preshading. You can see the panel lines in the picture but the streaks are a little harder to see. Looks really nice in person though.