Unfortunately there just isn’t any good, quick way to rig ratlines, especially on this tiny scale. If you do a Forum search on “ratlines” you should get several threads that explain the process. The fastest method that looks decent probably is the old “needle through the shroud” trick. Even it takes a long time.
One perfectly respectable solution is simply to omit the ratlines. If the rest of the rigging is well done, most people probably won’t notice that the ratlines aren’t there.
I’ll look up the needle through the shrouds technique, I think. I actually already have the deadeyes for the shrouds. I looked up the way to rig them and I think I can do it. I’m going to put the deadeyes together, attach them to the boards, and run the rigging from there. Then I’ll attach some thing that looks like chains underneath just for looks.
Okay I rigged the first set of deadeyes…I’m not ready for that yet lol. Not at this scale lol. I think I’ll just stick with the shrouds that are supplied, unless they are super loose. Then I’ll make my own and just glue on the crappy plastic ones. I’ll save the deadeye work for my Sultana build when I get that lol. I might still do my own shrouds, but I’m done with these tiny deadeyes until I finish my 74 or do a wooden kit lol.
I think you’ve made a wise decision. Rigging dead eyes and lanyards is one of the trickiest and, in the case of a good-sized ship, repetitive jobs in ship modeling. And it gets tougher as the scale gets smaller.
I assume you’re talking about the Model Shipways Sultana kit. It’s a fine one for breaking into wood sailing ship modeling. The scale is large, the rigging is relatively simple, and she makes a handsome model.
I have two sets of Jolly Roger instructions sitting around. Let me know if you want me to scan and email your way. Happy to do it. Just send me a message with your email address, and I’ll take care of it first thing Monday morning.
Well, I have installed the shrouds/ratlines, and I think they look pretty decent (a lot better than the totally square ones from the 1/196 constitution that in picked up and never built anyway). ANYONE BUILDING THIS KIT TAKE NOTE: However, the ratlines did not fit into the recesses in the boards, something Lindberg must have anticipated, as it suggested I cut them further open to fit right). The problem is, the boards were already installed, so I had to trim them while attached, a tricky practice at best. I knocked off a few rails and gunport lids in the process but eventually got them fit. I would recommend anyone building this kit widen the notches BEFORE installing the boards, and checking for fit. There wasn’t much room for the gunport lids so I had to move the “chains” around a bit. Furthermore, I didn’t install them in the recommended way, which was inserting the lower ends into the holes in the side of the ship first, but the deadeyes seemed like they would be way too high above the boards, and it seemed too brittle to bend like that. So I just glued them on. The holes and results can be seen here: It’s not ideal, but it will do for this build. Personally, I think the chains look worse than the ratlines. All in all though, I’m fairly pleased with the result, though the masts seem to have a slight take to them that I don’t believe is correct for the period. The masts seem pretty well centered, I think (but am sadly ignorant of what is considered good or bad here), though the fighting tops aren’t quite level Next up, the stays.
Oh and I finally found my instructions lol. Thank you very much for offering to send me a replacement set, Charles. That was a mighty kind offer, and I really appreciate it.
Well, I have finished the stays on my frigate. I made two mistakes. 1. I didn’t run the mizzen topmast stay through the fighting top but I’m hoping no one will notice. 2. I glued the mizzen topgallant stay to the main topmast in a way that the part going around the mast at the main topmast isn’t level. It’s not very noticeable however, and I plan to cover it up with some small black tape. Still and all, I think it looks pretty decent. I’m going out of order, so my next step is to add the backstays. And I’ve ordered some silkspan from Bluejacket to make sails with. After I fix those to the yards, all I’ll have to do is attach the yards, rig them, and I will be finished! It will be great to have my first (completed) build under my belt!
I built this same kit some years back and decided to make it into a dirty privateer. I still have another one in my stash that I intended to build as the La Flore. I used the plastic shrouds as well when i built this kit s. I did so for pretty much the same reason as you, time. it was a quick fun build.
Well, I have fitted the anchor and anchor chains (coiled per instructions). I believe they may be a tad large, as far as scale goes. How do they look? I am quite proud of my coils, large or not lol. The anchors have been hung per instructions as well. Furthermore, I have finished adding the spritsail yards and accompanying rigging, in a lighter color which I believe is appropriate. I love the look of it. I do have a question however regarding a sail plan. If the wind is on her aft larboard quarter, what would a likely sail plan be? I generally would like to see a lot of canvas- all of the square sails at least- in the end. Or perhaps I should change the sail plan for the wind to be directly abaft? What are your opinions?
That is, all square sails but the spritsail. I do not plan on using one. And the staysails might be a bit much so I probably won’t use those either, unless you all think differently.
You’re doing a very nice job on the rigging. The only issue I see is the one you ask about, namely the anchor cable. The Flemish coils are nicely done, yet the rope does seem slightly out of scale, and slightly “stiff” to boot.
A question–are you using beeswax on the thread? For the heavier line, actually soaking the thread in melted beeswax and squeezing off the excess gives you a smooth, kink-free, stretch of thread that you can mold and drape quite naturally.
Still and all . . . you have tons to be proud of here. Nicely done!
Thanks! I may be changing up the anchor chain anyway, it seems. This kit does not include any hawseholes, but now that their absence has been brought to my attention, I am considering drilling some into the hull and using those. I would probably just cut off the ropes and leave the coils, in this case.
To answer your question, though, I am not using beeswax, but that sounds like a good thing to do. I will have to pick some up. The reason the anchor chain looks so stiff is because it is a waxed rope. It’s nice when coiling and poking it through holes, but you’re right, it does look quite stiff.
As long as I’m already off to the shop, I might just get a new anchor cable. That is, assuming I have the guts to poke holes in my ship at this point (the prospect is quite terrifying).
Also, just a note that the instructions on this kit are pretty bad, though the rigging instructions are broken apart in a way that is fairly digestible. But it also asks me to lash the bowsprit to the ship through a nonexistent hole, so…some progress to be made lol.
Regarding beeswax - it can never, so far as I know, do any harm. Whether you actually need it is a somewhat different question.
The two big functions of beeswax are that it lays down fuzz and keeps out moisture, which otherwise might cause the thread to react too much to changes in the humidity. If you’re using cotton thread (which I strongly advise against), beeswax is just about essential. I’d also be inclined to wax the usual sewing-store-type cotton/synthetic blend stuff.
If, on the other hand, you’re using silk, or linen, or nylon, or any of the modern threads made specifically for ship modeling (Cottage Industries Models or Syren Ship Model Company, for instance), beeswax won’t actually accomplish much.
I confess that I’ve never bothered to melt the beeswax. I normally use a little cake inside a clear plastic box. Such things are widely available in sewing stores.
The phrase “anchor chain” came up. Beware! Chain anchor cables didn’t appear till well into the nineteenth century
Hmm, I don’t remember what the exact makeup of my rigging is (though I tried to get as high a percentage of artificial/synthetic as possible), so I’ll double check that and (since I did get it at a sewing shop) probably apply some beeswax. Thanks for the tip, guys.
Oh, I thought “anchor chain” was a phrase used to describe the huge ropes that held the anchor. I must have misheard/read something somewhere!
What would the correct terminology be? Line? Cable? Or something else?
Either “anchor cable” or “hawser” would be right. Technically, “hawser-laid” rope is spun up clockwise and “cable-laid” rope is spun up counter-clockwise. If you look at a piece of hawser-laid rope from the side, the individual strands appear to go upward and to the right. In cable-laid rope, they go up to the left.
In the seventeenth and eighteenth centuries, at least in the British Navy, cable-laid rope was typically used for the major lines of the standing rigging, and hawser-laid for everything else. That’s why experienced ship modelers often make their own rope.
An old-fashioned sailor would tell you that ROPE is a material used to make LINES. There are a few exceptions (footrope, top rope), but generally speaking rigging is made up of LINES.
Just to make things even stupider, in the latter days of the sailing ship, many of the lines were made out of chain.
Hope that helps - but I’m afraid I may have made things worse.
If you drill hawseholes, there’s a “cheat” that will help you out. Dril the hawseholes, then pass the anchor line though from port to starboard (or vice versa if that’s handier). Repeat for the second anchor line (if used (a second anchor rode was not often rigged, if only to reduce belowdecks clutter). Don’t worry about the fixed end of the anchor line, it will likely be below the gundeck and not visible.
To fasten the line to the anchors, take a bit of fine black or dark brown thread and tie it around the end of the anchor line a couple of millimeters from the end. Take about 4 or 5 turns of the thread around the end of the anchor line, then snube that with an overhand turn. Leave about 4-6" o the thread loose.
Pass the anchor line through the ring on the anchor, and make a tight loop around the ring. Then, bring the end back around to the anchor line making a loop about the size of the anchor ring. Now wrap the remaining thread around both the end of the anchor line and the line itself. This will approximate a fisherman’s bend, and will look a bit better than an overhand knot on the ring.
Ah, I see (regarding rope/lines). My apologies again, as I thought it was that something was a rope until it had a purpose/ was attached to something, etc.- at which case it became a “line.” I wonder where the distinction is drawn? Is it in diameter or use perhaps? Or maybe it’s just one of those (seemingly many) arbitrary terms with a few (random) exceptions?
Lol confusing indeed (line made of chain). But I appreciate all the info.

 ANYONE BUILDING THIS KIT TAKE NOTE: However, the ratlines did not fit into the recesses in the boards, something Lindberg must have anticipated, as it suggested I cut them further open to fit right). The problem is, the boards were already installed, so I had to trim them while attached, a tricky practice at best. I knocked off a few rails and gunport lids in the process but eventually got them fit. I would recommend anyone building this kit widen the notches BEFORE installing the boards, and checking for fit. There wasn’t much room for the gunport lids so I had to move the “chains” around a bit. Furthermore, I didn’t install them in the recommended way, which was inserting the lower ends into the holes in the side of the ship first, but the deadeyes seemed like they would be way too high above the boards, and it seemed too brittle to bend like that. So I just glued them on. The holes and results can be seen here:
  It’s not ideal, but it will do for this build. Personally, I think the chains look worse than the ratlines. All in all though, I’m fairly pleased with the result, though the masts seem to have a slight take to them that I don’t believe is correct for the period. The masts seem pretty well centered, I think (but am sadly ignorant of what is considered good or bad here), though the fighting tops aren’t quite level
  Next up, the stays.
 I’m going out of order, so my next step is to add the backstays. And I’ve ordered some silkspan from Bluejacket to make sails with. After I fix those to the yards, all I’ll have to do is attach the yards, rig them, and I will be finished! It will be great to have my first (completed) build under my belt!
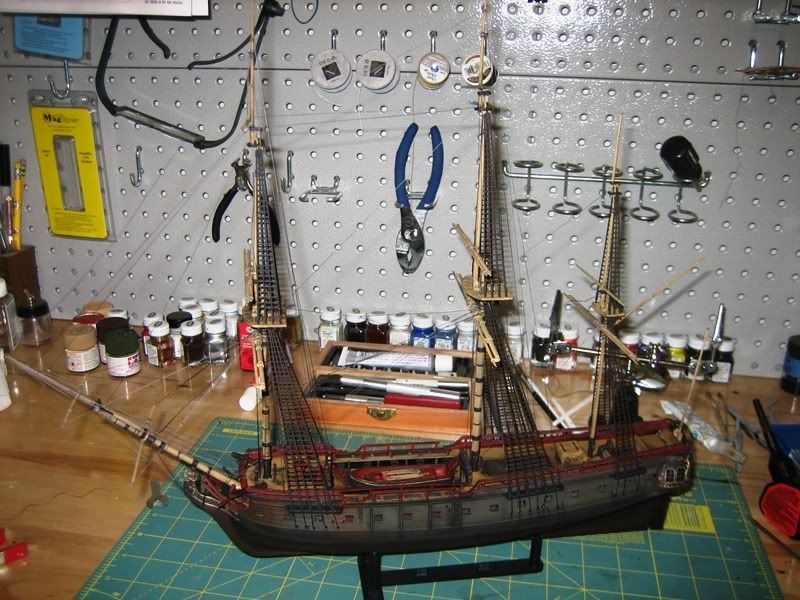

 Furthermore, I have finished adding the spritsail yards and accompanying rigging, in a lighter color which I believe is appropriate. I love the look of it.
 I do have a question however regarding a sail plan. If the wind is on her aft larboard quarter, what would a likely sail plan be? I generally would like to see a lot of canvas- all of the square sails at least- in the end. Or perhaps I should change the sail plan for the wind to be directly abaft? What are your opinions?