Greetings all. I’m starting a newer version of Lindberg’s Brig of War and wondered how the build went for other modelers. I understand it’s an old Pyro mold and based on a model of the Fair American. I’ve already removed the partally furled lower square sail on the mainmast as many brigs I’ve seen do not have a sail bent to that yard and I plan to separate the leech ends of the plastic sails from the yards to space the yard/sail assemblies more realistically on the mast. Any other suggestions or comments on this build are welcome.
Also I’m interested in posting photos but not sure how. Looks like Photobucket is the site most folks use?
I do not recommend Photobucket. Use anything but that. There are several other GOOD free alternatives: Imgur, Flickr, POSTIMAGE, among others and a few Pay sites that are inexpensive and dispense with Ads for Russian brides. There are many Hosting Site suggestions that have been posted over the last 2 years here on FSM. Take a look at the Technical Assistance Forum for guidance and also the Testing Forums for playing around.
Getting the link for Posting an image is a bit different depending on what Hosting site you use. Once you pick a site and upload some images to it, we’ll get you the info you need to get those pictures added. Just ask.
Thank you for this Thread. That old Pyro, now Lindberg, Brig of War lends itself to a fun easy build and good learning experience and, if you have the desire, to some worthwhile corrections to the Hull, Deck and Yards.
If you have built it before you’ve noticed it’s rather robust hull shape; The Stern is quite wide. The real Brigs were quite slimmer toward the stern. Besides the Hull shape the yards are too short. The masts are a correct height however.
Some History… This model was said to be a copy of the Fair American. Pyro surely Pirated this piece of Plastic from the Plan Produced for the Fair American kit by Model Shipways. Except Pyro made it closer to a bathtub toy shape.
A most interesting discussion of the Pyro Brig of War is here:
I really like this kit and have a couple in the stash. Made one as a kid and only built another two years ago with as many “fixes” as I was capable. I want to make another with better corrections. My experience with model ships dates from 2014 after a dry spell of 50 years so I’m still learning.
Yeah, if you’re looking for something resembling an accurate, realistic model, this kit is a terrible choice. But it can still be a fun project, a cheap way to practice some modeling skills to improve kit parts or scratchbuild replacements.
Even if you ignore the hull’s major dimensional issues, improving the masts and rigging will make a noticeable improvement. The resulting model will look good on the shelf, especially if displayed at eye level!
Any ideas on what to do with the ringbolts on the deck? There’s 10 of them. I’ve painted them black and wanted to add some detail by drilling through the “hole” in the middle and run some black or tan rigging thread up from below before I install the deck. Just not sure what I’d use them for. The Model shipways model of the FairAmerican doesn’t show them. Suggestions?
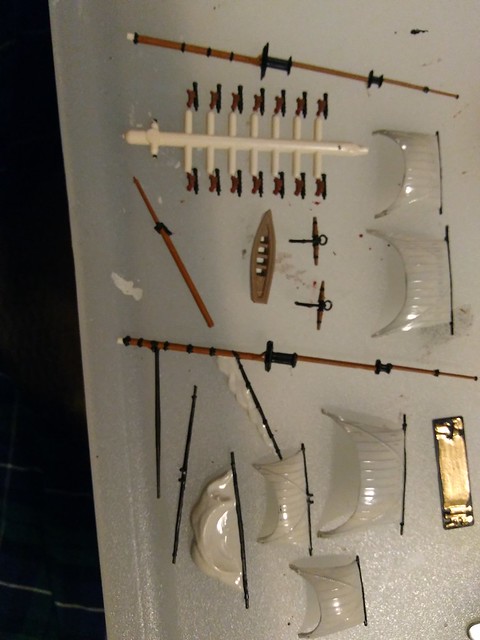
Here are some in progress photos. I’ve cut the yard and sail assemblies apart for more realistic spacing on the masts. I used anchor stocks and a boat, probably hang it over the stern, from an old Constitution parts model. Going to take the suggestion from Nino to use a paint pen for the clew lines and reefing lines on the sails. I didn’t want a square sail on the main yard so I cut it off.
As deck hardware these Rings seem way overscale. Had they been placed directly behind the Cannon they could be for Rigging the guns.
I built mine years back. My solution was the same as your suggestion; Drill it and run a cable thru it. I wish I had sanded’em off but I was so happy with my Brass masts and corrected stern that I quit “correcting” while I was ahead.
I hope some knowledgable folks will chime in on a proper solution.
My pic:
That Fair American model (Web Picture below) uses the grating hole for cable storage.
Thanks for the response, your deck detail is great! Well, I’ll try and utilize some of those ring bolts then. Sanding and cleaning up the keel tonight,maybe add some putty and detail to the forepeak. Jon
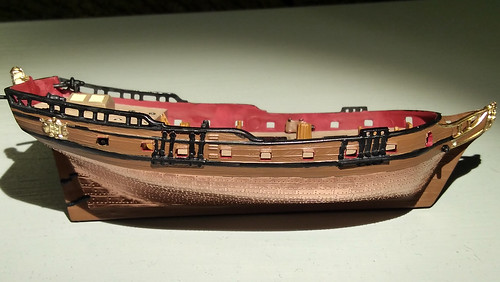
The hull is cemented together but the deck and boat beams on the stern are just test fit for now.
I cut two more gunports near the bow and found an extra cannon from an old Heller Phenix build. Think it’s a 6 pounder on that ship but we’ll pretend it’s a 9 pounder bow chaser on the ol’ Brig.
Getting the extra boat from a parted out 1/196 Constitution model dressed up. Made a couple oars from some scrap deadeyes left over from a Lindberg Jolly Roger. The black boat support beams at the stern were curved quarter boat davits from the Connie parts I just cut off the curved end and painted black.
Trying to put together a capstan with bars using a plastic deadeye and backstay assembly cut apart from the JR spare parts also.
Went ahead and drilled through all the ring bolts on deck, going to run some line up through them prior to fitting the deck. Still not sure what to use them for though.
Cannons are all painted. I couldn’t resist painting red on the barrel ends to simulate tompions. I love that look.
Going to try and fill in the fore peak with some plastic or putty and attempt to simulate a grating. This has been a fun model to experiment on making custom pieces, still learning about all that. All the models I built in my teens and 20’s I built just as is out of the box.
It has been a while since I posted an update on this build. Life is busy! But I have fitted the cannons and rigged them simply (first attempt at cannon rigging), and the masts are stepped and the basic standing rigging is set. Pictures to follow soon, hopefully.
Your Pictures of the hull look real good. In fact, one picture of the hull looks real good for proper width at the stern. Excellent brush painting on the deck “furniture” too.
I tried to find more info on the so-called Rings on the deck. They could have been used as part of the tackle to run the Guns in but don’t seem to be positioned properly for that either.
Keep up the great work. It is a fun model and there is a lot that can be added… if you have the good eyesight and tiny tools to do so. I tried to add a “water channel”. I won’t do that again.
Nino
P.S. Don’t forget to take a look at some photo’s of the old Fair American for ideas.
You are doing a terrific job! However, I do have one comment. I do not believe that the Fair American model from which this kit was patterned was coppered. I recommend sanding the coppering detail, rescribe the planks or do your own planking, and paint it an off-white. It’s just a thought.
Thanks, Nino. Always great to hear your input. I’m referencing the Fair American for the rigging now. The boat I fixed at the transom is an extra obviously. Not sure where else to put it. I decided to drill out the eyelets and run hawse cables thru them from the anchors to the capstan. Life has been very busy lately so it’s slow but steady going. Cheers!
Hi, warshipguy! Thanks for your kind input. That’s a great idea to sand off the copper sheathing. I have a second, older pyro brig of war I plan on narrowing the hull at the stern like Nino and others have suggested and will definitely take a crack at sanding off the copper sheathing and doing a planking set up to replace it somehow. My current build is a gift for my brother. It’s been fun and I really appreciate all the suggestions and support! My fiance has a laptop and helps me get pictures posted as time allows. Cheers
I have set the masts in place, rigged the guns, hung the ship’s boat over the transome, and set up the fore and aft standing rigging. I used Heller rigging thread and painted it gloss black to simulate tarred rigging on the real ship. I am currently working on the shrouds and ratlines. I am using the same method for the shrouds except that for the ratlines I will simply be using black sewing thread. Thanks for looking!