I thought it may be a good idea if we started posting pics of our spray booth assemblies along with some information as to what equipment we use. This was spurred by my own experience of trying to figure out what I needed for airbrushing, how to set it up and what accessories may be useful. Maybe if others post their own information here, this post could act as a reference and resource for others who are starting to put together their own spray booth area. My information is as follows and pictures are included below:
SPRAY BOOTH AND EXHAUST
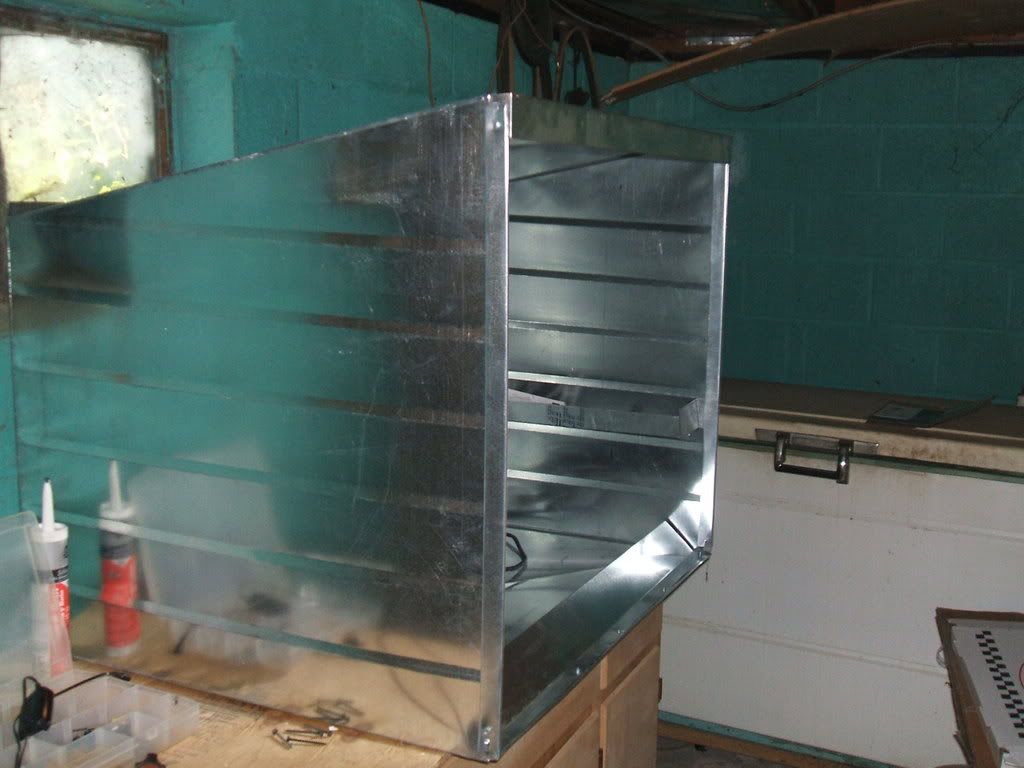
Paasche 22” x 16” Spray Booth (#HSSB-22-16)
Gunze-Sangyo Mr. Super Booth Vent Attachment (#MAGT03E)
3” Dryer Hose (5 feet)
4” x 3” dryer hose reducing adapter
Duct Tape (of course)
AIRBRUSH AND AIR SUPPLY
Badger Universal Airbrush (#360-Universal)
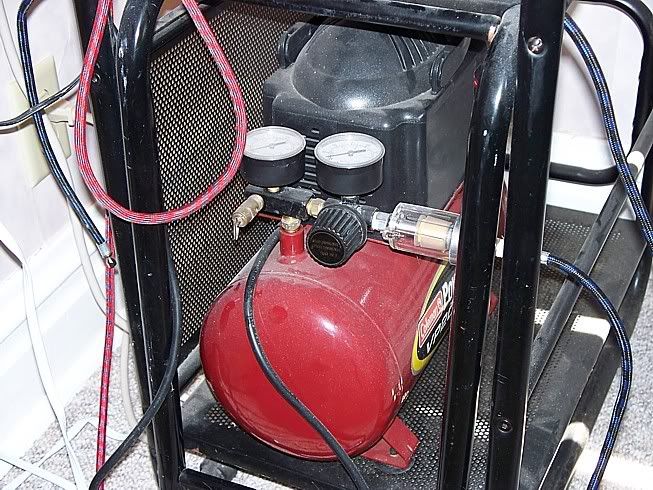
Badger Cyclone Air Compressor (#180-12)
Paasche Air Regulator, Moisture Trap, Filter & Gauge (#R-75AR)
Badger 10” Braided Hose (1/4” x 1/8”; #BD50-2011)
Badger Air Brush Holder
ACCESSORIES
10” and 14” Plastic Swivel Base (Lee Valley Tools)
Battery Powered Magnetic Back LED Lights (Princess Auto)
3/16” Plexiglass (to cover base of spray booth)
Due to space constraints in my home office, I had to set-up my spray booth area in my vacant basement apartment. Since I did not want to drill a hole through the wall in the apartment, I purchased a Gunze-Sangyo booth vent attachment that attaches to the dryer hose and allows you to vent through a slightly open window.
Since the spray booth attachment is ~2.75” in diameter, I decided to step down to a 3” dryer hose from the spray booth instead of a 4” hose which is standard to the Paasche booths. To do this, I purchased a 4” x 3” dryer hose reducing adapter that I mated to the 4” dryer hose outlet on the spray booth and then ran 5 feet of 3” hose terminated with the Gunze-Sangyo booth vent attachment to my window. All joins were then “duct-taped” to ensure they were air tight.
A Paasche regulator/filter/moisture trap was attached to the Badger Cyclone compressor and my Badger Universal 360 was connected via a 10’ braided hose. All threaded connections were first wrapped with Teflon tape to eliminate possible air bleeds. I did not Teflon the 1/8” attachment on the airbrush however.
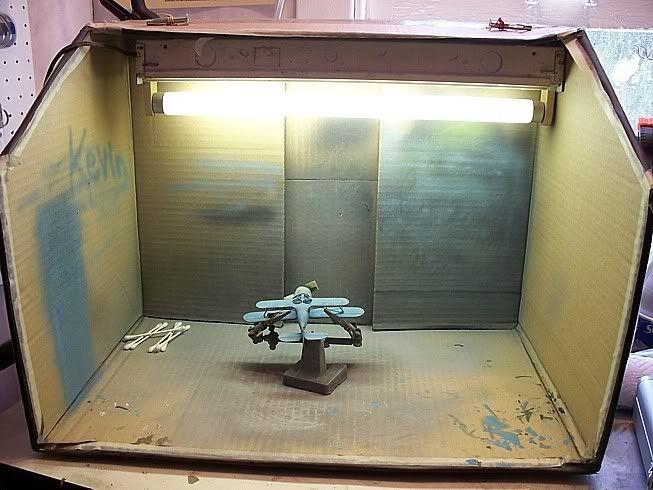
I purchased a piece of 3/16” thick plexiglass the same size as the base of the spray booth to keep the over spray from covering the metal base (I left the protective blue backing on the plexiglass sheet it for photographic purposes but will remove for usage because it makes the booth too dark). For lighting, I have a large desk lamp with adjustable head as well as two battery operated LED lights (from Princess Auto) that has a magnet embedded in the back of the light. These allow me to reposition the lights wherever I need them inside the booth.
I also purchased plastic swivel bases from Lee Valley tools as a cheaper alternative to the more expensive swivel spray bases available from Tamiya and Micro-Mark. I bought two different sized swivel bases to use depending on the size of what I am spraying.
Now that I have spent a small fortune and have things the way I want them………maybe I’ll spray something soon!
Now, that I have my info posted, lets see some other set-ups!
The booth is obviously homemade, built from melamine covered particle board that I recycled from an old closet organizer. It sits on a workbench in my garage and is exhausted from a bathroom exhaust fan that vents via a flexible dryer duct to outside. I think the fan is nominally rated at 110 CFM and it does a decent job in my garage. When I build a booth for airbrushing while inside my house, I’ll definitely use a larger fan.
The compressor is a Badger 180-1 fitted with an aftermarket regulator/moitsure trap. I have subsequently added an in-line misture trap as well. I also have installed an adaptor on the Paasche so that it can attach to the Badger hose, so I don’t have to switch hoses when switch airbrushes.
The 180-1 does not have an on-off switch, so I wired the booth to include a switched outlet for the compressor. The compressor always had a tendency to “walk” while in use, so I drilled counterbores for its rubber feet and used wire ties to hold it in place. Ironcially, providing a stable location for the compressor and giving it a conveniet on/off switch was a major motivation for building the booth in the first place.
Lighting is from three 18" fluorescents fixtures. Although all the individual fixtures have have switches, I wired them up through a switch, so that a sigle switch turns them on and off.
Any items such as cleaning brushes, pipettes, etc, that get touched by paint thinner are stored in Tupperware bins to keep the smell down. The booth and bins have made a huge difference in domestic tranquility!
Rod, do yourself a favor and shorten that hose setup so it’s a straight line. Your fan will thank you for it. The straighter the run, and the smoother it is, the easier for the fan to move the air.
I’ll post my setup later when I get home and can access all my pics…
You beat me to the punch on shortening the exhaust duct. Drats!
Andy,
A couple suggestions. Since you’re using an underpowered fan, you can still improve performance by 1) Closing in the top of the booth; fill that empty square with some plywood and seal it to make it airtight. 2) Removing those plastic boxes. They create additional turbulence and reduce your overall airflow. 3) Filling all those peg holes in the boards. Nothing kills a booth’s performance faster than leaks.
Heres mine as for size it will hold a 1/72 U-Boat just fine, i have a hood vent for my out side ventalation there are there floruessent tube light on the sides and its attached to an old PC desk.
That cracked me up, I have this vision of some guy standing in the hallway wearing aviator goggles and dribbling paint all over his hands and a model.
Seriously though, thanks Rodc for starting this thread, I’m trying to figure out what I’m going to do for a spray booth, and I’m sure I’ll get some good ideas from this thread. For instance, the Gunze vent thing for venting out a cracked window looks perfect for my plan, and I never would have known they even made one… so thanks!
That’s the Hasagawa 1:32 Stuka for size reference. It’s BIG, maybe too big for my usual builds. Though it sure was nice to be to place the Stuka inside and close the doors for drying.
I use a 14" fluorescent lighting fixture I hard-wired into the hood switch for lighting and the yellow hose exits through the back of the booth and outdoors to a 3 gallon tanked compressor. It vents directly through the wall through a standard 4” laundry vent.
It works pretty well, but it’s not perfect. It was originally built before I had a man-cave, and I could only spray outdoors, when the weather permitted. Can you imagine the whining I made? Now I’m pondering how best to convert it into a downdraft using a bilge fan I got for free.
Gip should be back to warn people away from using kitchen hoods, and he’s not wrong in doing so. I think I avoid blowing myself up by making sure the vent is free of “chuff” and always have good airflow.
This is my booth…still not wired or piped. Cost: $40 in sheetmetal (but I work with sheetmetal)
$110 (wholesale) for a 750 cfm centrifugal fan. (It’s outside in my truck so no pics!) and another $20 in metal pipe to vent thru the window behind. The sizes are 36" across, 30" high and 30" deep. (Someday I will build a 1/48th B-29!) The compressor is a 2 gal tank Chinese Harbor Freight thing that works well…regulator and water filter, plus an in-line Bagder filter. I’ll get it hooked up by winter [(-D] Painting outdoors right now.
If you have a friend that works in HVAC and builds sheetmetal duct…there you have it!
Well I almost hate to post my HIGH TECH setup. I really dont want anyone stealing my amazing plans for the booth. It took me many years to design this rig… LOL NOT!!! [(-D]
The booth reflects my painting skills. My skills STINK! But Im trying…
I’m sure you meant your post completely with tongue firmly planted in cheek; however, the setup you’ve displayed is actually one of the worst possible means of spraying. What you are doing is concentrating the aerosols and vapors in the box as you spray. The fluorescent light heats the aerosols and causes faster vapor evaporation and expansion; the bottom line is that you are increasing the potential for an overexposure to organic vapors using your current setup–regardless of whether you’re spraying enamels or acrylics. You really need to get rid of the box and get some sort of ventilation moving in your spray area. Properly positioned fans, open windows, etc. go a long way toward reducing vapor concentrations and potential inhalation exposures. An organic vapor respirator will help, too.
Just as a side note, the cardboard also increases the risk of fire.
Fenderman,
You stated, " You are protecting the surroundings with that booth…that’s first priority!"
Nothing could be further from the truth.
Spray booths are engineering controls designed with two primary purposes in mind, to reduce the risk of fire or explosion, and to reduce the potential for overexposures to organic vapors and particulates. Those are the first priorities.
In spiralcity’s case, if protecting his surroundings is the first priority, there are better ways to do it, and at not so dear a cost.
I spray directly in front of a wide open window plus I have one to my right with two fans blowing out. Lets be real, O.K. [:P]
A side note: My light generates zero heat, I can grab it with my hand with absolutely no discomfort. As you can see the box is well used and it’s one of many that I have used, same setup NO FIRE! Becuase there is no heat being generated anywhere.
Here’s mine. First is the over all view of my workbench. All my tools are stored in the drawer at the right side of my workbench. And the building materials in the plastic drawer on the workbench shelf.
On the left side of my workbench is the custom made spray booth. The booth has a 24" wide by 16" high opening and a 21" depth. With extract holes on the floor a home made “lazy susan”.
I like to spray standing. Before, the spray booth was mounted on the table height stand. But as I realized. I spent less time seated while spraying. So I asked one of my contructor to build me a new spray booth stand. I’m an Architect by day. So I designed a new stand that I feel needed to include.
A cabinet for airbrushing accessories.
A drawer for paint.
A glass top for mixing paints and space for my compressor.
And a small shelf for me to put my airbrush when cleaning and disassembling the unit.
The fume is extracted by a 8" diameter fan with a 450 CFM power. I’m still trying to find a flexible duct for this unit. The size is not readily available in our area(Brunei). The spray booth is on casters for easy cleaning and rearrangement (my workbench is inside my rented bedroom). And I’m happy with it. And enjoying every minute of airbrushingwith it.
I’m sorry this post got by me…your point is taken. I was referring to saving overspray from landing in unwanted areas…what idiot would smoke while painting? Damned if I know how I’ve used rattle-cans and other methods to paint since age 10 without blowing up the planet!
My spelling seems spot on, so I believe my brain works in that respect.
Hey RodC, thanks for the pictures of your setup. I think mine is exactly the same, with the exception of the airbrush I have (Badger 175). I am impatiently awaiting my booth’s arrival, and in the meantime have been looking around at lighting options, and I was very curious about those magnetic LEDs. I saw them at Wal-Mart the other day and think they’re going to be ideal, but do they provide adequate lighting? I’ve got a couple of fluoro lights on swingarms with magnifiers I could use if needed, but I was wanting something actually in the booth to help me see.
These small magnetic lights are OK but they alone will not give enough light. I would suggest mounting a small fluroescent fixture inside the spray booth and then use the small magnetic lights to provide brighter areas of illumination since they can be moved around easily inside the booth.