I have a 3 gal HF, and run this on the hose, so I can plug into shop air at work. I put a quick disconnect (QD) on the compressor outlet. Then I can plug in my line for the AB (also a NEO), or another line for tools or air chuck.
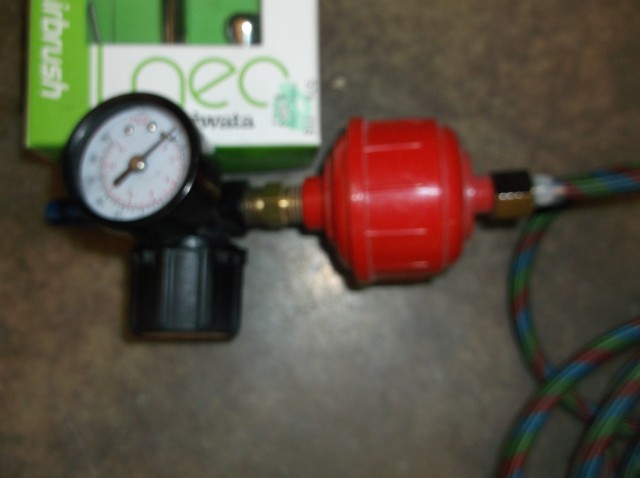
The air hose shown plug into the AB with the Iwata quick disconnect, the adjustable pressure guage plugs into the QD on the compressor. The orange pumpkin is a water trap. the trap and guage are from HF. Works like a champ. If you want to keep the compressor further away for the noise factor, just run an air hose with QD’s from where you set it up to your spray area.
Will need a 1/4 NPT nipple between the trap and guage and adaptor from 1/4 NPT to whatever your AB hose fitting is. Those should be available at the local NAPA or other McParts store.
I have a 3 gal hot dog Harbor Freight compressor that I set up to run 2 airbrushes. I have three water traps which is a bit overkill but I had them so I used them.
I setup my airbrushes with 1/8" quick disconnects so it did not matter which hose ran to which airbrush.
I appreciate everyones input, its kinda overwhelming specially on post # 3 with all those water traps. I’m hoping someone will post a setup with their pancake so i can see how it works out… I see plumbers tape on one. Thats good to know. I live in Oregon, so water traps help. Thanks to everyone so far for ur input.
All you need to do is put a short nipplet into compressor manifold screw your regulator onto that take another short 1/4 in nipped screw into other side of regulator and screw your watertrap onto that put another nipple in other side of watertrap screw on quick disconnect for air brush hose . Doesn’ matter what kind of compressor you have setup the same on all of them.
I also have a pancake compressor which in addition to powering an airbrush also has to fill the car tires and drive nails via an air gun. As such it needs to be removable from the modeling room. I have quick disconnects all around. Quick connects are available from most big box hardware stores, also from Harbor Freight (they cant mess one of these too bad). I leave the output pressure from the compressor alone. I’ll handle it on the other end.
I use a red rubber flexible whip to connect the compressor to the airbrush setup, female off the whip into a male connector on the side of a primary regulator/filter. This is a Harbor Freight which I had handy. I have seen the same thing in different packaging at Lowes hardware. I set this requlator at 30 to 40 PSI, gauge is a 180 - 200 max PSI gauge.
Out of the primary regulator I run into a final regulator (Lowes). These are direct connected with a short nipple. The second regulator is equipped with a 30 max PSI gauge. I set this to my final brushing pressure (10 - 15 PSI). Many gauges ahve a +/- 10% error and I feel I can get closer to my desired pressure using a finer gauge. This was an Amazon purchase since all the gauges I found locally were the higher range or were big bux (air tool stores).
Out of my secondary regulator I have a female quick disconnect. The inlet end on my airbrush hose (Harbor Freight) has the male. And I end up with an adapter to Badger out of the hose.
I have also covered the faces of my regulators with some Saran wrap held in place with some rubber bands. Replaceable as needed. Before my latest setup, I was only using a final regulator, and the face of the gauge was so covered with overspray it was unreadable.
IIRC, the quick disconnects are 1/4 inch NPT. The regulator(s) are also 1/4 NPT, with the gauge port 1/8 NPT. You may want to take your parts to the hardware store to buy the connectors (hint – try the plumbing/gas fitting department). Find someone, usually the oldest guy around, to help you select what you need.