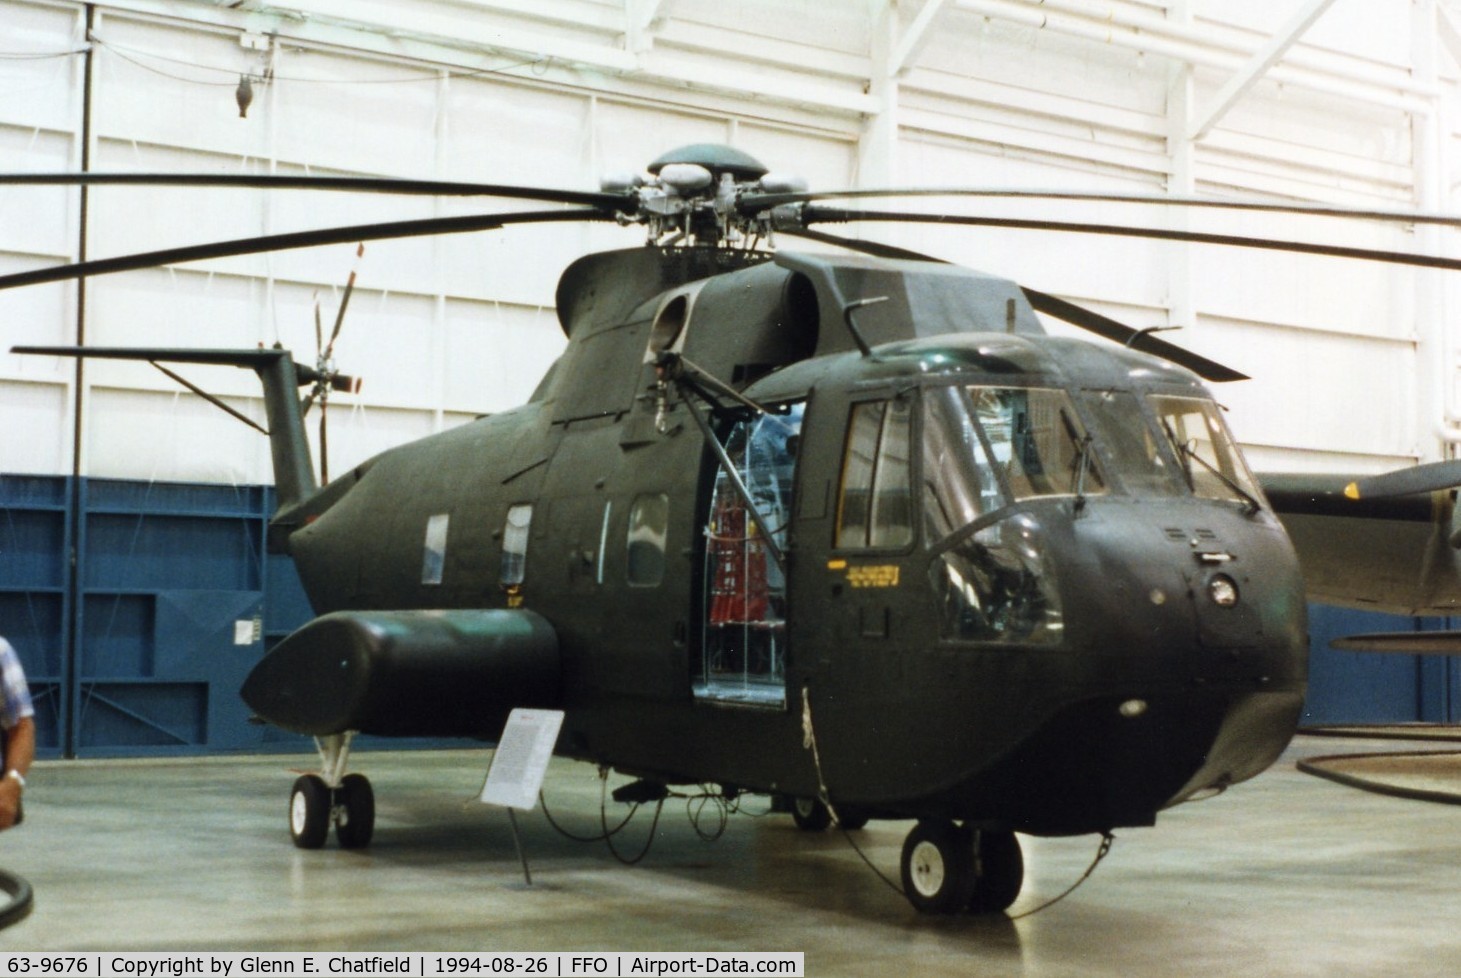
I wanted a project, and for my sins, they gave me one... (HH-3E Jolly Green Giant build thread)

I have been inspired by Helo 53’s awesome Jolly Green/Pelican builds (detailed here and on ARC) and I am now the proud owner of a Revell 1/72 HH-3E kit. [H]

Instead of dumping the details of my progress into my Huey build thread I shall be detailing my progress of building it in this thread, the Huey thread is already bloated with pics and stuff and it’s probably best to put a new build in it’s own thread to keep things tidy.

The kit itself looks like a nice kit even though it was made in 1969, I noticed a little flash on some of the parts whilst briefly looking the model over but it’s far better than the Revell UH-1 I bought and recently looked at building (the fuselage is more solid for a start). Even though it’s a 2nd hand kit all it’s parts are there, but unfortunately the clear windscreen part has some marks on it.

I will also recommend the seller I bought it from - Kingkit.co.uk, I was a little dubious to being with the other day but it turns out there’s been no probs with ordering the kit or receiving it, I ordered the kit on Saturday and received it today. There are also a lot of older/pre-owned kits on there, including a couple of others I’ve been eyeing up…

I do however have a Fujimi 1/72 SH-3H on it’s way from Japan that I will use for detailing the HH-3E, wish it would hurry up and get here now though…

The fuselage is shorter nose to tip of tail than I expected though, I did some number crunching based on the real life measurements of a HH-3E (found on WIkipedia) and the fuselage length should have been 310mm, but it’s actually just a little over 230mm long. Probably my error though. However I am now wondering if a 1/48 HH-53 would really be the 559mm (22") length I calculated the other day…

I hope to make a better job of this kit than I have the ESCI UH-1D rotorwash kindly sent me - I feel that I let myself down with all the breakages and the rather bad gap in the fuselage halves that I could probably have fixed.

No pics of progress yet though, I only got the kit today and pics of the sprues can be found on the web easily enough.

I plan on using the colour scheme on the box art, I have seen it referred to as the SEA Camo scheme. I’ve read that a good technique for doing it is to use blu-tack and masking tape to mask the various different colour areas off and then spray with an airbrush.

Hopefully I can do that reasonably well with my Badger 250.

Some questions though before I start on it -

  1. What parts should I look at using from the Fujimi SH-3H kit. I already know of using the engine intakes, the shield in front of the engine intakes (don’t know the proper name for it), the rotors (blades and hub/mast), the cockpit/interior, and perhaps the “dog house” as I’ve heard it referred to - the top of the engine bay where the rotors poke through. Anything else I could use from the Fujimi kit?

  2. Whilst I’m talking about the “dog house” - what’s the best way to cut that off (on both the HH-3E and SH-3H)? Straight cut down somewhere in the middle/back of that part and then a straight cut from the front to meet the downwards cut using a razor saw, or follow the contours of the bodywork with a knife?

  3. As it’s the Revell kit, not the Lindberg kit do I even need to replace the “dog house”? Where I’ve seen Helo 53 do it I think it was on a Lindberg kit that he kitbashed with a Revell Sea King?

  4. Decals. The HH-3E kit itself comes with a sheet of just 11 decals. Can anyone recommend any better decals (in 1/72 of course) that I could buy (and that are readily available)?

  5. Assuming I mess up the SEA Camo colour scheme would it be terribly inaccurate to paint it just plain OD?

You could do an overall black scheme to represent “Black Mariah” of the 20th SOS in Vietnam. She now resides in the Museum of the United States Air Force. The only markings are the serial number in red on the tail–39676. Not sure if that is how marked during the war but is how she is marked now. Many of the HH-3s used by the 20th and 21st SOS in Vietnam did not carry any markings or carried the national insignia in a removable bracket for cross border operations into Laos, so you could leave it in a SEA scheme with no markings at all–just the usual warning markings in red. Might consider replacing the tail rotor and landing gear as well.

Regarding the lenght of helicopters most or the time this is total lenght including the main and tail rotor disks not just the fusalage.

Thanks Mel. It’s very likely that I measured it wrong anyway.

Anyhoo I’ve assembled the majority of the model that comes in the kit - there’s not really a lot of it. Nice build and the fuselage fits together quite nicely, although I think I need to sand down the “spine” of the helicopter to make it look less sharp where the fuselage halves meet.

I’m kind of hesitant of posting pics though, due to the lack of quality my BlackBerry 8900 gives, the pics I took of my Huey were a bit hit and miss, I’ll see how some turn out this time.

I’m waiting on the Fujimi SH-3H which is obviously on a slow boat from Japan as it hasn’t reached me yet, I can’t progress much further without it.

But I do have some sanding/filing to do because I cut the door on the right hand side out (I like they way Helo-34 (Helo-53 on ARC) did that), but I got a bit over zealous (and used a Dremel which I probably shouldn’t have) and there was quite a sizeable gap between what was left of the door and the rest of that half of the fuselage. So I took some plasticard and cut it to fit around the door on the outside so it covers up the gap, but it’s 40though (I think) plasticard and it looks too thick in my opinion, so I need to file/sand it down some.

I also added a piece of the same 40though plasticard to the rear door on the outside, because there were some rather nasty moulding circles on it, again it’s a bit thick but doesn’t look too bad, I can live with it, certainly looks better than the original door did on it’s exterior.

@USAFSPOOK - Yes I saw the Black Mariah the other day. Not sure I like a plain matt black Jolly Green though, but yes if I mess up the SEA camo I’ll certainly consider it. With regards to the landing gear - what would you recommend? I can’t really use the Fujimi SH-3H landing gear because I’ll only have left/right because it doesn’t have nose gear, just a tail wheel.

Found some awesome reference pics the other day.

Here (Russian language site from what I can make out) - igor113.livejournal.com/191567.html

And here (not so close up though) - www.airliners.net/…/photo.search

Looking for some M60’s in 1/72 to put in the window on the left and door on the right and perhaps on the rear ramp, so far the only decent ones I’ve come across are these - www.herpa.de/…/detail.aspx

There in 1/87 and I’m not sure they’re all M60’s either.

And I may also be using this crew set as it has a gunner that may work for the door on the right hand side - www.modelhobbies.co.uk/…/productions-helicopter-crew-vietnam-721129-p-45357.html

go forth and sin no more

OK here’s some pics, apologies for the quality as usual.

This shows the magnets holding the halves of the fuselage together, corresponding magnets on the other half, the fuselage is such a good fit that these 4 magnets is all that the model needs.

These next 2 pics show the undercarriage on and off, I’ve attached them using magnets, so I can remove them when I hang it from my ceiling…

Plasticard around the door, the door isn’t fixed in, or at least it shouldn’t be. Still need to sand/file down the black plasticard as it’s too thick in my opinion.

Rear ramp exterior -

Drop tanks are detachable, again magnets, wonderful little things, although I may take my razor saw to the bits on the end of each sponson where the drop tanks attach, hack them off, glue them to the drop tanks and then re-attach via magnets that way and smooth out the gap left on the sponsons, so that I can have the smooth sided sponsons or the drop tank holding sponsons -

Here you can see where I’ve had to fill the gaps in between the fuselage and the sponson where I’ve put Green Stuff to make them level, I tried using squadron filler, think I should have got some Mr Surfacer instead, you can also see the magnets that hold the undercarriage on -

That’s it so far, I’m stuck waiting for my Fujimi SH-3H Sea King kit to arrive from Japan before I can progress much further.

Think I have a source for 1/72 M60 door guns for this bird - I purchased in error an Italeri UH-60 Blackhawk (night storm kit or whatever it’s called), I wanted it in 1/48 and was looking at the kit in 1/72 and 1/48 on two different pages and bought the wrong one, lol. Anyhoo that kit has M60’s on either side so I can use those for the M60’s on either side of this, the one in the doorway might need a bit of work to make it look like it’s on the arm they them on though.

Wish I could find something for the rear ramp, but I prefer the ramp to be up anyway.

I’m wondering when the HH-3 changed designations from the HH-3 to the HH-53. Whenever I hear the designation HH-3 I am always thinking about the SH-3 Seaking.

The HH-3E and the HH-53 are two different helicopters.

The HH-3E is based on the Sikorsky S-61R which was developed from the S-61/SH-3 Sea King.

See here -

HH-3E (Sikorsky S61R) - en.wikipedia.org/…/HH-3E

HH-53 - en.wikipedia.org/…/HH-53

HH-3 (or SH-3 Sea King) - en.wikipedia.org/…/HH-3

Personally when anyone says Jolly Green Giant I think of the HH-3E not the HH-53 which I associate more with the Pave Low designation.

The Navy operated the HH-3A, I am not sure what the differences between the A and the E are, other than the HH-3A being converted from the SH-3A and the HH-3E being converted from the CH-3E.

edit: I did a little research and now realize that one external difference is the positions of the cargo doors and pylon/floats.

Here is an E:

Here is an A:

The rear fuselage, tailboom, rear ramp, tail, elevator, landing gear setup, etc., etc., etc… are totally different on an E as well. They are not really even the same helo after the conversion.

They are, aren’t they? I am mostly done with the Lindberg ‘Human Heart’ kit I’m putting together for my wife (she’s a perfusionist). I am using the magnets to keep it together on it’s stand, yet allow it to be disassembled at will. I just need to paint it.

Gene Beaird,
Pearland, Texas

Cool, sounds good.

Boy! And howdy! They really are different. Thanks to pointing out the other variations between the two, Gino, but the nose looks the same. [:)]

Yup, the nose/cockpit area and the engine housing area is about all they share and that’s why when Helo H-34 did a build of a Lindberg HH-3E he used a Revell Westland Seaking MK 41 for the nose/cockpit among other parts, because the Lindberg kit is too pointed on the nose - cs.finescale.com/…/90644.aspx

It was that build and his build at ARC of the Revell HH-3E kit that inspired me to buy and build this kit myself.

Still waiting for my Fujimi SH-3H Sea King though so I can get on and finish this build, it’s been 2 weeks since I ordered it, seller states it can take 3 weeks though due to the slow boat from Japan and customs and whatnot.

So, finally got the Fujimi SH-3H kit I shall be using as a donor for detail parts for this bird (tail rotor, main rotor assembly, cockpit interior, perhaps some interior aft of the cockpit, rescue winch (nothing else I can think of at the moment, would be grateful for any suggestions for other parts I can use)).

But I also have a Revell Sea King Mk41 kit now because I got impatient and wanted to be getting on with this build - I’ll be building/painting that up as a RAF HAR3 SAR bird, one of those yellow ones (using Airfix decals) - should be nice and easy, just spray it white for primer then spray it yellow!

I’ll have a crack at getting some more of this bird done tomorrow and post some more progress pics (the other day I managed to “fix” the overly thick bit of plasticard I put around where I cut the door out). Just hope I don’t run out of poly cement, I’m getting low on it and I’ll have to wait for the new bottle I just ordered…

Not really sure what to do with the rest of the Fujimi kit that I won’t be using though - if anyone would like the left overs (almost a whole heli, certainly the body) please feel free to drop me a PM (bear in mind I live in the UK so shipping might be costly).

Update time…

Did some work on this yesterday and today (couldn’t last Friday due to other things) and here’s some pics showing the progress -

Canopy

I’ve put a little tab of 10thou plasticard on the centre at the bottom of the canopy to go with 2 tabs I’ve put on either side of the fuselage, to hold the canopy on, see below for side pics. I think I may have made an error in doing that though as that centre part of the canopy is not going to be painted, so you’ll see that part, I may have to trim it down and hope for the best…

I may just settle for taking the canopy off the Fujimi SH-3H kit and start again, assuming it fits (the original Revell canopy you see above came with some marks on the right hand side of it anyway).

Should have checked what I was doing against photos before I did it…

Cockpit

Cockpit assembly was made from the original Revell cockpit with the floor turned upside down and then I put the Fujimi cockpit floor on top of it and added the seats and instrument panel (had to sand the back of the instrument panel a little though and I haven’t quite got it even, yet). Still need to add the collective (for some reason the Fujimi kit only includes one?!), the cyclic sticks and the pedals (again there’s only 1 of these, I think, have to double check that).

Interior

I made my own interior, using black plasticard (think it’s either 30thou or 40thou) and the rear bulkhead from the Fujimi interior. It’s very basic as you can see and is primarily designed to give me a floor to put the crew chief in the door (when I get the figures) and also to support the pole for the main rotor so it’s at the correct level.

Left Side

Here you can see one of the tabs I mentioned (the black plasticard piece), there is one on the other side, and these hold the canopy on.

Right Side

I fixed the monstrosity that was the black plasticard surround (same stuff as I made the interior out of, see previous pics) that I had to put around where I cut the door out. I managed to cut it off and replace it with some white 10thou plasticard, then I sanded it down and once painted you’ll only know it’s there by running your fingers over it, hopefully. I’m also hoping the scratches/sanding marks come out with a coat of Mr Surfacer 1000 (not sure if I should do the whole bird or just specific areas) and/or a coat of Halfords grey spray primer (really don’t know which method to use at this point in time as a primer, a full coat of Mr Surfacer 1000 (would have to be airbrushed) or just paint the scratched areas with Mr Surfacer 1000 and then do an overall primer with the Halfords primer). Needs a little work done on the top inside edge still though, it looks a little untidy.

In this pic you can also see the FOD shield I borrowed from the Fujimi kit, it fitted quite nicely but needs a little filling with 10thou plasticard strips under it. I was going to borrow the engine air intake from the Fujimi kit also, but it seemed to be narrower and I felt it would need a lot of work to make it fit and look good, so I decided not to use it, you can’t see the bulk of the original Revell air intakes anyway.

Side Door

No real change here, just thought I’d mention (possibly again) that it’s a bit smaller than it really should be, due my overzealous cutting - I used a dremel when I should have stuck with a knife. Looks OK when on the side though.

Rear ramp

Outside of rear ramp. As I previously stated I put a piece of black plasticard on the outside of the original Revell rear ramp because it had some rather nasty circular mould marks on it, it was however a bit too thick, I believe it’s either 30thou or 40thou plasticard. I’ve tried sanding it down to make it thinner, it has worked OK but it’s rather scratched, I’m hoping that isn’t noticeable once I’ve primed it and/or coated it with Mr Surfacer 1000 (again not entirely sure what to do).

I’m currently thinking that I should have stuck a piece or the 10thou white plasticard that I have over the original rear ramp, or perhaps 2. That would have been thin enough and wouldn’t have required sanding, thus saving me the hassle of working out how to smooth out the scratches without take forever to do it…

Tail Rotor

Tail rotor from the Fujimi SH-3H kit. Unfortunately I somehow managed to get the magnet that I’ve placed in it to hold it on the tail fin (or the magnet in the tail, or both) at an odd angle, and I have to have it with 1 specific blade pointing down, or as near as, to get the tail rotor level (it’s either skewed out to the left or points inwards towards the tail otherwise or it does both), hence the Tamiya tape on the end of that blade - it reminds me which blade I need pointing down. Don’t know if I’ll mark it specially when painted though, might look a bit odd.

Main Rotor

Nothing special here, just the main rotor assembly from the Fujimi SH-3H kit. Too big to get any decent photo of it with my BlackBerry (not that my BB takes any decent photos anyway). I may in due course put it on a plate and weigh it down to get some droop in the rotors.

Rotor Hub Housing

Cut/drilled/filed/ground/sanded a hole in the top of the fuselage to accommodate a) the pole that supports the main rotor and b) the main rotor hub. It went well I think, it’s not quite perfect but once the rotor is on you can’t tell.

Fully Assembled pics

As you can see above it’s coming together quite nicely. 2nd pic of the three directly above shows the floor of the interior looking through the door (that’s where I’ll be putting the crew chief figure, hopefully holding an M60 from a 1/72 Blackhawk). The last pic shows the rear ramp down - I had to add magnets to either side (and in the fuselage) because whilst sanding down the rear ramp I sanded off the little tabs that held it in place when closed. Doh!! Just imagine there’s some cable there (I may add some thread to simulate cables at a later date anyway).

I still have a little work to do regards filling of gaps, plus I keep forgetting to assemble the winch from the Fujimi SH-3H and add it to the model (although I’ll probably leave it assembled but separate until painting of the fuselage is completed due to having to paint the camo scheme on) but aside from that I’m almost done assembling this model.

Need to buy an air compressor before I start painting though, and that may take a while so I think I’ll go back to assembling the 1/35 Academy UH-1C and/or HTL-4.

BTW I would greatly appreciate any advice regards smoothing out the scratches/sanding marks on the rear door and around the side door (and a few elsewhere) - I’m really not sure what to do about those and I don’t know if just coating in primer and/or Mr Surfacer would be the thing to do.

OK the concept is simple (getting it to work out is something else).

The idea is each grade of sanding (paper/stick ) is finer than the grade before. So each one will produce a scratch of it own size or “grit” (50 grit,30 grit, 100 grit, 500 grit, 1000 grit ,etc.).

So each progressively finer (higher number) grit will remove the scratches from the one before and leave only their size scratch; each finer grit will be shinier/ smoother than the one before.

Eventually you could get into the 1000s and won’t hardly be able to see the scratches, just a resulting shine.(think of metal jewelry)

The amount of shine (or size of scratches [grit] ) can be less than for a natural metal finish, if you appling regular paint (acrylic/enamel) as the “scratches” will be filled by the liquid.

On natural metal schemes with Alclad II the base plastic and base coat (usually black) has to be nearly flawless, so you’d want to get a very high shine (high # grit 1200+, etc.) on your plastic.

I hope this helps and answers what I thought was you question.

Looking forward to your next installment.